Disclosure: Some of the links below are affiliate links. This means that, at zero cost to you, I will earn an affiliate commission if you click through the link and finalize a purchase. Learn more!
In this article, I'll be explaining to you how to easily be able to stream in horizontal and vertical mode at the same time using Streamlabs. This way, you can stream to Twitch horizontally and YouTube Shorts vertically at the same time so that you can get more viewers.
Getting Things Set Up
The first thing that you're going to want to do is open Streamlabs and make sure that you have the latest version. If you do not already have Streamlabs desktop, you can download it here. It's completely free too.
Once you have this open, you're going to want to come to the bottom left-hand corner and get logged in. After you're logged in, you'll need to go ahead and connect to your Twitch and YouTube accounts.
To do this, you'll go to 'Settings' (the bottom directly above the log-in button) and then to 'Stream'. You'll want to connect both your Twitch and YouTube accounts so that you can stream both vertically and horizontally at the same time through Streamlabs.
Once you get these two accounts connected, press 'Done', and then select 'Settings' again. This time, go to 'Video' so that you can enable vertical streaming. On the top right-hand side, you'll select 'Enable Dual Output'.
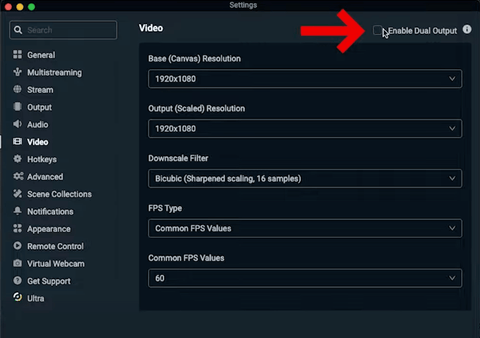
This is what is going to allow you to stream both vertically and horizontally.
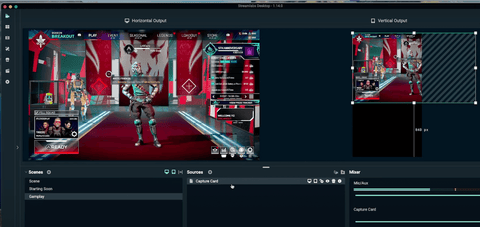
One of the great things about Streamlabs is that you only have to set up your scenes once and then you can utilize whichever ones you want by toggling them on or off.
Setting Up Your Scenes
To get started with setting up your scenes, head to the left-hand side and select the plus sign icon next to 'Scenes'. Let's name this "Starting Soon" and then select 'Done'. Then, press the same plus sign icon again, and let's name this 'Gameplay'.
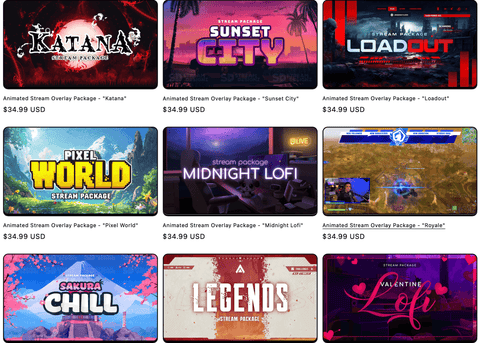
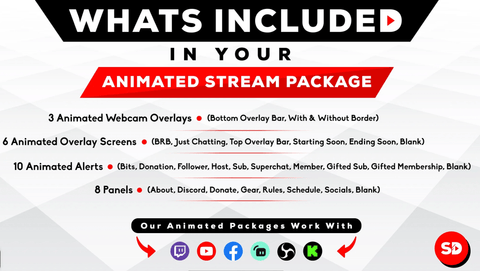
For this tutorial, I'll be utilizing overlays from Stream Designz. There are lots of different animated overlay packages to choose from that match the aesthetics and needs of any streamer.
They are also super easy to use and go a long way towards making your stream look more professional.
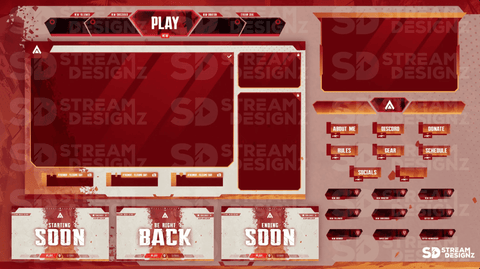
Right now, I'll be using the 'Legends' overlay package which is inspired by Apex Legends.
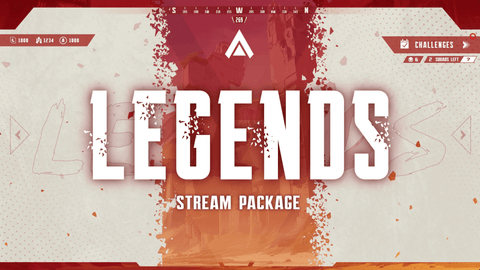
This animated overlay package comes with everything that you need to help your stream stand out and look professional. In the photos below, you can see everything that these packages come with.
Again, you can use any overlays that you would like, but I highly recommend the animated overlays from Stream Designz.
Setting Up Your Starting Soon Scene
Once you have your overlays, we'll come back to the 'Starting Soon' scene.
Come to 'Sources', press the plus sign icon, select 'Media File', and then press 'Add Source'. Let's name this "Starting Soon Scene". Next to 'Locate File', select 'Browse', and find your overlays files.
If you downloaded your overlays from Stream Designz, these will come as a zip file. You do need to unzip these before you can use them on Streamlabs. To do this on a Mac, all you need to do is double-click the zip file and it will put the unzipped files into a separate folder. If you're on a Windows, you'll right-click the zip file and select 'Extract'. This will then also put the unzipped files into a new folder.
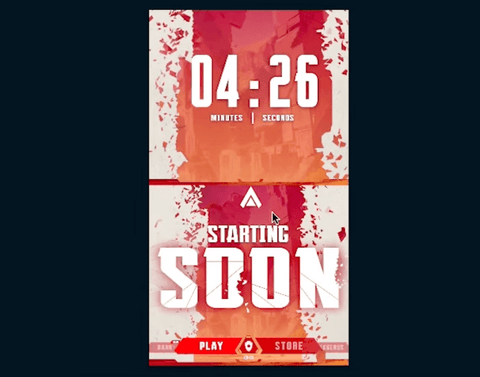
Once you have the folder ready, come to where it says 'Overlay Screens', and then select 'Starting Soon'. You can select 'Open' and you'll want to select 'Loop' before pressing 'Close'.
Now, you'll be able to see that you have your horizontal and vertical starting soon scenes.
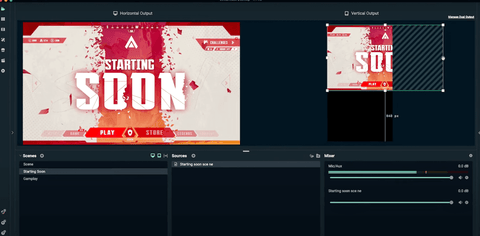
You will need to adjust the vertical one.
I like to make mine as big as possible without cutting any of the words off, and then I move it to the bottom of the screen so that the countdown timer can go above it.
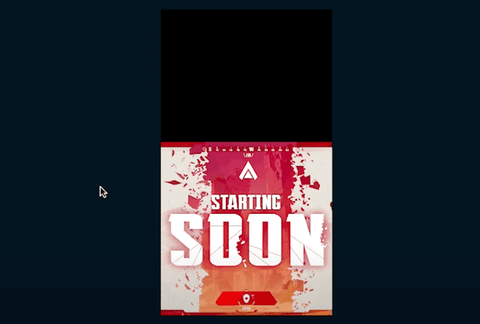
The next thing that we need to do is add the countdown timer to just the vertical canvas and not the horizontal.
To do this, go back down to 'Sources' and press the plus sign icon. Press 'Media File', 'Add Source', and let's name this "Countdown Timer".
If you purchased an overlay package from Stream Designz, the countdown timer is sold separately, but each of the overlay packages has a matching countdown timer.
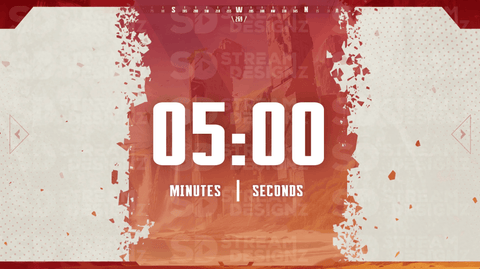
Once you get your countdown timer, you'll need to unzip this file as well before you can use it. Then, select the countdown timer file, and this time you do not need to select 'Loop' as we want the countdown timer to end when it runs out so that we can move on. Go ahead and press 'Close'.
Now, you'll be able to see the countdown timer on both the horizontal and vertical layout but remember that we just want this to be on the vertical one. To change this, press the computer button (the first on the left) next to the countdown timer under sources.
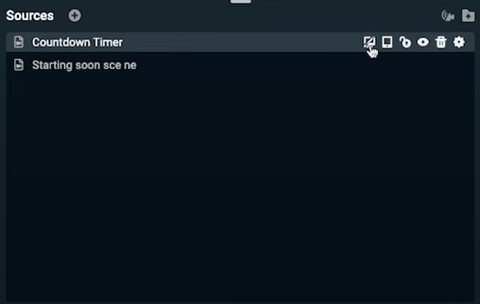
We still need to adjust the countdown timer on the vertical layout. Again, I like to size this up some and place it exactly where I want it to be.
You can already start to see how much more professional both your horizontal and vertical streams are looking from just these few steps that we've taken so far.
Setting Up Your Gameplay Scene
Next, we need to add in our 'Gameplay' scene.
To start, be sure to select 'Gameplay' under 'Scenes'. Then, press the plus sign icon under 'Sources'. If you game directly on your computer, you're going to select 'Display Capture' or 'Window Capture', and if you use a capture card, you're going to select 'Video Capture Device'. Since I'm using a capture card, I'm going to name this 'Capture Card' and then press 'Add Source'.
Now, I'm going to go ahead and select my capture card, which will pull up my gameplay as well. I also want to select '1920x1080' for the 'Preset'. Then, I can press 'Done'.
Now, you can see that I have my gameplay added to both my vertical and horizontal layouts.
On the vertical one, I'm going to adjust this just a bit so that it can be seen clearly, and I'm going to move it to the bottom of the canvas so that my camera can go above it.
To add your camera, select the plus sign icon under sources and then select 'Video Capture Device'. Press 'Add Source', then toggle on 'Add a new source instead', and we'll name this 'Camera'. Press 'Add Source' again, then select your camera under 'Device', and we'll want to select 1920x1080 for the 'Preset'.
You should now be able to see your camera on both landscapes.

Before I begin to adjust these, I'm going to add my webcam overlay from the animated overlays package that I purchased from Stream Designz.
To do this, select the plus sign icon under 'Sources' and select 'Media File'. You'll then toggle on 'Add a new source instead'. Let's rename this 'Webcam Overlay', and then select 'Add Source'. Now, you're going to locate the file.
Once you've found your overlay package, you'll see that there are three different webcam overlays for you to choose from. One will be just a border, another will have the option to show donations and subscribers, and the last one is just the bottom bar for if you're using a green screen. I'm going to be using the second one.
You will want to select 'Loop' for these and then you can hit 'Close'. Now, you're just going to need to size these to the point where it covers your camera. You can also adjust your camera to fit inside of the overlay if you need to.
Once you have this exactly where you want it to be, select 'Webcam Overlay in your sources and right-click it. Then, you'll select 'Group' and then 'Group into folder'. This is going to add a new folder to your sources. You're going to want to open up this folder and then drag and drop your camera into the folder.
What this does is it allows you to be able to size the camera and the overlay together without affecting the formatting so that you can place this exactly where you want to.

For your vertical landscape, you do not want the webcam overlay to be there. To turn this off, press the second button from the left next to 'Webcam Overlay' under sources.
Then, you can just adjust your camera to be where you want and where it will fit.
At this point, you'll want to go ahead and add in all of your other overlays, but we're going to move on. By now, you're in a place where you could go live since you have your starting soon and your gameplay scenes set up.
Adjusting Your Settings
Next, we want to go into settings and change some things to make sure that our stream doesn't lag and that it has good quality. This will help to ensure that your stream looks professional.
First, go into settings and then select 'Output'. Select 'Advanced' under 'Output Mode', and then you'll select your encoder. If you're on a Windows, you'll select your NVIDIA Encoder, and if you're on a Mac, you'll select 'Hardware Encoder'.
For 'Rate Control', you'll select 'CBR'. If you do not see CBR as an option, select 'Software (x264)' under encoder, then change this back to your hardware encoder and it should then come up.
For 'Bitrate', you need to remember that you're pushing out to two streams, one horizontal to Twitch and one vertical to YouTube, so you may need to utilize a lower bitrate in order for them to both have good quality. Since Twitch only supports a maximum bitrate of '6,000', but you can push this to 8,000.
The real question is whether your internet speed can handle 8,000. The best way to check this is to use Speediest.net. If you use this and have an upload speed of 20 or more, then you can almost certainly use a bitrate of 8,000 with no issues. The higher your upload speed, the better. Once you have your upload speed, you can determine if 6,000 or 8,000 is the better choice for you and your stream.
For 'Key Frames', select '2'.
You'll want to leave 'B-Frames' on, and for 'Profile', set it to 'High'.
Now, you can select 'Done', and all of your settings should be good to go.
Going Live
With your scenes and your settings all set-up, you can now go live.
In the bottom right-hand corner, press 'Go Live'. Once you press this, it will prompt you with a screen like the one below.
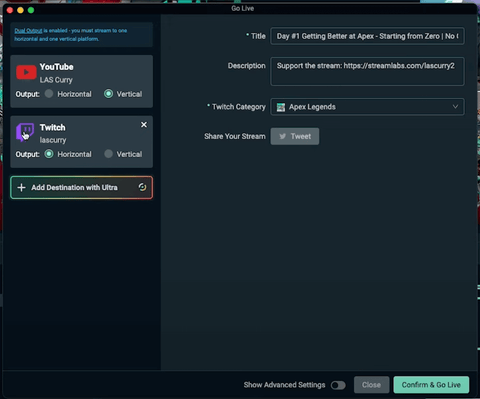
You want to make sure that for Twitch, the 'Output' is set to 'Horizontal', and for YouTube Shorts, it is set to 'Vertical'.
Then, you can adjust your title, description, and Twitch category. Once that's done, you'll hit 'Confirm & Go Live'.
Now you'll be live on both Twitch and YouTube Shorts. This does also work with other platforms, so you could be live on Twitch and TikTok at the same time, or Kick and TikTok, or any other mix of these. You can select whichever destinations you want to be able to use.
If you want to make your stream look even more professional by adding all of your other overlays like your alerts, just chatting scene, be right back scene, and more, click here! This video will walk you step-by-step through how to set up all of your overlays inside Streamlabs.
![How to Add Overlays in OBS Studio (Complete Streaming Setup Guide) [2026]](http://www.streamdesignz.com/cdn/shop/articles/Thumbnail_1_917415b4-0055-48d9-9f13-46b188205824.png?v=1782571692&width=1920)


How to Stream to YouTube Shorts Using Streamlabs
How to Setup Overlays in Streamlabs for Beginners