Disclosure: Some of the links below are affiliate links. This means that, at zero cost to you, I will earn an affiliate commission if you click through the link and finalize a purchase. Learn more!
In this article, I'll be explaining to you step-by-step how to set up your 'Just Chatting' scene using Streamlabs.
Adding Your 'Just Chatting' Overlay
The first thing you'll need to do is have Streamlabs Desktop open on your computer. If you do not already have this, you can download it here.
On the bottom left-hand side, you're going to come to where it says 'Scenes'.

Press the plus sign icon, let's name this "Just Chatting", and then select 'Done'.
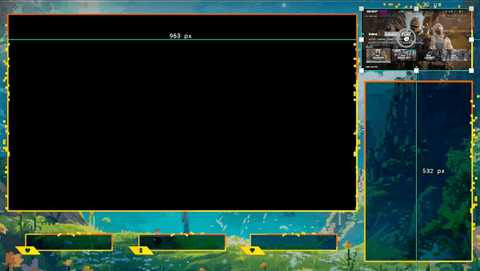
Now we need to go over to 'Sources'. Press the plus sign icon next to 'Sources' select 'Media File', then press 'Add Source'. You'll see an option that says 'Add a New Source Instead' and you're going to toggle this on. Let's name this "Chatting", and press 'Add Source' again. Now, it's going to prompt us to locate our overlays for our Just Chatting Scene.
For this example, I'll be utilizing the 'Pixel World' overlay package from Stream Designz.
There are lots of different animated overlay packages to choose from that match the needs and aesthetics of every streamer. These packages will come with all of the overlays that you need for your 'Just Chatting' scene and more.


As you can see above, these will include your camera overlays, gameplay overlays, chat, and stream labels- everything you need for your stream.
Once you've chosen your overlays, you can head back over to Streamlabs.
If you did purchase your overlays from Stream Designz, they will come downloaded as a zip file. Before you can use the overlays, you need to unzip the file. If you're on a Mac, double-click on the zip file and this will create a new folder with the overlays inside of it. If you're on a Windows, right-click the zip file and select 'Extract'. This will also create a new file with the unzipped overlays inside of it. Now, your overlays are ready to be used!
Now, you're going to press 'Browse' where we left off on Streamlabs. If you purchased a package from Streamlabs, you'll go to the 'Overlay Screens' folder and then select 'Just Chatting'. Press 'Open', then in the list of settings, make sure to select the box for 'Loop', and select 'Close'.
If the overlay is bigger than your canvas, right-click your 'Chatting' source, press 'Transform', and then select 'Fit to Screen'.

With this overlay in place, we want to lock it. To do that, click on your 'Chatting' source again and select the lock icon.

Now, we have our animated 'Just Chatting' scene set up. Next, we're going to add in our gameplay.
Adding in Your Gameplay
To add your gameplay to your 'Just Chatting' scene, press the plus sign icon next to 'Sources'.
If you're gaming directly on your computer, you'll select 'Window Capture', press 'Add Source', and then select the game that you want to add. If you're using a capture card, you're going to select 'Video Capture Device', press 'Add Source', then select 'Add a New Source Instead'. Let's name this "Gaming", press 'Add Source' again, select your capture card, and then click 'Done'.
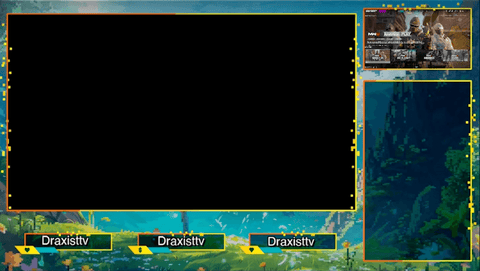
Now, we have our gameplay added. To scale this down, grab one of the corners and place it over the small box in the top-right corner of your overlay. If it's a little bit bigger than the box, that's okay as we're about to format it.
To format this, go down to 'Sources' and drag 'Gaming' to be below 'Chatting'.

Once you've done this, lock the 'Gaming' source just like you did with the 'Chatting.

You can see now that your gameplay has a nice border around it and that it's in place. This is great for when you're doing an intermission.
Adding Your Stream Labels
To add in your 'Stream Labels', it may be useful to watch this video here. It will walk you step-by-step through how to add in all of these. For now, I'll just be explaining how to do it once, so I would highly recommend watching that video to get all of yours set up.
Start by pressing the plus sign icon and selecting 'Stream Labels'. Select 'Add Source', then 'Add a New Source Instead', and name this according to which stream label you're setting up ("New Follower", "New Subscriber", etc...).
Press 'Add Source' and then you'll be able to select the label that you want to pop up. There are lots of different options for you to choose from based on the streaming platform that you'll be utilizing. Again, I would recommend watching the video where I walk you step-by-step through how to add all of these.
You'll select whichever one you want and then add it. If you've added these in the past, what you can do instead is press the plus sign icon, select 'Stream Label', and then simply select the one that you want to add from the list of ones you've already set up.
Once you have your 'Stream Label', you can go ahead and drag it into place. For me, I chose the 'New Subscriber' label, so I'll place this in the center of the bottom left-hand corner box.

With this one in place, you'll follow the same steps to add your 'Top Donation' and 'Stream Goal'.
With all of these in place, you'll go ahead and lock these just like you've done for the other overlays.
Adding in Your Camera
The next thing you're going to do is add your camera so that you can engage with your viewers.
Start by pressing the plus sign icon next to 'Sources' and select 'Video Capture Device'. Press 'Add Source', then 'Add a New Source Instead', and let's name this "Camera". Select 'Add Source' again and then you'll want to select your webcam or camera from the dropdown list.
If you already have your camera or webcam added to your Streamlabs, you can instead press the plus sign icon, select 'Video Capture Device', press 'Add Source', and then you'll be able to add your camera.
Once you add your camera, it will initially take up the entire screen. You'll want to resize this and fit it over the large box on the overlay. Again, this needs to be a little bit bigger than the overlay box. When you get this in place, go down to 'Sources' and drag the 'Camera' source to be below 'Just Chatting'.
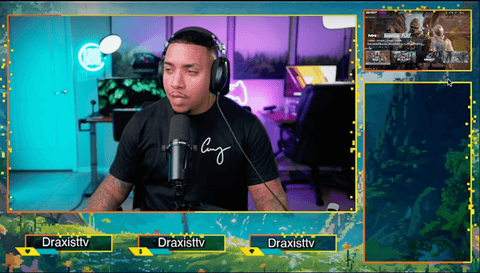
Now, your camera will be added and in place. Go ahead and lock these like you've done with the others.
The next thing you're going to want to do is add your Twitch chat. To learn how to do that, watch this video here. It will explain to you step-by-step how to add your Twitch chat.

Share:
How to Setup Animated Twitch Alerts in Streamlabs
Streamlabs Adding Twitch Chat Overlay to Your Stream