Disclosure: Some of the links below are affiliate links. This means that, at zero cost to you, I will earn an affiliate commission if you click through the link and finalize a purchase. Learn more!
In this tutorial, I'll be explaining to you step-by-step how to set up your Twitch chat overlays using Streamlabs so that you can show your chat on your stream.
Getting Started
The first thing you'll need to do is have Streamlabs Desktop open on your computer. If you do not already have this, you can download it here.
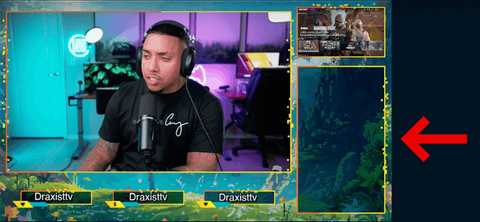
Once you get this pulled up, you're going to go to 'Scenes'. you should have your 'Starting Soon', 'Countdown Timer', 'Be Right Back', 'Stream Offline', 'Gameplay', and 'Just Chatting'. You'll typically want to put your Twitch chat in your 'Gameplay' or 'Just Chatting' Scene. I'll be doing this in my 'Just Chatting' scene, so I'll select this.
Since I have the rest of my 'Just Chatting' scene set up, I'm going to have an open box left which is where my Twitch chat is going to go.
If you're interested in any of the overlays that you see throughout this tutorial, be sure to check out Stream Designz. I'm specifically using the 'Pixel World' animated overlay package.
There are tons of different overlays for you to choose from based on how you want your stream to look. They're super easy to use and come with everything that you need to make your stream look professional and put together. You can see what all these packages come with in the photos below.


These packages will include not just what you need to add in your Twitch chat overlay, but also all of the other overlays that you can use in your stream.
Setting Up Your Twitch Chat
Once you have your overlays, head back over to Streamlabs. With your scene selected, head over to 'Sources' and press the plus sign icon. Scroll to where it says 'Chat Box' and then select 'Add Source'. Let's name this "Chat Box" and then press 'Add Source' again.
This is where we're going to begin to customize our chat box.
The first thing that I like to utilize is the 'Boxed' theme as this makes it look cleaner when you have the name, the chat message, and the actual icons.
Then, you can decide whether or not you want the messages to always be shown by toggling on or off the 'Always Show Messages' setting. I like to use this feature as there is an ending point in the chat box portion of my overlay, so they will naturally disappear.
For 'Hide Delay', I leave this as is at 15 seconds.
If you scroll down to 'Badges', you'll see that these are all checked. Personally, I only like to use 'Show Moderator Badges', 'Show Subscriber Badges', and 'Show Twitch Prime Badges'. You can of course select whichever ones that you want to be able to utilize. I also like to select all three of the 'Extra Emotes'.
Now you can select which color you want the text to be, adjust the font size, and change the background color. I like to leave the text as white. As for the font size, this is my personal preference, but I've found that 18 works well and is a good size to be able to be seen. As for the background color, I'm going to leave this set to black as it will be for the box and my font color is white.
'Hide Characters' is based entirely upon personal preference. If you do not want your chatbot, like Nightbot, to pop up inside this box, then you'll want to check this. You can also choose to hide commands starting with '!'.
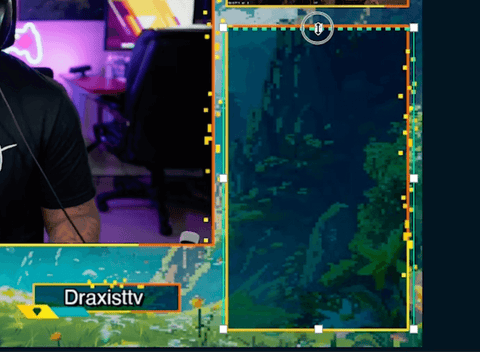
'Browser Setting' is going to be the most important thing that we look at. If you were to close out these settings right now without adjusting anything else, you'll find that your chat box is way too big for your 'Just Chatting' area.

What you'll want to do first is customize this so that it fits directly in the spot for it on your overlay. If you just go ahead and crop or resize this, what's going to happen is that the text for your chat is going to get cut off. This is why it's important that you adjust this under 'Browser Settings'.
You'll have to adjust these settings and mess around with it to find out what fits with your stream overlay package as each one will have a different amount of space for the chat box. For me, I'll try the width at '325' and the height at '550'. Once you have this figured out, you can select 'Close' and see if your chat box fits inside the designated space.
For me, the box was a little bit too big and tall, so I'm just going to play around with this until I can get it just right. If your height is a little bit too tall, that's completely fine. What you really need is for your width to be correct.
To adjust your height and have that be correct, you can go out of settings, hold down your 'Option' key, and resize the top of the chat box. Just be sure that you don't do this for the width.
Testing Your Chat Box
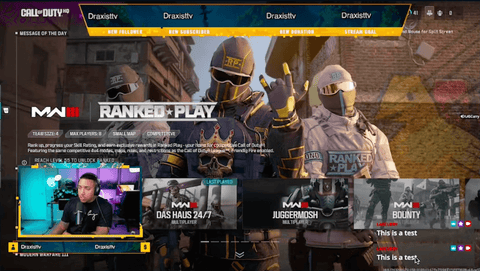
To test this, you'll want to head over to your Twitch account and go to your chat. You'll just want to type in 'This is a test' a few times here so you can go back over to Streamlabs and see if it looks all right. I would also encourage you to send a longer message so that you can see how these will look- you can even type in 'This is a test to see how longer messages appear inside Streamlabs'.
Once you've sent these chats, you can head back over to Streamlabs and you'll be able to see what these chats are looking like as they pop up.

Adding Your Chat to Your Gameplay Scene
One of the great things about Streamlabs is that it is now really easy to add your Twitch chat to your 'Gameplay' scene.
Head back over to 'Scenes' and be sure that 'Gameplay' is selected, then press the plus sign icon next to 'Sources'. From here, you'll select 'Chat Box', then press 'Add Source', and because you've already created it, you can just select it and press 'Add Source' again.
Now, your chat box will be in your 'Gameplay' scene as well. If you come back to your Twitch account, you can send the send comments as earlier and see how they look here as well.
When someone sends a chat, it will now appear on both your 'Just Chatting' and 'Gameplay' scenes.
One of the things that you'll want to do if you want to add a little more excitement to your stream is to add stringer transitions or animations for when you're switching between different scenes. To learn how to do that, check out this video here that will walk you through step-by-step this process of adding stinger transitions.

Share:
How to Setup a Just Chatting Scene in Streamlabs
How to Setup a Stinger Transition in Streamlabs