Step 1: Have your Animated Overlays Ready to Go
If you don’t already have animated overlays, check out Streamdesignz.com to buy and download packages. They have a lot of different overlays to select from so that you can choose the one that’s right for you.
Step 2: Open Streamlabs
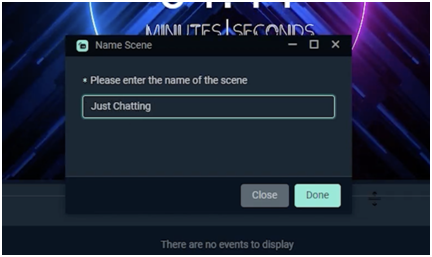
Step 3: Rename your Predefined Scene
Once the application is open, head over to the left-hand side where you’ll see ‘Scenes’. There is already a predefined scene which you’ll want to rename by right-clicking on it. Let’s rename this “Starting Soon”.

After renaming it, hit done.
Step 4: Adding a Source
Now, you’re going to want to go to where it says ‘Sources’ and hit the plus sign icon (+).

On the next screen, ‘Essential Sources’, pops up, you’re going to want to select ‘Media File’ and then click ‘Add Source’.

Step 5: Rename your New Source
It gives you the option to rename the file, so let’s name this one “Start” before clicking ‘Add Source’ again.

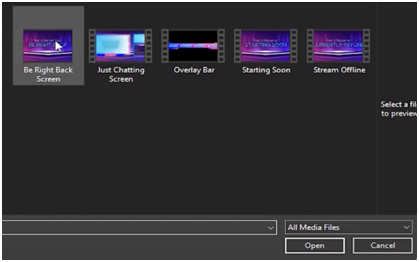
Step 6: Locating your Streamdesignz Files
Under ‘Locate Source’ hit ‘Browse’ and find the Streamdesignz files that you have already downloaded.
Step 7: Adding in your ‘Starting Soon’ Streamdesignz File
Head into your files, and you’ll get to where it says ‘Overlay Screens’ where you’ll select ‘Starting Soon’.

Select open and make sure to select ‘Loop’ since this isn’t animation, and you’ll want it to keep going until you decide to switch scenes.

Then, press close and your ‘Starting Soon’ scene is ready to go!
Step 8: Adding in your Countdown Timer
Start by going back to scenes and pressing the plus sign icon (+). Let’s name this scene ‘Countdown’ and select ‘Done’.
Then, go to sources and import the source by pressing the plus sign icon (+) and selecting ‘Media File’ before pressing ‘Add Source’. Once you get to the next screen, select ‘Add New Source Instead’ by toggling the button on. While here, you should also rename it ‘Count’.

Again, locate the files you’ve already downloaded and find the countdown timer. Open it up and this time, don’t select loop because once the timer runs out, you just want it to finish. Press ‘close’ and now you have your countdown timer!
Step 9: Adding the Just Chatting File
Press the plus icon (+) by ‘Scene’ again and name this one “Just Chatting”.
Select done and again we’re going to head over and press the plus icon (+) by source, select ‘Media File’, and press ‘Add Source’. Then, be sure to select ‘Add a New Source Instead’ just like you did when adding the countdown timer. Name this “Chatting”, click “Add Source”, and locate the file called “Just Chatting” that you downloaded from Streamdesignz. In your downloads, you should be able to find this under “Overlay Screens”.

From here, the file should be named “Just Chatting Screen”.

With this one, you are going to want to select ‘Loop’, after doing this, hit ‘Done’.
Step 10: Setting Up your Gameplay
Start off by adding a new scene, which you should name “Play”, and then press ‘Done’. Next, add a new source and add a new media file just like we’ve done for the others. Let’s name this source “Gameplay”. Select ‘Add a New Source’, locate the file, and this should again be under ‘Overlay Screens’. Select the file titled “Overlay Bar”, put this one on a loop as it is an animation, and there you go.

Now, you can resize it and place it all the way at the top of your screen.

In a few steps, you’ll learn how to add in your gameplay and everything else that you’ll need!
Step 11: Setting up your “Be Right Back” Screen
Start by adding a new scene and naming it “Be Right Back” and select ‘Done’. Next, add a new source, go to ‘Media File’ and add this, and select ‘Add a New Source Instead’. We’ll name this “BRB”, add source, and locate the file which will again be under “Overlay Screens” as “Be Right Back”.
Add the ‘Loop’ to this one, close that, and now you can see that it’s ready to go!
Step 12: Adding the “Stream Offline” Overlay
This is the screen that you’re going to want to utilize when you’re about to end your stream. Add a new scene, name this “Offline”, and press done. Then, add a new source, select ‘Media File’ add source, select ‘Add New Source Instead’, name this “Offline”, and select add source again. Next, locate the file under “Overlay Screens” as “Stream Offline”, and select open.

Once again, this one should be a loop so you’re going to want to select that. Now you can see that it says the stream is offline.
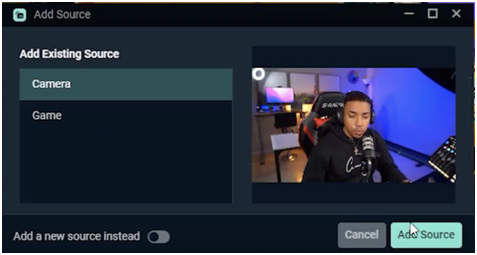
Step 13: Adding your Webcam
Instead of adding a new scene, this time you’re going to select “Just Chatting” in the sidebar. Once you’ve done this, you can add a new source and look for ‘Video Capture Device’ which is right next to ‘Media File’.

From here, press ‘Add Source’ and name this “Camera” before selecting ‘Add Source’ again. Then, go ahead and select your camera and hit close.

Now, you can see that this has covered your entire screen, so we’re going to want to resize this and position it exactly where we want it. Before you do this, you’re going to want to go down to sources and make sure that “Just Chatting” is above “Camera”.

By doing this, when you resize the camera, it will fit nicely inside the “Just Chatting” box that is already on the screen.
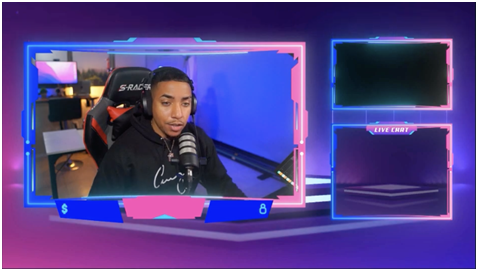
Step 14: Adding the Gameplay Window
Now, we’re going to want to add the gameplay window to the box on the top right portion of the screen. Make sure that you’re still on “Just Chatting” as your scene and go ahead and add a new source which we’ll name “Game”. Select ‘Video Capture Device’ again, add source, select ‘Add a New Source Instead’ and name this one “Game” as well. Click ‘Add Source’ again and under ‘Device’, you’re going to want to select ‘Game Capture HD60 S’.

Close this screen, and again you can see that this is taking up more of the screen than you want. Make sure that “Gameplay” is under “Just Chatting in your ‘Sources’ box and then you can resize this to fit correctly on your screen.

Note: If you don’t already have this, you should absolutely download “The Ultimate Streamer Checklist”. It is a checklist that you must have if you want to step up your stream and have it look professional. In this, I tell you what to do before you go live, what to do after you go live, and what to do during your stream. It is the ultimate guide to getting people to subscribe to you, how to promote your stream, and how to promote your content after you’ve streamed so that people can find your content when you’re offline. This is a FREE checklist that you can download here to upgrade your streams.
Step 15: Adding Gameplay in Scenes
Now, go back over to scenes and select the “Gameplay” that we set up earlier and then head over to sources and add a new source. Select ‘Video Capture Device’, press ‘Game’ instead of ‘Camera’, and since we’ve already added this, we can select it again by pressing ‘Add Source’. Once again, it’s covering the entire screen, so go down to sources and make sure that “Game” is below “Gameplay”.

From here, you can leave it covering the entire screen, but your gameplay bar should be visible at the top where you placed it earlier.
Step 16: Adding your Camera to the Gameplay Screen
To add your camera again, add a new source, select ‘Video Capture Device’, add source, and select ‘Camera’ before pressing ‘Add Source’ again.
Now, you’re going to want to resize this camera a little, but leave it in the center of the screen, so that we can add the webcam border.
Step 17: Adding the Webcam Border
Head over to sources and press the plus sign button. For this, you’re going to want to select ‘Media File’, add source, select ‘Add a New Source Instead’, and name it “Webcam”. To locate this file, inside of your Streamdesignz package you’ll see where it says ‘Webcam Overlays’ and you’re going to want to go into this.
Note: There are three different files within the ‘Webcam Overlays’ folder
1. Bottom Overlay Bar: Typically good for when you’re using a greenscreen

2. With Border and With Bottom Overlay Bar: Good for showing when someone donates to you or follows you.

3. With Border but Without Bottom Overlay Bar: This is the one that we’re going to want to use for step 17.

For step 17, we’re going to be using the last file ‘With Border but Without Bottom Overlay Bar’. Select this and you are going to want to turn loop on since this is an animation. From here, you can resize it to fit your camera window.
Step 18: Grouping Elements in your Sources
Now, what you’re going to want to do is go down to sources, grab the “Webcam”, hold your control key, and select the camera. Right-click and select ‘Group’ and then ‘Group into a Folder’.
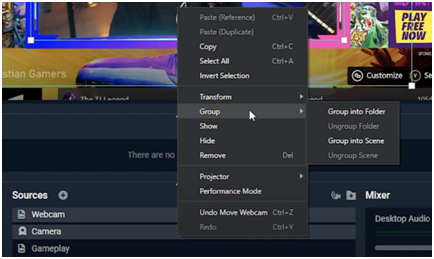
From here, you just need to save it. By doing this, you can move and resize the elements on your screen without it moving your camera in order to position everything exactly where you want it.
Step 19: Creating Alerts
Let’s go back over to ‘Scenes’ and select “Be Right Back”. Then, head to the website stremelements.com, get logged in with your Youtube, Twitch, or Facebook, and then go to the left-hand side where it says ‘Streaming Tools’ and then go to ‘My Overlays’.

Select ‘Create New Overlay’ to add alerts and let’s leave it at 1080p. Hit ‘Start’ and go to where it says ‘Add Widget’, then select ‘Alert Box’.
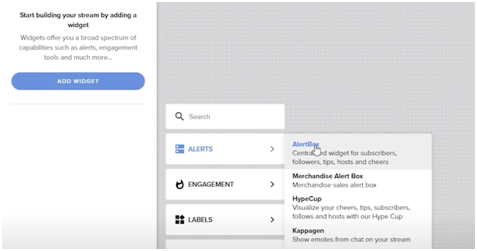
Here, you should see a few different options: Follower Alert, Subscriber Alert, Tip Alert, Cheer Alert, Host Alert, Raid Alert, and Purchase Alert.

For this tutorial, we’re only going to set up the ‘Follower Alert’, but the process is the same to set up any of the others.
The first step from here is to press the gear icon to the right of where it says ‘Follower Alert’ and this will pop up a menu. You can see that there is already an icon that will show up saying that someone is following you, but we want to have this match the theme or brand that we’ve chosen for the stream. In the Streamdesignz package, you do get icons for the alerts. So, you’re going to press ‘Change Video’.

Then, delete the file that was preset, and go to ‘Upload’ to select your files. In your Streamdesignz package, these can be found under the folder called ‘Alerts’, and we’re going to select ‘New Follower’. Press ‘Okay’ and then hover over the icon and press ‘Submit’.

Now, you can see your animation. To enlarge this, go to the bottom where it says “Emulate”, click this, and then select ‘Follower Event’. We’re going to want to make sure that the name is nicely included within the animation- to do this we have to adjust a few settings.
The first setting that you’re going to want to change is to align this with the ‘Left Layout’.

Next, scroll down to find ‘Text Settings’ and you’re going to want to make the font size 20px. Then scroll down and find where it says ‘Pulse’. With this, you’re going to want to find the color that matches your theme, for this tutorial it’s ‘Illumination’. For my theme, it’s a nice shade of blue and I’m going to use this same kind of blue. After doing this, go to where it says ‘Advanced’ to change your margin. Typically, with the top margin, the sweet spot is at 200px to get it right in the center.
Since we don’t want the text to show up first, we’re going to go back and go to ‘Animation Settings’ and then to ‘Text Appearance Delay’. You’ll typically want this to be around 1 second. Once you’ve gone through this same process with all of the other alert types, press ‘Save’ in the top right corner and let’s name this save overlay “Illuminate Alerts”.
Step 20: Adding your Alerts into Streamlabs
Near that top corner, you’re going to want to hit the paper clip icon to copy the URL.

Then, head back over to Streamlabs and under ‘Scenes’ go to ‘Starting Soon’. Once you’ve done this, go to ‘Sources’, hit the plus icon, find where it says “Browser Source”, and select ‘Add Source’. Let’s name this “Alerts”, add source, and this is where we’re going to want to paste the URL that we copied.

Select ‘Close’ and now you can see that your alerts are there. Now, head back to Streamelements, select ‘Emulate’ on the bottom of the screen, and then press ‘Follower Event’ a few times so that you can go back into Streamlabs to watch the alert. While this is happening, you’re going to want to position the alert to where you want it to go on the screen.
Now, we want to add these alerts to every single scene. Click on ‘Countdown’, hit the plus icon by ‘Sources’, hit ‘Browser Source’, then ‘Add Source’, select ‘Alert’, press ‘Add Source’ one more time, and there it is. Again, you can test this by going to Streamelements and pressing ‘Follower Activity’ a few times. You’ll just want to move this to where you want it to be, and you’ll follow these same steps for the rest of the ‘Scenes’.
Step 21: Having your Chat Show Up on your Live Stream
To do this, head back over to Streamelements, go back to your overlays, and press ‘Create New Overlay’. Again, 1080p is fine so we can select ‘Start’ on that. On the left-hand side, you’re going to press ‘Add Widget’ and then go down to the bottom, select ‘Stream Tools’, and then ‘Your Stream Chat’.

This chat is the one that’s going to pull, so you can have it pull from your Twitch account, your Youtube account, or your Facebook account- it can pull in those chats.
On the bar on the left, go to where it says “Position, Size, and Style”. On your stream, you can see that where you want to put your chat is shaped like a slightly rectangular box, so that’s the shape we want to make here. To do this, we can change our width to 500px and this will give us the shape that we want.
Next, we’re going to want to change our opacity, but before we do this, you’re going to hit ‘save’ and name this ‘Chat’. Save that and then copy the URL by pressing the paperclip again and head over to Streamlabs. Under ‘Scenes’, we’re going to go to “Just chatting”, and then go to ‘Sources’ and hit the plus icon. Again, we’re going to select ‘Browser Source’, ‘Add Source’, then select ‘Add New Source Instead’, name this “Chat”, and then paste in your URL just like we did with the alerts.
Now, your chat will be on the screen, and we can resize this. If you cannot see the chat, make sure that it is showcased in your sources. You can see that this fits well inside your box, so you just need to resize it. An easy way to do this is by pressing your ALT key and grab one corner and bring down the size of your chat box. Once this is done, head back over to Streamelements and we can adjust the opacity of the chat box.
I took my transparency down to around 50% and then hit ‘Save’ in the top right corner. From here, when you go back to Streamlabs, you can see that the opacity has changed just by hitting save in Streamelements.
Step 22: Adding the Stinger Transition
The stringer transition is used when you’re switching scenes so that there’s a nice little animation between them rather than just the cut that we currently have. To change these, you’re going to want to hit the icon to the right of ‘Scenes’ that will say ‘Edit Scene Transitions’.

Then, you’re going to select ‘Add Transition’, name this “Stinger”, and under ‘Type’ you’re going to scroll down and select ‘Stinger’. This is going to open up a menu, and in this menu, we’re going to want to go to ‘Video file’, hit ‘Browse’, and find your Streamdesignz package which will have a folder called ‘Stinger transitions’. You’re going to select this and press ‘Open’. One thing that is very important is under ‘Transition Point’ which you’re typically going to want to have this around 750. Keep the ‘Audio Monitoring’ as ‘Monitor Off’, but under ‘Audio Fade style’, you’re going to want to change this to ‘Crossfade’ which just means that your audio or voice isn’t going to be cut out.

Hit ‘Done’, and then we can go ahead and toggle this on. Now, you can see if you flip between your scenes that you have this transition between them.
Your next step is to go live!
I hope this tutorial was helpful in teaching you how to add animated overlays in Streamlabs.
To follow along with a video version of this tutorial, click here. To learn how to make sure the quality of your stream looks as good as possible, click here.

Share:
Pepega Twitch Emote: Origin, Meaning & How To Use | Stream Designz
How to Create a Twitch Banner and a Twitch Profile Picture using Adobe Express