This tutorial will teach you how to create a Twitch banner and a Twitch profile picture using a free tool called Adobe Express! This application is really easy to use and you don’t need any previous experience to be able to make a professional-looking Twitch banner and profile picture.

You’re going to want to choose a color that’s going to not only match your branding, but that’s also going to pop and be memorable to your viewers.
Step 1: Create a Free Account to Begin Using Adobe Express.
You can find the signup portal here! Once you create your free account, you can begin to make your very own Twitch banners.
Step 2: Create a New Project
Once you’ve logged in with your new account, you’ll be brought to the menu screen. You should see where it says ‘Create a New Project’, go here and select ‘Custom Size’.

Let’s put the width at 1200 and the height at 480 which will give you the perfect size for Twitch. Now you have a perfectly clean canvas that’s ready for you to start creating!
One really good thing about using Adobe is that they give you a lot of materials to work with. They have templates, text, photos, shapes, design assets, backgrounds, logos, and libraries.

Step 3: Create a Background for your Banner
Since Twitch has the video in the middle of the screen, you don’t want to put text and other things on your banner- it should be kept simple. At most, you’ll want to have a nice background color, maybe some shapes, some elements, and maybe your logo in the center for the mobile version.
The first thing that you’re going to want to do is go to backgrounds on the toolbar that’s on the left side of the screen.

Now, you can just scroll through the backgrounds to find one that you like- personally, I like to scroll and find the ‘Chromatic’ backgrounds, hit more, and then select any kind of color that you like here. I prefer to use ‘Blurred Colors’ and one that will stand out. All you need to do is click on the one that you like and it’s going to add it directly into your Adobe Express account.

Step 4: Adding Elements to your Background
If you have your own logo, now is the perfect time to add it to your Adobe Express account. Head over to the left where it says ‘Photos’, clicking this, and then selecting ‘Upload Photos’.

From here you’ll be able to upload your logo. If you don’t have a logo, Adobe has some that you can use! Right under where it says ‘Upload Photo’ you can see the search bar that says ‘Search Adobe Stock’, here we’re going to type in ‘Gaming Logo’ and hit enter.
Note: If you see anything with a crown in the bottom right corner, this means that it’s only available on the paid plan. Looking at the Adobe Pay plan, it’s $9/Month which is really good considering it allows you access to over 20,000 files, graphics, and other things that you can use like planning and scheduling posts to social media, and sharing your templates and assets with Creative Cloud Libraries.
For this tutorial, I’m going to utilize an “Eagles” one which is not included with the free account.

You can see that this logo has a white background and we don’t want this- but one really cool feature with Abode Express is that you can remove the background of any photo with just the click of a button. If you click on the photo, a menu will appear on the right-hand side of the screen which will have a button that says ‘Remove Background’ that you’ll want to press.

Once you click this, a new screen will appear that says ‘Edit Cutout’ and you’re going to want to select where it says ‘Auto’. After doing this and clicking the ‘Done’ button, the background will be removed and now we can use the logo a bit better.

Now what we want to do is resize the logo, but be careful, you don’t want to make it too big because you don’t want it to be showcased on the desktop version and you want this to be more suited for the mobile version.
Step 5: Making the Background Look Better
Another neat feature of Adobe Express is that you can add shapes to the background to give it a more dynamic feel. On the left-hand side toolbar, you’ll see where it says shapes and you want to click this. I’m going to select a square and once it’s on your screen you can add other kinds of elements to it.
I start off by turning mine slightly sideways.

Then I’m going to bring it in some and resize it to be more of a long rectangle. Now, on the right-hand side, you can see where you’ll be able to edit the shape. I’m going to change the fill color of mine to black because we want it to match our logos background. I’m also going to give mine a white border. Now I’m going to make it smaller and bring it to the top left corner.

Now that this side is completed, you can click the shape and on the right-hand side, you’ll have a plus icon and you can duplicate the shape.

Now, we’ll take the duplicated shape and move it to the right side where we’ll rotate, turn, and resize it to match how the left side looks. I’m also going to center the “Eagles” logo a little bit better.
On yours, you can play around with this until it looks the way that you want it to. Even if you don’t have any previous experience with an application like this, Adobe Express is really easy to use.
Step 6: Making the Background Pop More
Click on the background (you’ll know when you’ve selected it because the right-hand side will say ‘Edit Background’) and where ‘Enhancements’ is, we’re going to increase the saturation to make the blue pop some more. We’re also going to reduce the shadow, add some more highlights, and increase the contrast.

This all helps the blue to really pop.
Step 7: Downloading your Banner
Once your banner is completed, you’re going to want to go to the top right-hand corner and press ‘Download’.
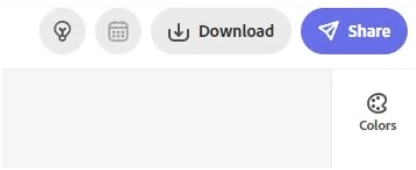
Make sure to select ‘PNG’ and then press ‘Start Download’. This will then begin to download directly to your computer and you can most likely find it in the ‘Downloads’ folder.
Step 8: Uploading your Banner to Twitch
Once your banner is downloaded, you’re going to want to head over to Twitch and get logged in. Head over to where it says ‘Channel’ and that will bring you to your profile.

Where it says ‘Customize your Channel’, you’re going to select ‘Edit’, and this will take you to your creator dashboard where you’ll be able to edit how your channel looks.
Once you’re in your creator dashboard, you’re going to select where it says ‘Brand’.
Scroll until you see ‘Profile Banner’ and select ‘Upload’. Find the image that you’ve just created for your banner in your files and upload it here. After doing this, select ‘Custom Image’ and then select ‘Save’.

Refresh your channel browser, and you should see that your banner has appeared on your profile. Remember, on the desktop version, the logo is going to be covered but you have branded sides that you’re able to do here.

On the mobile version, which is typically where people watch Twitch, you can see the whole logo and the branding in there.

How to Make Profile Picture using Adobe Express
Step 1: Create or Log In to your Adobe Account
If you aren’t still logged in, or if you don’t have an Adobe account. Now is the time to do this. If you don’t have an account- this is a free software and the signup process is really easy. Click here to be taken to the Adobe Express webpage.
Step 2: Setting up the Size of the Profile Picture
Once you’re logged in to Adobe Express, you will see your dashboard that has all of the options for things that you can create. For this tutorial, we’re just going to go to the left-hand side and click ‘Custom Size’

After selecting that, you’ll be shown a page titled ‘Select a Size’ and you’re going to want to set the width and the height both to 256.

Then, you can simply just hit ‘Next’.
One of the really great things about Adobe Express is that it’s not just for making profile pictures, but you can also use this for making social media graphics, logos, and banners. There’s really so much more that you can do with this.
Step 3: Importing the Picture of Yourself
Once your canvas is set up, you’re going to want to import the photo of yourself that you’ll be using in the profile picture. To do this, go to ‘photos’ on the left-hand side’s toolbar.
Note: It is super important to have a profile picture that’s just your face where you are smiling, happy, and excited. You’re going to want to make this your profile photo for Twitch, Instagram, Tiktok, and even on your Youtube so that you have consistency across all of your accounts and so that people will recognise you when they see your profile picture. This means that you’re going to want to have a picture of yourself that really looks good.
Select ‘Upload Photo’ and find the photo that you want to use in your files. Once you’ve found the file, press ‘Open’ and add it. Once you have done this, you’ll see that it will be on top of the canvas that we created in the last step.
Step 4: Removing the Background of your Image
When you click on the image, a toolbar will appear on the right-hand side of the screen and you’re going to want to click ‘Remove Background’. We do this so that we can add a nice background behind you.

By just clicking this button, Adobe will work its magic and remove the background for you. This is one of the really nice features of Adobe Express. Now, you can see that the background was removed and you’re going to want to go back over to the right-hand side toolbar and under ‘Edit Cutout’, you’re going to select ‘Auto’. Once you’ve done this just hit the check mark.

Step 5: Resizing the Image
Since we want this profile picture to be more of just your face, you’re going to want to resize your photo to be this way. You’re going to resize this quite a bit.
For mine, this is how the photo looked on the canvas before I resized it:

And this is what it looked like when I finished resizing it and had the photo where I wanted it to be:
This really shows you just how closely cropped you’re going to want to make your photo. In my photo, you can see my eyes, my teeth, that I’m smiling, and that I’m happy. Now we want to make this just a bit better.
Step 6: Changing the Background
You’re going to want to move the image down just a bit so that you can access the background. Once you’ve done this, click on the background and head over to the right-hand side toolbar. You’re going to want to choose a color that’s going to not only match your branding, but that’s also going to pop and be memorable to your viewers.
Once you have a photo that you’re happy with, you can move your photo back up into place.
Here’s how mine is looking:

We’re still going to want to make this pop just a little bit more though.
Step 7: Adding Effects to your profile picture
Click on your photo again so that the right-hand side menu appears and then go down to ‘Effects’. Select ‘Enhance’ and increase the saturation and contrast just a little bit so that you pop off the background some more and give the image some dimension.
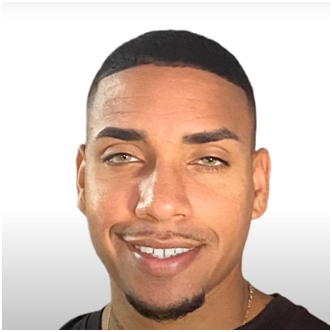
Here’s how mine looks after making those adjustments:

You can see that the photo now pops and it has more dimension than it did before. This will really help to make your profile picture stand out and be memorable.
Step 8: Downloading the Image
Now what you want to do is select ‘Download’ in the top right corner, then select ‘PNG’ and press ‘Start Download’

Step 9: Adding this Photo to your Twitch Account
Once the photo has downloaded, you’re going to head over to Twitch and go to your channel.
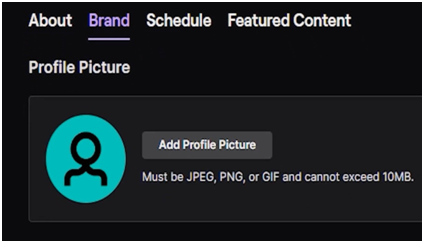
Once you’re on your channel, you should see a button near the top that says ‘Edit’ and you’re going to want to press this in order to get to the ‘Creator Dashboard’. Once here, you’ll go to the top and select ‘Brand’ where you will have the option to select ‘Add Profile Picture’

Once you’ve selected that, find the picture that you download from Adobe Express and upload it. You can see once you’ve done this that the image fits exactly where we want it to.

All we have to do is select ‘Save’. Simply refresh the page and you should now see your profile picture on your Twitch account.

You can see here that this pops and people will be able to recognise your photo when they see it. That’s all you have to do to create your professional profile picture to use across Twitch and all of your other social media accounts.
Thanks for reading this tutorial on how to create your Twitch banner and profile picture. If you’ve followed both of these tutorials, your Twitch account is going to look much better and a lot more professional- this will only help people to see you more seriously as a streamer.
To watch the video on how to create a Twitch banner, click here.
To watch the video on how to create a Twitch profile picture, click here.

Share:
Step by Step: How to Add Animated Overlays Inside of StreamLabs
OBS Studio Overlay Setup for Beginners (FREE Overlays)