Disclosure: Some of the links below are affiliate links. This means that, at zero cost to you, I will earn an affiliate commission if you click through the link and finalize a purchase. Learn more!
In this tutorial, you're going to learn how to capture all of the separate audio devices on your Mac into OBS Studio. You no longer have to download external softwares and worry about viruses. Now you can bring your Discord audio, game audio, and screen share audio directly into Discord without worry.
To do this, you do need to be using OBS 30 or higher, and you also need to have a Mac operating on OS Ventura 13 or higher. If this is the case for you, then you can follow along with no issues.
Setting Up Your First Audio Source
Start by getting OBS Studio opened and to the page where you can see your sources and scenes.
By default, you would typically add each individual audio source under the scene that you're looking to utilize. However, my preferred method is to create one scene that will house all of your audios and then add this scene to each individual scene which you want it to be included in. This way, your countdown timer, just chatting, gameplay, and starting soon scenes all have the audio devices that you want to capture.
Under scenes, you'll press the plus icon (+) and name this 'Audio Source Main'. This will now give you a blank slate for 'Sources'. Under sources, we'll press the plus icon and the first thing you're going to do is press 'macOS Audio Capture'.
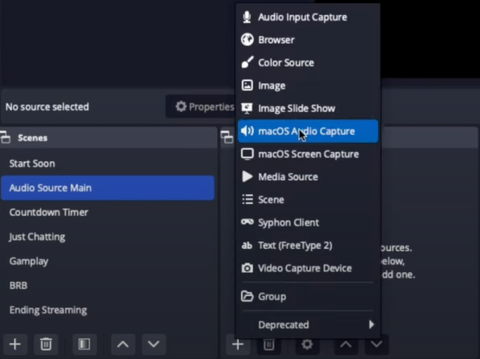
Go ahead and name this 'Desktop' and click 'OK'. Under 'Method', if you use 'Desktop Audio Capture', this is going to capture all of the sounds coming from your Mac, whether you have a game open, a browser open, an app open, or anything else. After you press 'OK', you'll see that you can adjust the audio without any issues.
However, is not my preferred method, I prefer to be able to adjust each of my individual audios separately, my music separately, my discourse separately, and my game separately. This is exactly what I will be showing you how to do today.
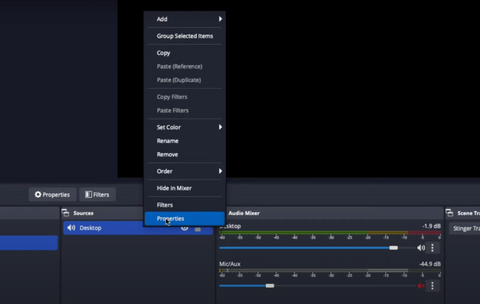
On your source named 'Desktop', you'll double-click and select 'Properties'.
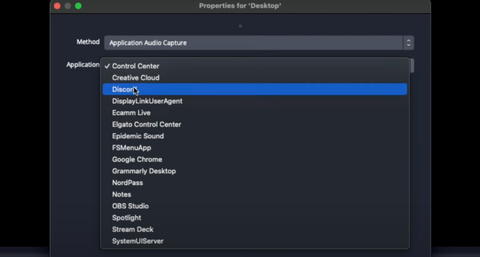
Under 'Method', we're going to switch this from 'Desktop Audio Capture' to 'Application Audio Capture'. When you change this, it will then give you the option to select any of the applications that are open on your computer. I'm going to select Discord.
After doing this, head back to sources, double-click desktop again, and select 'Rename'. Let's change this to 'Discord'. Here, you can go ahead and adjust the volume, and rather than change the volume for everything on your computer, it will only change the volume for 'Discord'.
Now, click on the three dots at the end of the 'Discord' volume bar under 'Audio Mixer', and come to 'Advanced Audio Properties'.
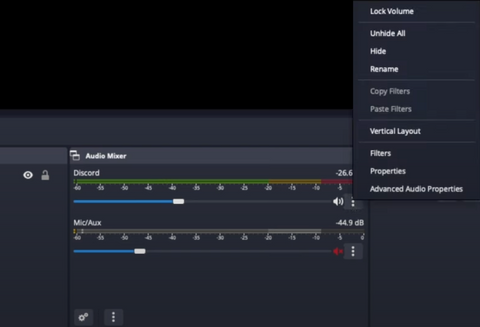
You'll see here that under 'Discord', 'Audio Monitoring' is set to 'Monitor Off'. If you want to be able to hear Discord as the stream hears it, then you will need to change this to 'Monitor and Output'.

If you do not want to be able to hear this, then leave it set to 'Monitor Off'.
Adding Music
Now, we're going to bring in our music. Music for your stream is going to be super important. You can get this from Spotify, Apple Music, YouTube, or wherever, but personally, I prefer to use Epidemic Sound.
Epidemic Sound offers royalty-free, copyright-free music that you can use on any platform without having to worry about copyright strikes. They offer over 40,000 songs and over 90,000 sound effects that you can use in your streams. This is also great because it means you'll never have to worry about the music in your streams being muted or removed altogether.
If you use this music and post it along with your stream to YouTube, Instagram, or TikTok, you will be 100% protected against copyright issues so long as your accounts are listed in your safelist.

They have tons of genres and artists for you to choose from; there's something on Epidemic Sound for everyone and for all kinds of content.
I will say, this is not a free site, but the money is absolutely worth it if you're serious about streaming and gaining subscribers by uploading your content to platforms like YouTube, Instagram, TikTok, Twitter, and others.
They do also have an app that you can download on your computer which is super helpful and is what I will be using in this tutorial.
Back inside OBS Studio, you'll press the plus sign icon under the 'Sources' tab and again press the 'macOS Audio Capture' option. Let's rename this 'Music' and change the 'Method' to 'Application Audio Capture'. This time, you're going to select 'Epidemic Sound' under 'Application'.
Now, there will be a 'Music' option under the 'Audio Mixer' tab.
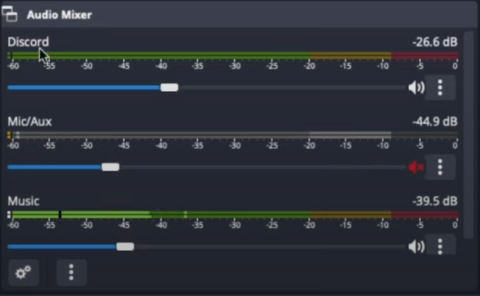
I like to keep my music fairly low so that it doesn't overpower all of the other audio. Right now, if you were to press play directly on the Epidemic Sound app, it will also be coming through on OBS and you can change the volume in OBS rather than in Epidemic.
This is why it's great to be able to differentiate the audio sources that I'm using inside of OBS Studio.
Capturing your Game
Next what you're going to want to do is capture the game. Let's say that you game directly on your Mac, or you want to capture your screen, you'll start by pressing the plus icon under 'Sources'. This time, you'll select 'macOS Screen Capture', and let's name this 'Screen Gameplay'.
Under 'Method' here, you have three options: 'Display Capture', 'Window Capture', and 'Application Capture'. You can decide here again which one works best for you.
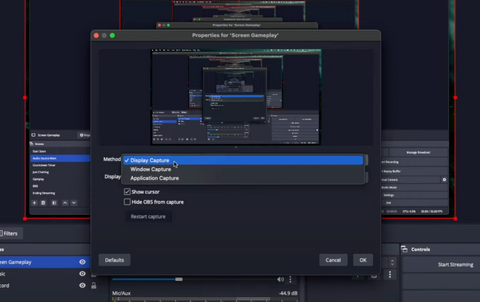
Display capture will capture your entire screen.
Window capture will capture a select window that you have chosen.
Application capture will capture only one specific app that you have chosen. If you choose this, under display, if you have multiple monitors, you can select the monitor that you want to utilize. As well, under application, you will select which open application you would like to be captured.
One of the great things about this feature, if you use the screen capture for your gameplay, it will automatically bring in the audio with it and you will not have to bring this in separately.
Once you choose your application and select 'OK', you'll see that your 'Screen Gameplay' is available in your 'Audio Mixer' tab.
Adding Capture Card Audio
Let's say you're streaming with a capture card, how do you bring in the audio from this into OBS?
To do this, you'll press the plus icon under sources, and select 'Audio Input Capture'. We'll name this 'Capture Card Audio'. Select 'OK', and then under device, you should see your capture card as an option. Select this and now you'll be able to see your capture card audio under the audio mixer.
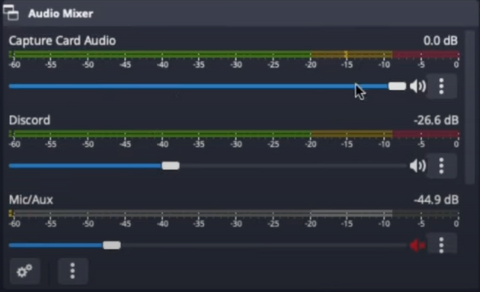
Now, all of the audio that's coming from your capture card in your console is going to be coming into OBS.
Adding Your Microphone's Audio
You may be wondering, "What about my microphone?" Press the plus icon under sources again and select 'Audio Input Capture'. Let's rename this 'Mic'. Under the 'Device' options, you're going to select your microphone and then press 'OK'.
Like the others, this will now appear in the audio mixer tab for you to be able to adjust.
Copying Audio Sources and Pasting Them Into Each Scene
Now, you should have your microphone audio, capture card audio, gameplay audio, music, and desktop audio all separate under the audio mixer tab. This way, you can adjust all of these to your liking and change them one by one instead of all at once.
Remember how I said you won't want to do this for every single scene? Let's get into how to copy these. For example, if for my 'Starting Soon' scene I want to bring in the same audio set that I just created, I'll start by pressing the plus icon under the sources of the 'Starting Soon' scene.
Now, you'll select 'Scene' and then press 'Audio Source Main'. This will bring in all of the audio set that you just created in that scene. All of these will appear in the audio mixer tab, but this time in the 'Starting Soon' scene.

You can now go in and do this for every single scene that you have.
Remember too that if you want to be able to monitor any of this audio, click on the three dots again next to one of the audio sources under the audio mixer which will bring you to the advanced settings. Here, you can choose which audios you want to monitor and hear through your headphones.
However, if you want to make sure that any microphone that you utilize inside of OBS sounds professional, check out this video here! It will walk you through step-by-step how to get the best-sounding microphone for your streams.

![How to Add Overlays in OBS Studio (Complete Streaming Setup Guide) [2026]](http://www.streamdesignz.com/cdn/shop/articles/Thumbnail_1_917415b4-0055-48d9-9f13-46b188205824.png?v=1782571692&width=1920)

How to Setup Twitch Alerts in OBS Studio (Super Easy)
How to Setup OVERLAYS on Xbox (WITHOUT OBS or STREAMLABS)