Disclosure: Some of the links below are affiliate links. This means that, at zero cost to you, I will earn an affiliate commission if you click through the link and finalize a purchase. Learn more!
Twitch has made it even easier for you to set up your Twitch alerts inside of your streaming software. In this tutorial, I'll be explaining how to set up your Twitch alerts using OBS Studio. The great thing about this is that most of the heavy lifting is done directly on Twitch's website.
Logging In and Creating A New Alert
Firstly, you're going to go to Twitch.tv and get logged in to your account. Then, you'll want to go to your Creator Studio dashboard by clicking on your profile photo in the top right-hand corner and then selecting 'Account Settings'.
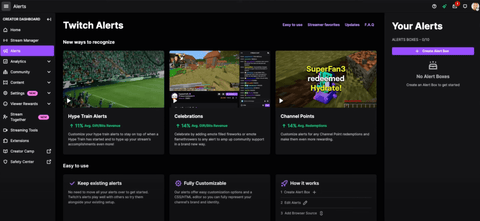
On the left-hand sidebar, select 'Alerts' before going back over to the right-hand side and clicking 'Create Alert Box'. This is going to bring you to Twitch's new editor which will make this all really easy to get set up. This tutorial will explain how to do some of the alerts, but not all, because each one will end up following the same steps as the previous ones. Once you understand how a few of these work, you can go in and customize the rest!
On Twitch, you can set up alerts for: New Followers, Subscriptions, Gifted Subscriptions, Cheering, Raids, Charity, Hype Trains, Channel Points, Goals, and more. In this, I'll be explaining a bit about new follower alerts, subscription alerts, and cheering alerts.
Adding Your First Alert
The first alert that we are going to add and adjust will be the 'Follower Alert'.
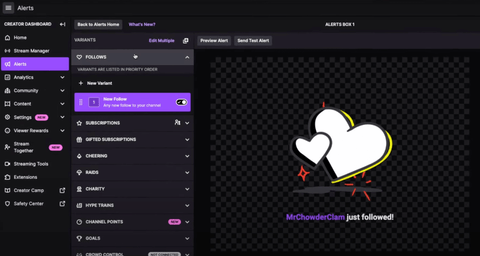
On the right side, you'll find 'General Settings' and will need to click on this.
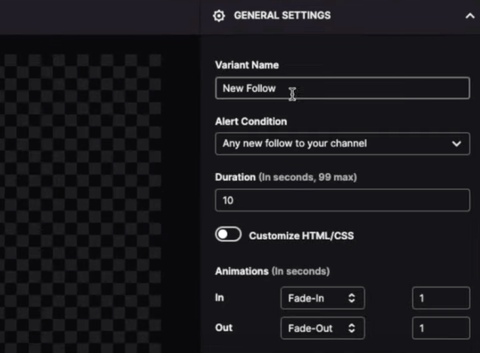
This is where you will be able to name the follower. I like to leave it as 'New Follower'.
For the 'Alert Condition', keep this set to 'Any new follow to your channel', which is the only option.
As for duration, it will by default be set to 10 seconds, but this is a bit long, so I would suggest changing it to be about 4 seconds. This seems to be the sweet spot.
You are also given the option for the animation. I really like to use the 'Slide Up' and 'Zoom Out' animation options.
After adjusting these settings, click 'Save Changes' in the top right corner, and then select 'Preview Alert' next to the sidebar. Once you preview the alert, you can see all of the changes that you made and how the animation plays.
Once this is in place, go back over to general settings and select 'Layout'. This is going to give you the option to select where you want the text and alert to be. Right now, you have the text right under the picture. I prefer to choose the option that will overlap the text and the picture. This option will look like a box with text inside of it under the layout settings.

As for the 'Background', we're going to leave this alone as we want it to be transparent so that it doesn't create any issues with the stream and how the alerts appear.
Now, we'll go down to 'Text and Speech', which is where you can decide what you want the text to say when it's displayed. Typically, I'll utilize the default '{username} just followed!'.
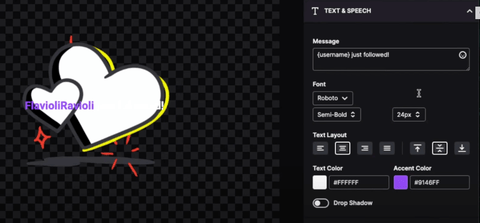
For the font, I like to use 'Roboto' in the 'Semi-Bold' option with a '24px' font size. This just makes everything clear and easy to read. All of the other text settings you're just going to leave as is because it will center the text and everything else for you. I do, however, like to add the 'Drop Shadow' as it makes the text pop a little bit more.
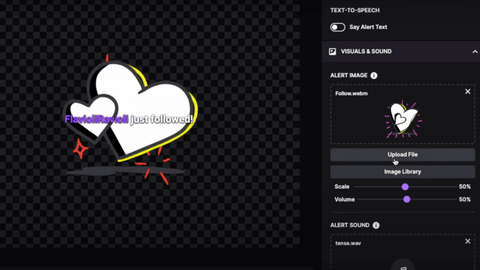
From there, we're going to move on to 'Visuals and Sound' which is where we can change what the alert looks like.
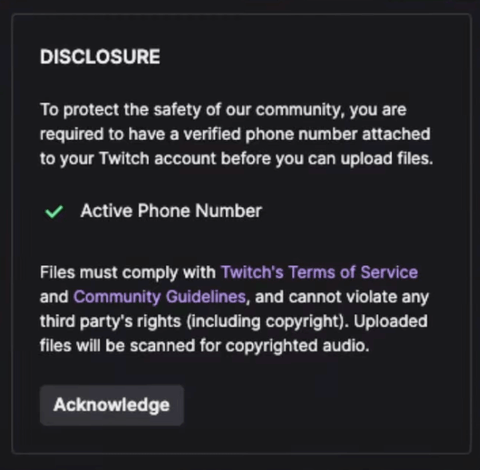
If you have never used Twitch's editor before, this is where a box will appear telling you that you must have a phone number linked to Twitch and you will have to acknowledge their disclosure regarding uploading files and alerts.
Once you do that, you'll have the option to add your own custom alerts and sounds.
We're going to start adjusting this with the image. By clicking on 'Image Library', you'll be brought to a screen that has tons of different alert images to choose from that Twitch offers.
However, I like to utilize custom alerts, so what I do is go to Stream Designz and select one of their professional alert overlays.
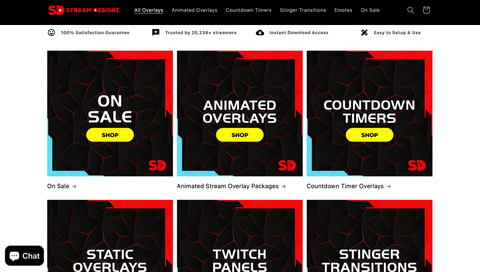
On Stream Designz, I'll go to 'All Overlays' and then scroll down to find 'Animated Alerts'. Of course, you can shop all of the other products on the site and find a theme that will allow you to have all matching overlays for your stream. For now, I'm going to choose the 'Velocity' animated alerts package.

If you click here, you can select the video and see what the alerts will actually look like as they're playing.
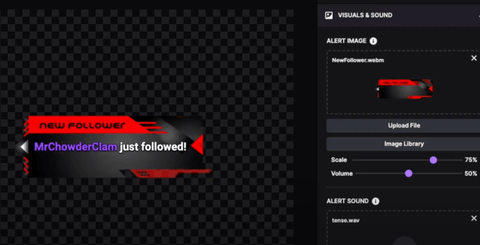
Once you download overlays from Stream Designz, they will come as a zip file that you will need to unzip. After doing this, go back to Twitch, select 'Upload File', and find the overlay package. If you bought the full package and not just the alerts package, these will be included along with everything else. Find the 'New Follower' file, select it, and press open.
Once you have added this to your Twitch, press 'Save Changes' and Preview Alert' again, and now you should see your custom new follower alert playing.

For the text to fit well, you can either go back to 'Text and Speech', or you can do what I prefer which is to go to 'Visuals and Sound' and increase the overall size of the alert. I'm going to go to 'Scale' and change this to '75'. When I save the changes and replay the alert, the text fits in much nicer and allows for longer names to fit as well.
As you've probably noticed, there is a sound that plays each time the notification goes off. To change this, we're going to go to 'Alert Sound'. Similar to the image library, you have access to the Twitch 'Sound Library'. There aren't a lot of options here, but they are good options to get you started.
If you're looking for something better, I highly recommend using Epidemic Sound. They have over 40,000 songs and over 90,000 sounds to choose from for all of your streaming needs.

All of their music is royalty-free which means you won't have to worry about any kind of copyright claims or potentially having your sound removed from your videos. This is incredibly useful if you ever decide to post your stream onto YouTube, Instagram, TikTok, Twitter, or anywhere else that you can upload videos to.
With their 'Safelist' feature, after you link your accounts to your Epidemic Sound, your accounts will be safeguarded against copyright claims for using their music or sounds.
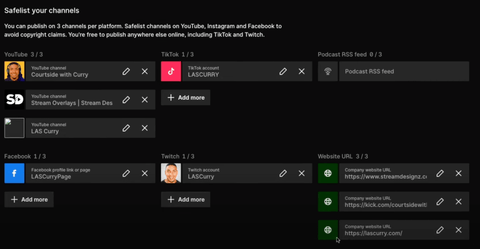
This is not a free service, but it is definitely worth the cost if you are posting your content online after streaming it. They have a fantastic selection to choose from and it truly fits the needs of every streamer and gaming content creator.
To find my audio, I'm going to go to 'Sound Effects', then I'll scroll down to 'Foley', and I'll select 'Games'. Once you've chosen an audio, I'm simply going to press the 'Download' button and head back over to Twitch.

Once you're back on Twitch, select 'Upload File' and find the Epidemic Sound audio file that you've just downloaded. Once you've found it, select 'Open', and let it load. After it loads into Twitch, I'm going to go ahead and lower the volume just a bit down to '30%'. Then, press 'Save Changes', and then select 'Preview Alert' to hear the new sound along with the animated alert.
Now, your follower alert is all set-up!
Subscription Alerts
Setting up your subscription alerts are going to be a little bit different than setting up the new follower alerts, so we're going to jump into how to do this now.
For the subscriptions, you'll see that you have three different types of subscriptions: Prime Subscription, Resubscription, and New Subscriber.
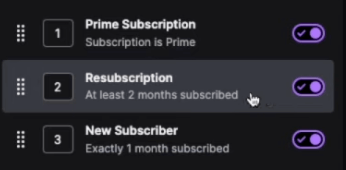
Because of this, you're able to make different alerts for each different kind of subscriber. One of the things that I want to emphasize is that the process is exactly the same for setting up each of these. Something you should note is that on the right-hand side if you scroll down to the bottom, there is a 'Celebration' tab.
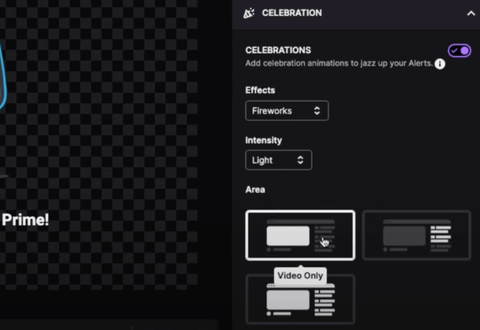
This is a pretty cool and new feature that they have added. When you turn this on, it will allow you to go ahead and have effects show up on your video, directly inside of the chat, or you can have the effects show up everywhere on your Twitch.
What I would encourage you to do is that if it's a first-time subscription, keep the 'Intensity' set to 'Light'. If it's for a 2-month subscription, change it to 'Moderate', and for anything more, go ahead and put it on 'Extreme'. This is going to give you tons of effects to be able to put on your screen, which again makes this a super cool new feature
Cheering Alerts
Moving on to 'Cheering' alerts, this is where you're going to be able to decide if anyone gives you any kind of 'Bits'.
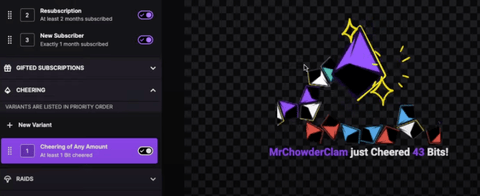
What I want to show you here is how to leverage 'Variants'. This is what is going to let you add different variations of the bit. Let's say, for example, somebody donates one bit, but you want to have a different customization for someone who donates 100 bits.
To do this, select 'New Variant' and then go back over to general settings on the right side. Under 'Alert Condition', you can choose 'Cheered At Least', 'Cheered Exactly', or 'First Time Cheer'. I'm going to choose 'Cheered Exactly' and then input '100 Bits' into the 'Bits' box. As for duration, '4 Seconds' again is going to be your sweet spot.
This is going to be the same for the 'Prime Subscription' as well, except this one has the options for 'Subscription is tier', 'Multi-month subscription', 'Months subscribed exactly', and 'Months subscribed at least'.
Finishing Up
Now, with everything set up how you want for your alerts, you'll see 'Browser Source URL' in the bottom-right-hand corner and you'll press 'Copy' right next to it. Next, you're going to head over to OBS Studio (or any other streaming software that allows you to use browser sources).
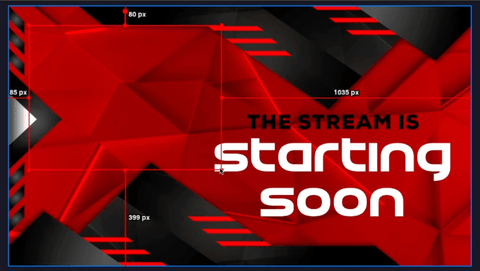
Start by selecting the 'Starting Soon' scene, then select the plus sign icon (+).
Under 'Sources', you'll select 'Browser'.
I'm going to name this 'Alerts 2' and then select 'OK'. This will bring you to another screen where you will paste in the URL that you copied from Twitch.

You can just leave the 'Height' and 'Width' as the default. However, it is very important that you check 'Control audio via OBS' as this will allow you to be able to control the volume of the sound effects without having to log in to Twitch. Once you've done this, press 'OK'.
Your alert box will now appear on top of the 'Starting Soon' graphic, and you can make this as big or as small as you would like.
After you're content with the size, all you need to do is go back over to Twitch, go back to the 'New Follower' alert, then select 'Text Alert', and go back over to OBS to make sure it's working and showing up.

Once you can see that it's working, all of the other alerts will be working as well.
If you want to learn how to add overlays like the ones you've seen in these pictures, click here!

![How to Add Overlays in OBS Studio (Complete Streaming Setup Guide) [2026]](http://www.streamdesignz.com/cdn/shop/articles/Thumbnail_1_917415b4-0055-48d9-9f13-46b188205824.png?v=1782571692&width=1920)

If I Started Streaming In 2024, I'd Do This
How to Split Audio in OBS on Mac (WITHOUT ANY SOFTWARE)