In this tutorial, I'll be explaining how you can stream both horizontally and vertically at the same time utilizing OBS Studio. With this, you can stream to YouTube Shorts, Twitch, Kick, TikTok, or anywhere else all at the same time.
Adding Your Vertical Plugin
The first thing you're going to need to do is get the vertical plugin for OBS Studio.

To get this, you're going to go to aitum.tv. All you have to do is press 'Download Vertical' and it will bring you to a screen just like the one in the photo below.
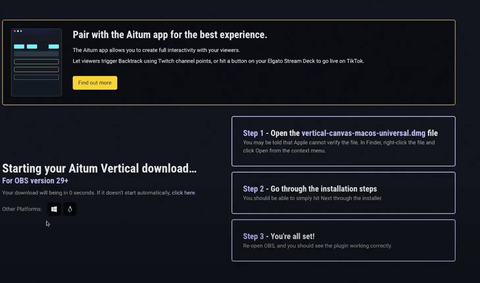
This will automatically begin downloading, and now you're going to want to open up the file once it's finished downloading. Then, you'll follow the installation steps that they outline. Once you restart OBS after completing the steps, you should see the vertical plugin working correctly.
If you do not see the vertical plugin on the right side after reopening OBS, go to the top of your screen, select 'Docks', and then make sure that 'Vertical', 'Vertical Sources', and 'Vertical Scenes' are all selected.
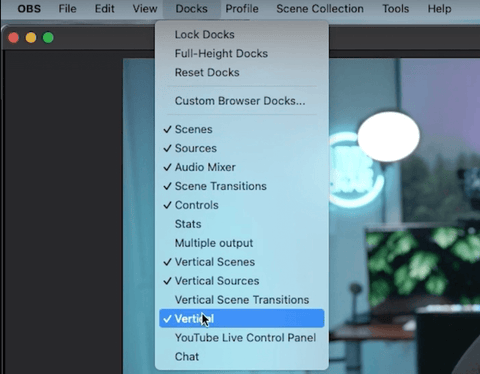
It should show up now if it hadn't before.
Adding Your Scenes and Overlays to the Vertical Canvas
The next thing that you're going to want to do is add in all of the scenes and overlays that you'll be using in your stream.
For the overlays that I will be using today, I purchased these from Stream Designz. They are very easy-to-use, professional-looking animated overlays that really help to take your stream up to another level.
There are overlay packages that fit the needs and aesthetics of every streamer.
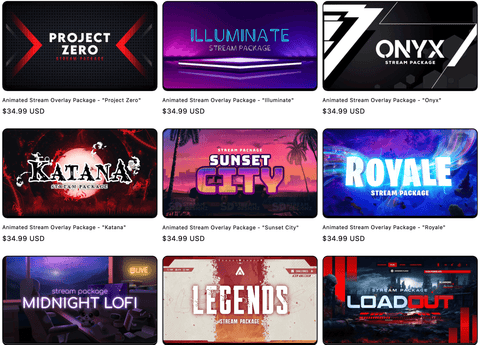
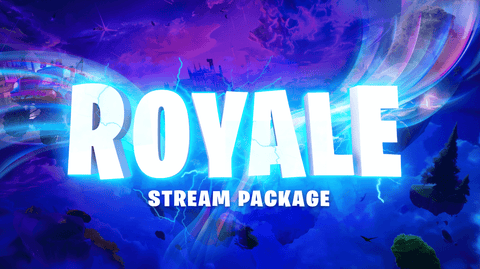
Today, I will be utilizing the 'Royale' package, which is inspired by Fortnite
You can see below what all comes in the package and what each of the different components looks like.
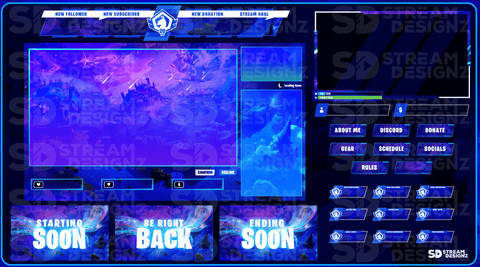
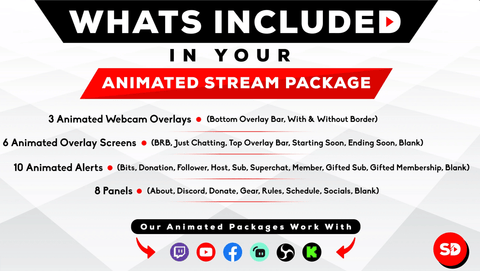
These packages will give you everything that you need for your stream.
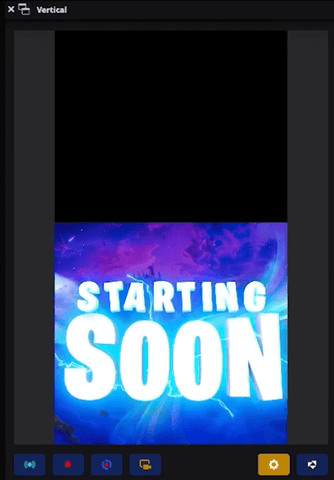
Once you've selected an overlay package and you're back in OBS Studio, we'll begin with the 'Starting Soon' scene.
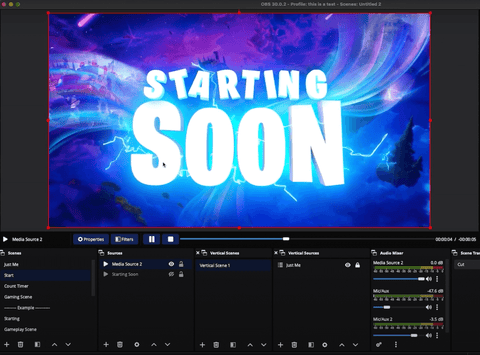
To do this, on your horizontal scene', press 'Start'. After that, go over to sources, press the plus sign icon, and then select 'Media Source'. Let's name this 'Media Source 2', and then you'll locate the file where you have your 'Starting Soon' overlay.
If you went ahead and purchased your overlays on Stream Designz, these are going to download as a zip file. You do have to unzip these before you can use them on OBS, but it's really simple to do. If you're on a Mac, all you need to do is double-click the zip file and it will create a new folder with all of the files in it. If you are on a Windows, you will need to right-click the zip file and then select 'extract'. This will also put all of the files into one folder for you.
Once you have this folder, you'll go into 'Overlay Screens' and select 'Starting Soon'.
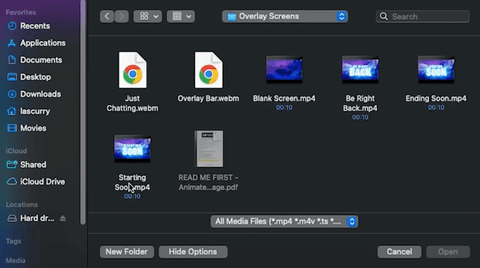
After selecting this file, press 'Open', and then be sure to select 'Loop'.
Now, you should be able to see that your Starting Soon overlay is available for you to utilize.
Next, we need to make sure that this is also on our vertical scene as well.
To do this, press the plus sign icon under 'Vertical Scenes', and let's name this 'Starting'. Press 'Okay', and then you'll have a brand new canvas here.
Under 'Vertical Scenes', you're going to press the plus sign icon, come to where it says 'Scenes', and select the scene that you just created ('Start'). Now, you can go ahead and adjust this.
What I like to do is make it as big as I possibly can, without having the text cut off. I'll also sometimes put it at the bottom of the screen, especially with my starting soon.
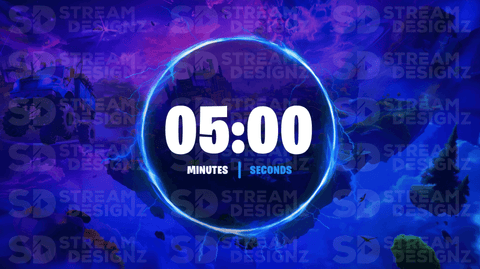
Now, you'll be able to see the 'Count Timer' scene on the far-left side of the screen. If you bought an overlay pack from Stream Designz, the countdown timers are sold separately, but each of the overlay packages does have a matching countdown timer.
Go over to 'Vertical Scenes', hit the plus sign icon, select 'Scenes', and select 'Count Timer'. Then, you'll be able to see your countdown timer on the vertical canvas as well. Now you just need to size this up and adjust its position to your liking.

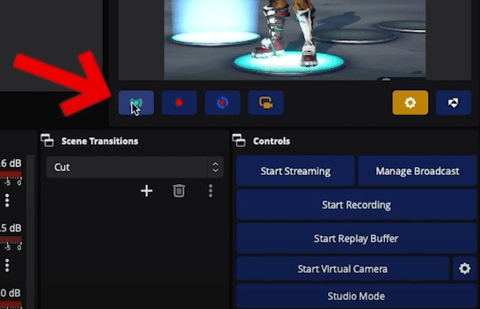
One great thing you can do here is if you right-click on 'Starting 2', under 'Vertical Sources', you'll see 'Linked Scenes'. You can now link this to 'Start', which means that whenever you switch your scenes on your horizontal scenes, it will automatically switch your vertical scenes as well.
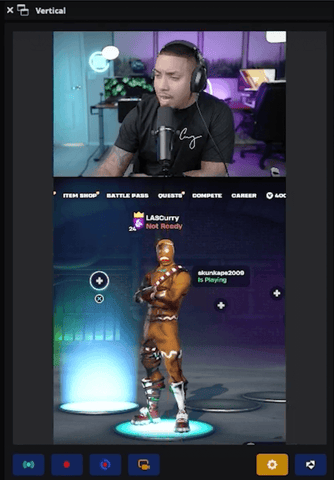
Next, we need to create our gameplay scene. On the horizontal canvas, I have my gameplay, the webcam overlay that I got from Stream Designz, and then my camera.

What I want to do now is create a vertical version of my gameplay scene. Head over to 'Vertical Scenes', press the plus sign icon, and then select 'Video Capture Device'. I'm going to select this since I utilize a capture card, but if you stream directly from your computer then you'll select 'Screen Capture'.
Once your gameplay is added, you're going to want to resize this. Most people are going to make this as big as they can, but this ends up cutting off a lot of the scene. What I like to do is try to keep it as horizontal as I possibly can, while keeping it in the center, and leaving enough of a view for people to still be able to see.
Remember that at the bottom of the gameplay, the chat will be there. There are going to be a lot of comments or things that can be distracting, so I typically like to try to cover this up with another camera angle. You can also just extend the gameplay scene more if you prefer, which is what I will be doing for this.

We're now going to add the camera at the top of the vertical canvas. To do this, go to 'Vertical Sources', press the plus sign icon, select 'Video Capture Device', and then you ought to be able to see it at the top of your vertical canvas. Again, we are going to need to resize this.
After this looks how you want, we're going to right-click 'Gaming Scene 1' under 'Vertical Sources', and make sure that 'Gaming Scene' is selected. This will mean that whenever you switch to or from your horizontal gameplay scene, the vertical will change as well.
Adjusting your Stream Settings
What we need to do now is adjust our settings so that the vertical stream can be sent to either TikTok or YouTube Shorts.
On the right-hand side, directly under your vertical canvas, there is a gear icon that you'll need to press. This will pull up the settings for the vertical canvas, and we need to go to 'Streaming' on the left-hand side. We're going to name this 'YouTube Shorts' as that's where we're going to be streaming to.
Then, we want to select 'Enable', and get our server information and key.
To do this, you're going to come to YouTube, get logged in to your channel, press the 'Create' icon (the camera with the plus sign inside of it) in the top-right corner, and select 'Go Live'.
If you have never live streamed to YouTube before, it will make you wait 24 hours before you can go live and have access to your Stream Key. If you have streamed before, it will bring you to a page just like the one you can see below.

We're going to go ahead and select 'Start' next to 'Right Now'. On the next screen, you'll want to select 'Go' next to 'Streaming Software, and then you'll be brought to a dashboard just like the one in the picture below.

We're then going to come to where it says 'Stream URL', press copy, and then head back over to OBS and paste this into the 'Server' box. Once you've done this, go back to YouTube, copy the 'Stream Key', and then paste this into the 'Key' box on OBS.
For the 'Video Bitrate', make sure you select at least 6,000 Kbps, but I like to do 9,000 Kbps.
The easiest way to know if you can actually use the 9,000 bitrate without any issues, go to Speedtest.net to test your internet download and upload speed. If your upload speed is more than 20 Mbps, then you can 100% use the 9,000 bitrate. However, since you have a vertical and horizontal stream going on at the same time, this is going to double the bandwidth. So, you may want to use 6,000 anyway both here and on Twitch (if that's where you'll be sending your stream).
Under 'Advanced' settings, I like to just select 'Use main OBS settings'. Then, once you press okay, your vertical stream is ready to be used for YouTube Shorts.
As for your horizontal stream, you'll want to go to where it says 'Settings' in the bottom-right-hand corner of the screen. Next, you'll select 'Stream' and this is where you'll select where you want your horizontal stream to be sent to. If you want to connect to Twitch, you simply need to connect your account or use your stream key. If you want to send your stream to YouTube, Kick, or wherever else, you can do that too.
The great thing about doing all of this is that once you have your horizontal and vertical stream set up, you just need to select 'Start Streaming' on the bottom-right-hand side, and then select the streaming button under your vertical stream for them to both go live.
If you want to learn how to set up the rest of your overlays, set up alerts, and finish using everything from the Stream Designz package to make your stream look professional, click here and watch this video that will easily explain to you how to do this!
![How to Add Overlays in OBS Studio (Complete Streaming Setup Guide) [2026]](http://www.streamdesignz.com/cdn/shop/articles/Thumbnail_1_917415b4-0055-48d9-9f13-46b188205824.png?v=1782571692&width=1920)


How to Setup YouTube Alerts in OBS Studio
How to Stream to YouTube Shorts Using Streamlabs