If you're tired of having boring PS5 streams, without any kinds of overlays because you don't have a capture card or an expensive computer- you don't have to worry about that anymore. This tutorial will explain to you how to add overlays to your PS5 stream without needing any of that stuff.
To do this, you'll want to have a computer and your PS5. The computer will be used in the beginning for the initial setup. After you set this up for the first time on your computer, you can use your phone and every time you go live it will bring up your overlays for that platform.
Step 1: Creating a LightStream Account
First things first, you're going to want to have your computer opened and go to GolightstreamStudio.com

Once you're here, you can see that this is the tool that we are going to be using to add our overlays. This website is not free, however, you do not need to go ahead and get the $16/month plan for 1080p and 30FPS unless you want to. The $8/month plan gives you 720p at 30FPS which will be fine especially for now as most people are going to be watching you on mobile.

Step 2: Setting up LightStream
Once you select your plan, you'll also see that this gives you the option to use their app on your phone as a remote control for your streams.


Step 3: Adding Your First Overlay to LightStream
Next, on the left-hand side, go to 'My Project' and be sure to select 'New Gamer Project'.

On here, there is an option that says 'Auto Live My Project'- what this means is that every time you press 'go live' directly on your PS5, it will automatically start to push your stream live to Twitch with all of your overlays and everything that you need. I'm going to go ahead and leave this switched on because it will be beneficial to not have to turn everything on manually each time you go live.
Now we can begin the actual process. The first thing that we're going to do where it says 'Layers' is select our 'Game Source'.

Everything that is coming from our PS5 is going to show up directly as a game source directly inside of LightStream.
This is going to be our 'Scene 1' which will mostly be our gameplay scene, and we need to get this set up. To start, let's rename this scene to 'Gameplay'.
What you'll want to do next is buy some overlays. It wouldn't be worth it to just have your gameplay be here; you need to add other elements to utilize in your stream and on LightStream.
I'm going to be utilizing overlays from Streamdesignz.com. There are tons of animated overlays to choose from that will give a professional edge to your streams that other overlays are lacking. They're really easy to use and set up as well. For today's example, I'll be utilizing the 'Matrix' design.


The full package includes so many animated overlays (webcam overlays, alerts, panels, etc…) that you can use for all elements of your stream. It adds versatility and professionalism to your stream that will for sure keep viewers interested and coming back. You can get your overlays from anywhere that you want, or you can make them yourself, but for this tutorial, these are the ones I'll be using.
If you did go ahead and download the overlays from Stream Designz, they'll download as a .zip file. To unzip a file on a Mac, all you have to do is double-click the file. If you're on a Windows computer, you'll just have to right-click the file and press 'Extract'. After unzipping them, they will appear as a folder on your computer and we're ready to access our overlays.
Once this is done, head back into LightStream and click the plus button (+) to the right of 'Layers'. To add an animated overlay, you'll need to select 'Video Clip' and select 'Upload a Video' to find the file for the overlay that you're adding.

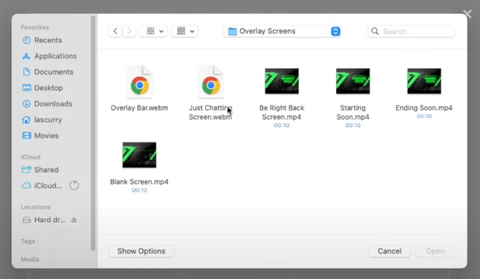
In your files, head to the desktop tab, find the folder with your animated stream package and go into the 'Overlay Scenes' folder. The first overlay that I'm going to look for is 'Starting Soon'. Once you've found this, hit 'Open' and once it uploads, you'll have your first overlay added. Now that we have our first overlay added, if we were to go live right now, it would be there. You can already see that it's going to look more professional than if you only had your gameplay by itself.

Step 4: Adding Additional Scenes
To add the second one, you're going to create a new scene and title it 'Countdown Timer'.
Note: If you bought the Stream Designz overlay package, the countdown timer is not included. It is a separate purchase, but you can purchase one with the same theme as your overlay package.

Again, you'll hit the plus icon under 'Layers', select 'Video Clip', and select 'Upload Video'. Now you'll go into your files, find your overlay package, and find the 'Countdown Timer' overlay. Once you've found the file, press 'Upload' and now you've added your countdown timer!
Now that you have two, all of the rest will follow these same steps.
For your third one, let's add the 'BRB' overlay. Start by creating a new scene and naming it 'BRB'. Head back over to the left-hand side and press the plus sign icon next to 'Layers'. Be sure to select 'Video Clip', and then press 'Upload Video'. This will bring you to your files where you'll need to locate your overlay package again and find the 'BRB' overlay. Once it uploads, this one is good to go.

For the fourth scene, you'll want to add in the 'Ending' scene. Create your new scene and name it 'Ending'. Press the plus icon by 'Layers', select 'Video Clip', and then select 'Upload Video'. Go through your files and once again find the folder with your overlay package. Look for the 'Ending' file and then select 'Upload'.

This is going to be the scene that you want to use at the end of your stream to let your viewers know that you are getting ready to end your stream. This is a great way to sign off and let your viewers know what your streaming schedule is.
Step 5: Adjusting Your Gameplay Scene
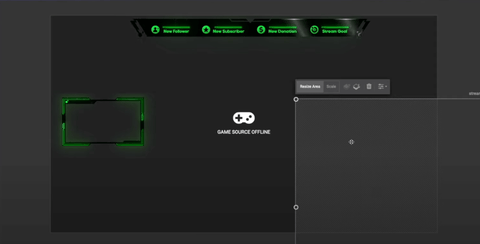
Now we're going to create our gameplay scene to make sure that this all works. We will create a new scene, name it 'Gameplay', and press the plus icon. This time, instead of clicking 'Upload Video', select 'Game Source'. This is going to be where our game is playing.
From here, we're going to add our 'Overlay Bar' which will have notifications for things like new followers, new subscribers, etc.. To do this, we'll follow the same steps as the previous overlays. Press the plus sign icon, select 'Video Clip', and then 'Upload Video'. Hit 'Browse' and where it says 'Overlay Screens' you should see 'Overlay Bar'.
Select 'Upload' and then you'll have your professional-looking, resizable overlay bar.

Later on, I'll explain how to add labels. This way, when someone subscribes or does something, it will show up in the overlay bar.

With this now, press the plus sign icon again and choose 'Video Clip' so that you can use the animated webcam overlay. Press 'Browse' and go again to your overlay files. If you have the Stream Designz package, you'll have three options for webcam overlays- I'll be using 'Webcam With Borders'. After choosing one of the options, press 'Upload'.
For now, I'm going to put mine in the middle left. However, where you put your webcam can change with each different game that you play and where the camera would look best.

You also only need to do this if you are going to be using the camera on your PS5. If you're using your computer camera, then this step isn't necessary.
With the webcam overlay in place, we can delete the reference image from the 'Layers'.
Once all of this is done, you're going to want to rearrange your scenes a bit so that 'Gameplay' comes right after 'Countdown Timer'.
Step 6: Adding Alerts
By adding alerts to your stream, it will display when someone follows you on Twitch or other similar things that will keep your audience engaged and connected with the stream.
To add these, we're going to jump over to Streamelements.com. Once you're there, it will ask you to log in to your Twitch and authorize access for the site to access your Twitch. Now, you're going to want to go to the left-hand side to 'Streaming Tools' and then down to 'Overlay'.

Select 'New Overlay' and just leave this at 1080p. Press 'Start' and then 'Add Widget'. From here you'll select 'Alerts', then 'Alert Box', and you should see the different alert options here. It will give you a follower alert, tip alert, subscriber alert, host alert, raid alert, purchase alert, charity campaign donation alert, and cheer alert.
I'll explain how to do one and then all of the others are done in the exact same way. Let's start with the 'Follower Alert'. It will give you a basic alert so that you can see what it's going to look like.

However, in the overlay package from Stream Designz, there are replacement alert overlays. To change the default alert, start by clicking the settings button next to 'Follower Alert', and then select 'Change Video'. Now, you'll select 'Upload', then 'Select File', and go back to the overlays package that you have downloaded. Once you find the right folder, select the one that says 'Follower Alert' and then press 'Open'.


You can of course tweak this a bit more to get it adjusted to your liking. Once you're done adjusting these settings, be sure to press 'Save' in the upper-right-hand corner. Let's name this 'Alerts for PS5 stream'. To change all of the other alerts, you'll just follow these exact same steps for each of the ones that you want to use. Now, press the paper clip icon in that same corner to copy it so that we can bring it over to LightStream.
Once you're back on LightStream, make sure that you're on the 'Gameplay' scene. Press the plus sign icon next to 'Layers', and then select '3rd Party Integrations'. On the left-hand side, select 'Browser Source' or 'StreamElements'. I'll just be using 'StreamElements'. After you select this, you can go ahead and paste the link that we just copied from that website.
Now, go back over to StreamElements and press 'Emulate' a few times and quickly switch back over to LightStream so that you can see the alert.

As it first appears, it's definitely a little bit small, but you can adjust this to make it bigger. So now, whenever anyone follows you, subscribes, or donates, the alerts will pop up. All of the alerts, and most everything in this tutorial, are things that you only need to set up once and then they are good to go for as long as you want to use them.
Step 7: Adding in Your Chat
There are two options for how to see your chat. You can use the chat that is found on the right-hand side- using this version, you can respond and manage your chat.

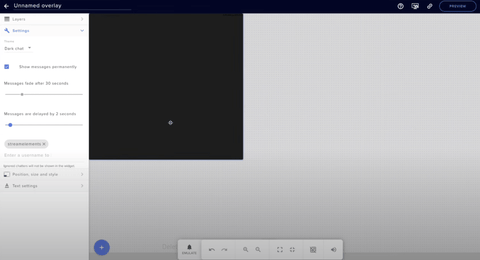
Under the settings, you can change the theme to 'Transparent' and this will get rid of the background. For now, I'm going to leave it as 'White' so that I can see the background as I'm adjusting it. Now, I'll hit save, name it 'PS5 Chat', and then select the paper clip icon to copy it.
Head back to LightStream, select the plus sign icon, and then press '3rd Party Integration'. You'll click on 'Browser Source' and then paste in the link that you copied. Click 'Enter' and now you can see that your chat has been created. I'm going to place mine in the corner.

Now that this has been placed, go back over to StreamElements again and change the 'Theme' to 'Custom'. Choosing this will make your chat transparent. Once you've done this and you hit 'Save', it will automatically update on LightStream.
Step 8: Adding Labels
Very similar to how we set up 'Alerts', we need to set up labels for times like when people follow us. To do this, head on over to StreamElements again.
Following very similar steps as before, you'll press 'New Overlay', then 'Add Widget'. Under this, you'll need to go to 'Labels', and then find the 'Followers Label'. I'm going to go ahead and change mine to 'Name Only', but you can have yours say 'Latest Follower' or anything else if you would like.

If this is all you want, go ahead and click 'Save'. Let's name this 'Label PS5', press 'Save' again, and then click the paper clip icon to save the link to the label.
Once you're back in LightStream, hit the plus sign icon again. Then, select '3rd Party Integration', press 'Browser Source', and paste the link. Now, you'll be able to see the label appear on the screen.

Now, each time someone follows you, this will automatically update. There are a few more steps that we need to do on the PS5 to make sure that all of the labels, alerts, and other pieces are working, but there's one more scene that we need to create before we get there.
Step 9: Setting Up the 'Just Chatting' Scene
Let's say you want to keep all of your overlays and chats without having to create all of them over again. If you go down to your scenes, there is an option to duplicate them.


This is everything that I've left for now. Of course, the alerts would still pop up as they come in.
Now, we'll press the plus sign icon and then select 'Video Clip'. From here, we'll add the 'Just Chatting' scene from our overlay package in the 'Overlay Scenes' file. This is a great scene to use to be able to engage with your viewers and you can definitely start to see now how this stream is looking a lot more professional.

Next, we're going to add our gameplay to this. Usually, you'll put your gameplay into either the center box or you can put it in the top corner. If you're using a webcam directly on your PS5, you will not have much flexibility when it comes to your camera, so I would put your gameplay in the center. If you're using a camera on your computer then I would consider putting that in the middle and having the gameplay on the side.
You'll already have your chat loaded into this scene and it will go in the bottom right-hand corner. Use the sidebar to unlock the chat and then head back over to StreamElements to turn the chat to white again. To do this, you'll go to 'Settings', and then to 'theme' and you'll select 'White Chat'. After you press 'Save', head back to LightStream.
To position the chat box, start by dragging the chat layer to the top of the row of layers for it to sit on top of the overlay instead of behind it. Once you've done this, you can adjust the chat to fit within the 'Live Chat' box on the overlay. When you get this to be where you want, go back to StreamElements and change the color back to 'Custom' so that the translucent background comes back. Press 'Save' and go back to LightStream.
Next, at the top of the screen, you can see the label that you created. On the bottom of the overlay is a spot that has a person with a plus sign next to it for new followers and a dollar sign for any donations that you may get.

The label that we set up is for new followers, so we're going to move this down into the right spot.
To create the label for donations, go back over to StreamElements and press 'New Overlay'. From there, select 'Add Widget', then go to 'Labels' and find where it says 'Bits'. Under 'Bits', you're going to want to select 'Latest' and then 'Latest Cheer'. Now, you'll have this appear, so you need to hit 'Save' and copy the link using the paper clip icon.
Just like before, you'll go back over to LightStream, select the plus sign icon, and press '3rd Party Integration'. From there, select 'Browser Source', paste the link, and save this. Now you can move this new label for donations into its correct spot.
Now it's time to head over to your PlayStation.
Step 10: Ensuring Everything Works on Your PS5
Once you're on your PS5, you're going to want to start by going to 'Settings' and then by going to 'Network'. Once you're here, go to 'Settings' and press 'Set Up Internet Connection'.

Now, hover over your internet and this will give you the option to select 'Advanced Settings'. Scroll down to where you see 'DNS Settings' and change this to 'Manual'.
To get the information that we need for the 'Primary DNS', head to this site. This will automatically tell you the best thing to put in this field based on your location.

After you've input this, select 'OK', and it will say 'Connecting to the Access Point'. This is essentially what tells your PS5 that every time you go live to Twitch, it needs to also connect to LightStream to bring those overlays in.
Once this is done, you'll want to actually check that this is working when you live stream to Twitch. Stay in settings, but go to 'Users and Accounts' and then select 'Linked Services'. Here, you'll want to make sure that next to Twitch it says 'Linked'.

To finish checking that everything is working, you'll need to go back to your dashboard and load a game. Once the game loads, we're going to run a test to make sure that this is going to work and allow you to live stream to Twitch. I'm going to go ahead and have my live stream open as the game is loading so that I can start the stream. To start the stream, press 'Broadcast'.


If you go back to Twitch, you'll be able to see the same screen that we see on LightStream. On LightStream, if you switch between your scenes- for example, if you switch to the countdown timer, when you go back to Twitch, the scenes will have changed as well.
Thanks to the remote feature included in your LightStream subscription, you can control all of your scenes from your phone rather than having to switch tabs back and forth on your computer. To get this set up, you'll need to go to here and log in to your Twitch account. After you get logged in, it will give you all of the options to switch between scenes and it will automatically change the scenes on your Twitch stream.
You can already tell that this has made your stream look much more professional and put together just by adding these overlays. These will keep your viewers more interested and engaged with your content while keeping them coming back to your future live streams.
If you want to learn how to stream to Kick and Twitch simultaneously from your PS5 with overlays and without a graphics card or fancy computer, check out this video!
If you would like to follow along with a video tutorial of this article, click here!
![How to Add Overlays in OBS Studio (Complete Streaming Setup Guide) [2026]](http://www.streamdesignz.com/cdn/shop/articles/Thumbnail_1_917415b4-0055-48d9-9f13-46b188205824.png?v=1782571692&width=1920)


How to Edit Gaming Videos Using CapCut
How to Stream to Xbox on Discord