Disclosure: Some of the links below are affiliate links. This means that, at zero cost to you, I will earn an affiliate commission if you click through the link and finalize a purchase. Learn more!
If you're debating whether or not to get the Shure MV7 or the MV7+ microphone, the answer is pretty simple. For the extra $30, I would definitely recommend getting the MV7+, but I'll explain why so that you can decide what the best option is for you.
You can find the link to these below so that you can check them all out!
Shure MV7+ in Black: https://geni.us/U8av (amazon)
Shure MV7+ in White: https://geni.us/Y3vBC (amazon)
Shure MV7: https://geni.us/A5NP9 (amazon)
External Differences
Let's start by comparing some of the external differences between the two microphones and why I would recommend the MV7+.
The first thing that you'll notice is the interface at the top.

On the left is the MV7+ and on the right is the MV7.
As you can see, the MV7 will have a headphone and monitoring button, a place for you to be able to adjust the volume, and then the mute/unmute button. On the MV7+, you have a single line that's going to be the RBG which we'll get into shortly. You'll also be able to tap to mute/unmute which is really easy and simple.
You'll also notice that the pop filter on the MV7+ is a lot longer than on the MV7. A lot of people who purchase the MV7 end up swapping out the pop filter for the one that's already on the SM7D. This is going to automatically provide you more protection against plosives. Once we start looking at the software, you'll see that there is also technology built into this that is designed to prevent that.
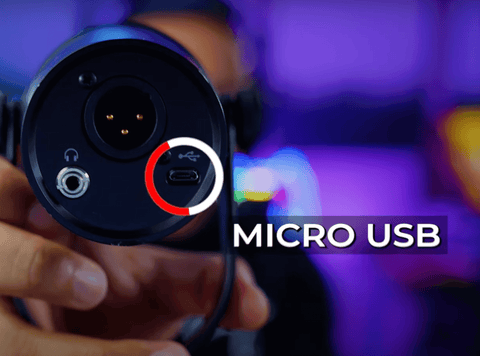
The other noticeable difference is on the back. The MV7 has a Micro USB connection.
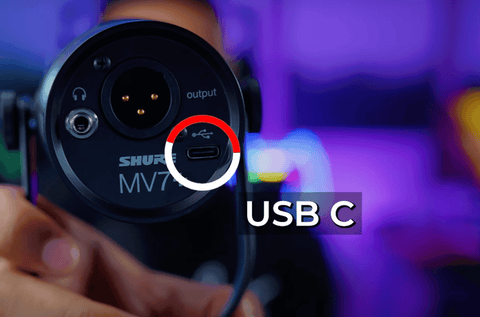
The MV7+ has a USB-C connection which will make it super easy to use.
A lot of people were having issues with the MV7 Micro USB connector as it would snap or break pretty frequently and people were constantly having to get the cable replaced.
These are the big external differences.
Differences in the Software
Now, let's get into what you get inside of the software and how you're able to customize the MV7+.
The first thing that you're going to do is get it connected. Once you do this, you'll notice that the RBG bar will begin to light up. Right now, I have it set to where when I tap on it, the color will pulse, but we'll get to how to change all of these settings shortly.
You can also now tap it to mute/unmute the microphone and you'll see that the color will change as well.
Let's get into the software now so you can learn how to get the best sound possible using this microphone.
The software that this uses is the Motiv Mix app. When you open this, it's going to right off the bat give you some 'Best Practices' on how to utilize the actual mic. We'll just go ahead and press 'Don't show me this again' and then hit 'Next' until it goes away. I'm going to be showing you what all you'll be able to do with this software.
On the left-hand side, you'll see all of your sources.
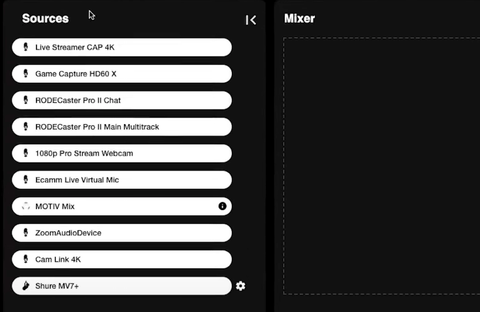
We'll specifically be focusing on the 'Shure MV7+' source, so we'll drag and drop this from 'Sources' into the 'Mixer'. This is how you're going to be able to start customizing and utilizing this.
Keep in mind that you'll only have access to the Motiv Mix app when your microphone is actually connected to the USB-C port. When you're connected to the XLR port, you're going to continue to use your audio mixer to customize any of the settings that you need.
Next, click on the gear icon under 'Input 1'.
This will bring us to the section where we can see a lot of the features that we're going to be able to utilize.
The first thing we're going to have the ability to use is the auto 'Gain' level. This means that whenever you back up, get closer to the mic, start talking lower, or start talking a higher, the software will automatically adjust your gain level to keep your voice sounding as natural as possible without a lot of peaks or lows.
Then, you're able to select whether you want to monitor the output as well so if you want to be able to hear how you sound, you can always choose to monitor that.
Next, you can change the 'Tone'. There are three different tone options: 'Dark', 'Natural', and 'Bright'. These just allow you to adjust the way that you're going to sound. This way, you can utilize your microphone with Zoom, Google, or any other platform that allows you to bring in your microphone and you'll have that nice, crisp sound.
You'll also have the option to adjust your reverb, so you can choose between 'Studio', 'Play', and 'Hall'. Then, you can adjust the intensity based on your own preferences and decide what you're looking for.
Again, you'll have all of these different customizations to be able to choose from.
One of the really great features that I was talking about earlier is the 'Real-time Denoiser'. This is simply going to remove all of the background noise that you have behind or around you and allow you to capture a really clean sound.
I also mentioned earlier how the MV7+ already has a pop filter that's a little bit longer than the MV7, but also inside of this software here, you'll be able to activate the 'Popper Stopper'. This will help, again, to remove any plosives and will give you a more clean sound.
You can definitely already start to see that the benefits of spending the extra $30 are going to be worthwhile.
Another thing that this software offers is the 'High Pass Filter'.
Then, under 'LEDs' is where you'll be able to Customize the lighting on the MV7+.
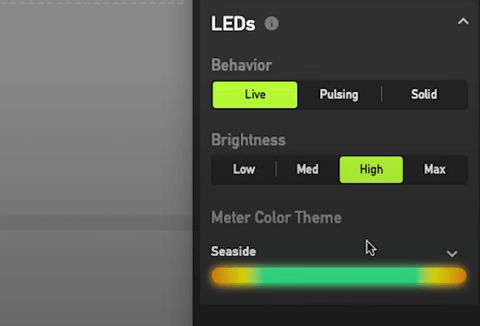
You'll have the option to set this to 'Live', 'Pulsing', and 'Solid'.
If you choose 'Solid', then you'll choose your color and it will stay as a solid color, unchanging.
If you choose 'Pulsing', then it will remain the color that you choose, but it will adjust the brightness and will change as you talk or tap on the mic.
If you choose 'Live', it's going to continually monitor your voice to be able to capture the audio there.
Next, you have the option to change the brightness. This is all going to come down to personal preference.
You'll also be able to change the color to your liking. You can choose a solid color or you can go ahead and do a custom color. There are also options that will be already provided if you want to choose from any of those. You can always change this option and then look at your mic and see if you like it or not.
There are going to be a lot of options here for you to customize.
Again, you are going to be able to utilize the Motiv app with the MV7, but it really all comes down to your own preference and what you want your microphone to look like. If you want the RGB look with the wider pop filter, then the MV7+ is definitely for you. It's somewhere around $9-$15 to get a longer pop filter for the MV7.
This is, again, all personal preference, but for me, the big winner is going to be the MV7+. I do believe that it is worth the upgrade if these are the mics that you are looking for.
If you're not interested in either one of these, but you're looking more at the Shure SM7dB, then check out this video here where I break down this mic, go over the benefits of it, and show you how to get it set up.

![How to Add Overlays in OBS Studio (Complete Streaming Setup Guide) [2026]](http://www.streamdesignz.com/cdn/shop/articles/Thumbnail_1_917415b4-0055-48d9-9f13-46b188205824.png?v=1782571692&width=1920)

How To Edit Your Twitch Streams Into TikToks YouTube Shorts & Reels
How to Stream in 1440p 60fps to YouTube with OBS [No LAG]