In this tutorial, I'll be explaining to you how you can stream in 1440p at 60 fps to YouTube without any lag utilizing OBS Studio. I'll also be sharing the best settings so that your stream looks smooth.
Getting Started
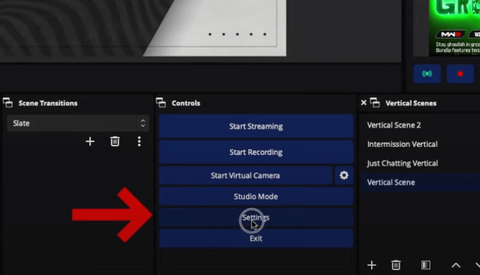
The first thing you're going to do is get OBS Studio opened. Once you've done this, go to the bottom-right and select 'Settings'.
Then, on the left-hand side, go to where it says 'Stream'. Here, you'll want to make sure that for the 'Service' you have 'YouTube RTMP' selected.
Creating Your Stream Key
Now, in order to be able to stream in 1440p, you'll need to use your 'Stream Key'. To add this, select 'Use Stream Key (advance)' and to get your stream key, you'll have to go over to YouTube.
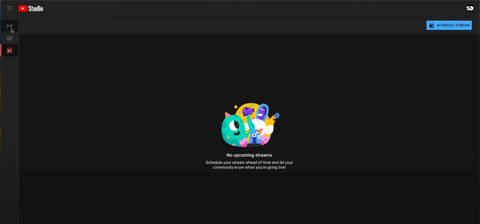
Once you're on YouTube, click on the camera icon in the top-right corner and then select 'Go Live'. You'll be brought to a dashboard just like the one below.
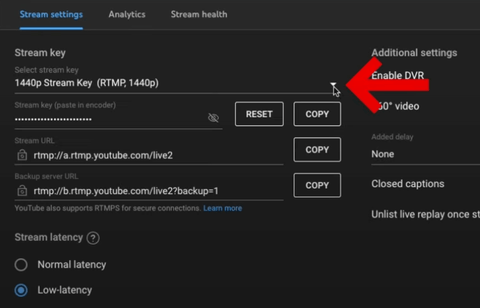
On the left-hand side, you'll select 'Stream' and this will bring you to the control room. What you'll want to do is select the drop-down menu under 'Select Stream Key' and press 'Create New Stream Key'.
Let's name this "New 1440p Key", then scroll down to where it says 'Turn on Manual Settings' and check the box. For the resolution, you'll choose '1440p (6 Mbps - 13 Mbps) and check the box for 'Turn on 60 fps Option'.
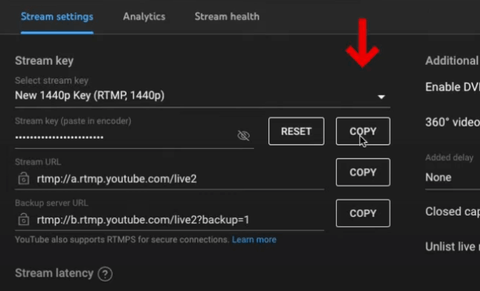
Now you can select 'Create' and once you've done that, you'll select 'Copy' next to your 'Stream Key' and come back to OBS.
Once you're back on OBS, you'll just paste it right in. You'll also want to check the box that says 'Ignore Streaming Service Setting Recommendations'. Press 'Apply', then select 'Ok', and now we can really begin the actual process.
Adjusting Your Output Settings
The first thing you'll want to do for this portion is to go back into settings. Then, you'll come to where it says 'Output' and then go to where it says 'Streaming'. This is where you're going to select your video encoder.
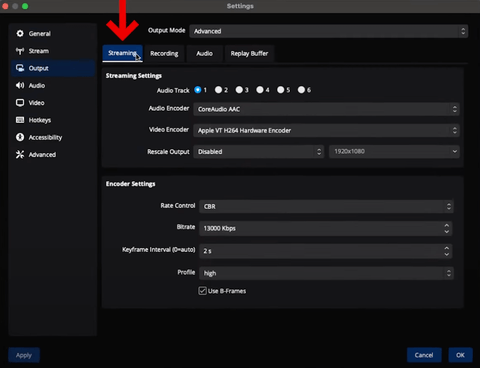
If you're using a Mac, you'll use 'Apple VT H264 Hardware Encoder' and if you're using a Windows, you'll select 'NVIDIA NVENC H.264' or 'NVIDIA NVENC H.265'. You'll just want to make sure you utilize your graphics card.
Next, we're going to come down to where it says 'Rate Control' and you'll select 'CBR'.
For the 'Bitrate', you'll want to make sure that this is at about '13,000 Kbps'. To know if you can support this bitrate, you'll need an upload speed of at least 30. You can check this for free by using Speedtest.net.
All you need to do is press 'Go' and it will give you both your download and upload speed.
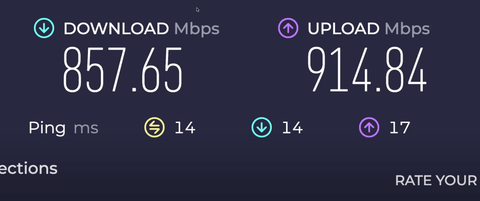
Again, you'll need your upload speed to be above 30 to support a bitrate of 13,000 Kbps. If you have that, then you'll be fine to proceed with this bitrate.
For the 'Keyframe Intervals', you'll keep this at '2 s'.
For the 'Profile', you'll want this set to 'High'.
You'll also want to have the 'Use B-Frames' box checked.
If you're on a Windows, your settings are going to be a little bit different.
You'll still have your rate control set to CBR, your bitrate set to 13,000 Kbps, and your keyframe intervals set to 2 s.
However, your 'Preset' will be set to 'P6: Slower (Better Quality)'.
For 'Tuning', you'll set this to 'High Quality'.
Your 'Multipass Mode' will be set to 'Two Passes (Quarter Resolution)'.
Your 'Profile' will be set to 'High' and you'll also want to check 'Psycho Visual Tuning'. I would remove 'Look-Ahead' especially if you don't have the GPU to support it.
Then, you'll leave the 'GPU' set to '0' and you'll set your 'Max B-Frames' to '2'.
Now, you can press 'Apply' and then go to where it says 'Video'.
Adjusting Your Video Settings
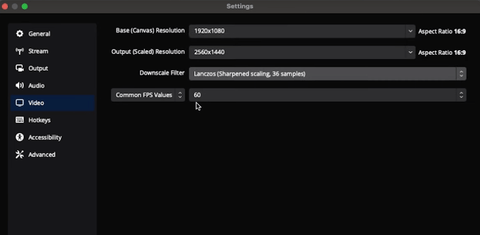
This is going to be super important here. For the 'Base Resolution', if you have a 1080p monitor, this will be set to '1920x1080'. If you have a 1440p monitor, then you would reflect that here and the same goes for a 4k monitor. I'm going to keep this set to '1920x1080 p' just because that's what I want my canvas to be inside of OBS.
This is also very important. For the 'Output (Resolution) Scale, if you want to be able to stream in 1440p to YouTube, you'll need to set the output scale to '2560x1440'. If these base and output resolution numbers do not match, you'll want to be sure to select '36 Samples' for your 'Downscale Filter'.
Then, for your 'Common FPS Value', you'll want this to be set to '60'.
Now, you can select 'Apply' and then press 'Okay'.
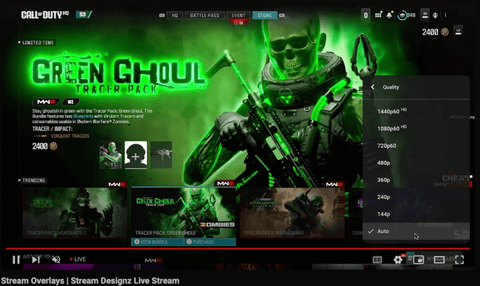
If you go to your gameplay and select 'Start Streaming', you can go over to YouTube and see that you're live and have 'Excellent Connection'. Then, to view your stream, you'll copy the URL and open it in a new tab.
Here you'll be able to see that the quality will be extremely smooth and at 1440p. The quality will look the same as it would on an actual console.
Next, if you want to learn how to set up all of your overlays inside of OBS Studio, check out this video here. In this, I will walk you step-by-step through how to do this.
![How to Add Overlays in OBS Studio (Complete Streaming Setup Guide) [2026]](http://www.streamdesignz.com/cdn/shop/articles/Thumbnail_1_917415b4-0055-48d9-9f13-46b188205824.png?v=1782571692&width=1920)


Should You Buy Shure MV7+ or MV7? (Don't Waste Money)
Stop Downloading Your Stream From Twitch if You Use OBS