-
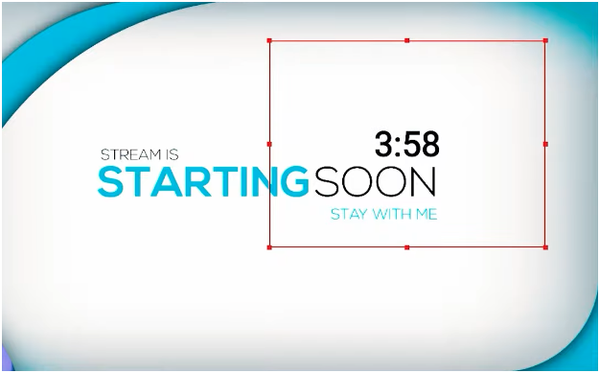
Starting Soon Screen
- Countdown Timer
- Alerts
- Break Overlays
- Chat Overlays
- Game Overlays
- Main Gameplay Scene
Download the free template files for this tutorial at https://lascurry.com/streampackageartic using the coupon code FREESTEAMOVERLAY.
Creating a Starting Soon screen
First, create the Starting Soon screen. This screen will be showing before your twitch stream begins and features a countdown timer for your audience. This countdown timer is a free tool I created for you, which can be found at www.lascurry.com/countdowntimertool.
-
In OBS Studio, click the
 icon under the Sources tab to add a new source.
- Select Image from the dropdown menu. The Create/Select Source popup window appears.
- Select Create New and name your image Start. Click OK.
- Select the Starting Soon file from the file browser. Click Open, then click OK.
- The new Starting source is now in the Sources tab. Select the source, then right click and select Transform, then Fit to Screen.
- Click the lock icon
 to prevent further changes.
Add A Countdown Timer
Go to www.lascurry.com/countdowntimertool
After customizing your timer settings, click Get my Timer. Your new timer opens in a new tab.

Click the URL in the new browser tab and copy the full URL.
In OBS Studio, add a new source in the Sources tab. Select Browser.
Rename the new source Countdown. The Countdown Properties window appears.
Paste the countdown timer URL in the URL field. Click OK. The timer appears on screen.
Drag the timer to the desired position on screen and lock it by clicking the lock icon next to Countdown in the Sources tab.
Adding Alerts
Next, we’ll set up alerts that allow your audience to know when your stream is starting, when the countdown ends, subscriber alerts, and more. Set up each of these alerts individually following these steps.
Log into Stream Elements using your Twitch account.
Go to My Overlays in the side menu. Click Create New Overlay. A new tab opens.
In the new tab, leave the resolution at 1080p and click Start.
Click the blue plus icon in the bottom left.

Select Alerts, then AlertBox. A panel appears on the left with the new layer.
Doubleclick the AlertBox 1 layer to open the layer settings. Rename the layer, then click the arrow to adjust the alert settings.

Click the gear icon next to the first alert you wish to set. Click Set Image.

A pop-up window appears. Upload your image as a new file. Then click Submit on the upper left of the image thumbnail.
Next in the side panel, scroll to the Layout area and click Text Over Image. Scroll to Text Settings. Adjust the text to your liking.
Click the Advanced tab to adjust the text margins.

Top: 100 pt Right
Bottom: 150 Left
Click Emulate and select the event that corresponds to your new alert. The recent changes appear on screen.
Click Save and name your overlay. Save.
In the top ribbon, click the hyperlink icon to Copy Overlay URL.

In OBS, add a new Source using the +. Select Browser source. Click Create New and name the alert and click OK. The Image File pop-up window appears.
Paste the alert URL in the URL field in the pop-up window. Click OK.
Back in Stream Elements, click Emulate to emulate your alert. The alert appears in OBS Studio. Position the alert to your liking, then click Save.
Creating a Break Overlay
Adding a Chat Overlay
Click New Overlay. The Overlay Editor opens. Click Start.
Hit the blue + button, then click Stream Tools.

Doubleclick the new Your streams chat 1 layer in the side panel.
Click Position, size, and style.
Width: 500 px
Height: 700 px
Click Settings. Click Theme, then click Custom. Scroll down and choose a Background Color. For now, choose a bright color to help you see the chat overlay when you position it in the template frame in OBS.
Save. Name the overlay Chat in the pop-up window and click Save.
Copy the hyperlink by clicking the hyperlink icon in the upper right of the toolbar.
Return to OBS and add a new Source. Select Browser. Name the source Chat and click Save. The Chat Properties window appears.
Enter the copied URL in the URL field. Click Save. The chat overlay appears.
Resize the chat overlay to fit the black rectangles of the overlay template, then Save.
Once positioned, return to Stream Elements to change the theme to Dark or a new color.
Adding a Game Overlay
In OBS, add a new source and select Video Capture Device. The Create/Select Source window appears. Name this Game and click OK. The Properties for Game window opens.
Select your capture card in the Device drop down menu. Click OK.

Resize the Game overlay to fit the black rectangle on the template. Make sure the Game source is beneath the template in the Sources tab so it appears behind the frame. Align to your liking, then lock Game in the Sources tab.
Adding a Webcam Overlay
Add a Video Capture Device source from the Sources tab. Name itCamera and click OK. The properties window appears.
Select your webcam in the Device drop down menu. Click OK. Your webcam appears on screen.
Click the Camera in the Sources tab, then position the webcam to fit the template. Lock the camera and all other sources.
Creating the Main Gameplay Scene
In OBS, duplicate the Intermission scene and rename it Gameplay. Click OK.
Remove the unnecessary alerts from the Sources tab and unlock and hide the camera.
Click Game in the Scene tab. Right click and select Fit to Screen.
Add the Gameplay overlay by clicking + in the Sources tab, then selecting Image. Name the new source Webcam and click OK.
Select the Facecam overlay and click Save.
Right click the overlay and select Fit to Screen.
Next, adjust the Facecam overlay over the webcam. Lock the camera to help you position the webcam overlays.
Once correctly positioned, select both Webcam and Camera in Sources by holding the Ctrl key. Right click and select “Group Selected Items.” Now you can position both overlays as one.

Resize and position the grouped overlays, then lock the group in the Sources tab.
Test the placement of your alerts in the new overlays in Stream Elements. In the Stream Elements dashboard, click Alerts, then emulate the Follow Alerts several times in a row.
The multiple Follow Alerts appear in OBS. Position the alerts on screen and save.
Conclusion
You’ve learned to set up alerts, gameplay, and webcam in OBS Studio and Stream Elements. Now that the most important streaming elements are set up, you’re ready to engage with your audience.
OBS Studio is a powerful tool in making professional streams, so be sure to explore the software for yourself. Check out www.LASCurry.com for more information and tutorials!

Share:
How to Create a Twitch Banner and a Twitch Profile Picture using Adobe Express
How to Set Up Twitch Panels