Disclosure: Some of the links below are affiliate links. This means that, at zero cost to you, I will earn an affiliate commission if you click through the link and finalize a purchase. Learn more!
In this tutorial, I'll be explaining to you how to multistream on your PS5 to platforms like YouTube, Twitch, Kick, Facebook, or any other RTMP destination without needing a capture card or an expensive computer. The software that we'll be using to do this is Lightstream Studio.
While setting this up, you will need access to a computer, but after you have done this the first time, you can manage everything from your mobile device.
Choosing a plan
If you already have a Lightstream plan, the multistreaming feature will already be included in your plan at no additional cost. However, if you have never used Lightstream before, this software can be used to add overlays to your console, but also to be able to steam to multiple platforms. Doing this is a great step towards growing your channel.
You can see the different plan options in the photos below. The first is the monthly plan options, and the second is the annual plan options.

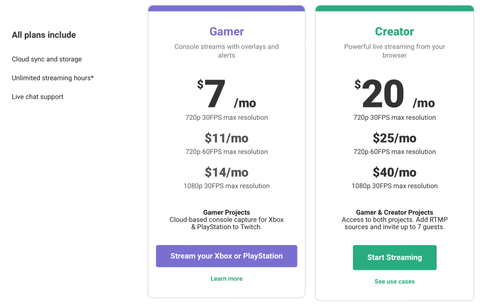
With these plans, you do get a 7-day free trial to ensure that you like the software and to give you time to try anything out. If you click here, you can get 35% off of any of their plans!
Setting up Lightstream
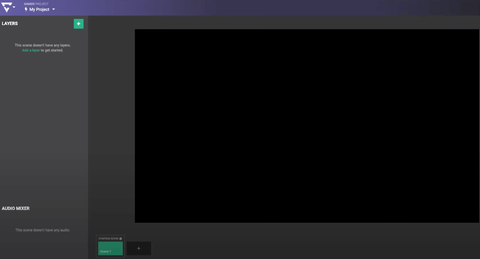
After choosing your plan, you'll be brought to a dashboard like this.
Now, we are able to get everything set up in Light stream, and then we can move over to the PlayStation as there are some things that we need to check to ensure that the two are communicating with each other.
In the top-left corner, you'll see where it says 'My Project'.
You'll want to click on this, give your project a name, and then select the resolution that matches the plan that you chose.
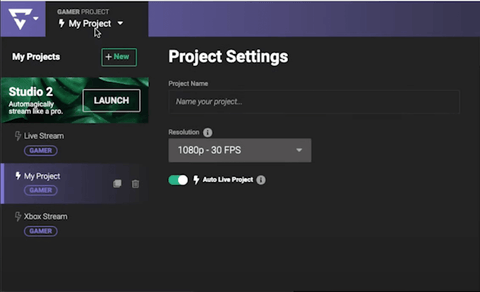
Next, you want to make sure that you have 'Auto Live Project' turned on. This is very important as it means that when you go live on your PlayStation or Twitch, it will go ahead and send everything over to your live stream. Then, the live stream will send itself over to YouTube, Kick, Facebook, or any other RTMP sources that you have selected.
I'm going to be utilizing a project that I have previously set up which includes my overlays, starting soon, countdown timer, gameplay, and just chatting scenes.

If you want to learn how to add overlays on your PS5 using Lightstream, click here! If you see any overlays that you like here, be sure to check Stream Designz! There are lots of different options for overlays, animated overlays, countdown timers, and more!
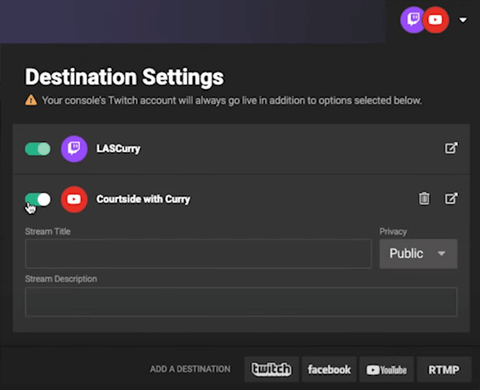
If you come to the top-right-hand corner, you'll find your 'Destination Settings'. You can see that I have YouTube and Kick selected.
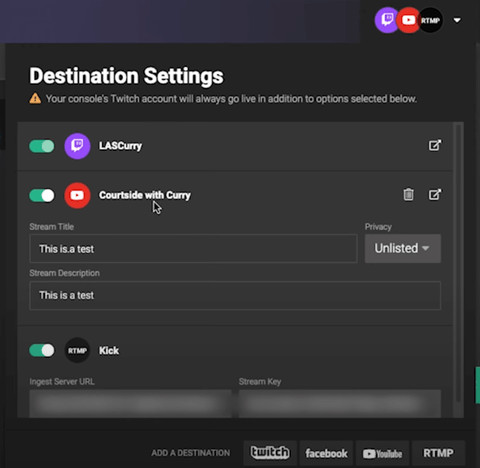
Twitch needs to be the primary platform that you stream to. You cannot stream from your PS5 to YouTube and have Lightstream send it to Twitch, Kick, or other similar platforms. You need to use Twitch as the primary as this is the only way that Lightstream is able to pull the stream and send it to the other destinations that you have selected.
You can select up to five different destinations to stream to when you use Lightstream Studio. Even with one of these having to be Twitch, you still have 4 other platforms that you can send your stream to.
Adding Platforms to Stream to
Let's start by adding YouTube.
Click on the YouTube logo, and when prompted, choose your account and get logged in.
If you have never live streamed to YouTube before, you'll need to go to YouTube.com, sign in with your account, and authorize live streaming. Then, this will take 24 hours before you can get access.
Once you get this connected, you'll have the option to turn it on or off, but we want it to be turned on so that when we start streaming, the stream goes live on YouTube.
You'll also have the option to add a 'Stream Title', which for the purposes of this I'm just going to title it "This is a test". I'll also make the description the same, but of course, when you're going live, you'll change this.
Another option here is to have the stream be public, private, or unlisted. Public means that anyone can see your live stream. Private means that only you can see your livestream. Lastly, unlisted means that only you and anyone who you share the link to the video with can your livestream. For now, I'm going to make mine unlisted while I'm running tests on it.
Now, let's add our Kick destination. To do this, select RTMP, and name this 'Kick'. You'll need to turn this on and once you do, it will ask you for the server URL and the stream key.
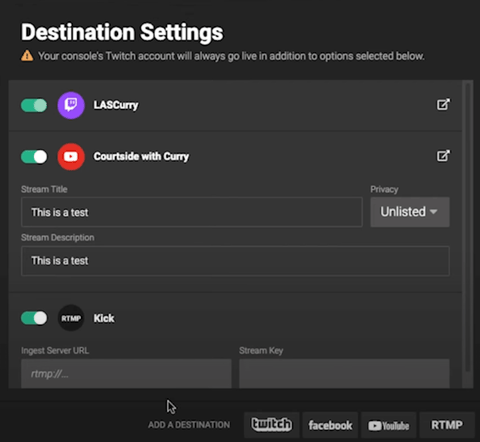
To get these things, you'll want to go to Kick and log in to your account. Then, go to 'Settings' and select 'Stream Key'.
All you need to do here is select copy and then head back over to Lightstream and paste both the URL and the stream key. Doing this is what will allow your Kick to go live every time you go live on your PlayStation through the Twitch platform.
Now, you can choose whatever other platforms that you want to send this stream to whether it be to different live streaming platforms, Facebook, or you could even send it to multiple YouTube channels. Just remember that you can send your stream to up to five different platforms, but one of them must be Twitch in order for this to work.
Adjusting your PlayStation Settings
Now that you have all of your different programs linked, it's time to make sure that everything is set up and working on your PlayStation.
Once you're on your PlayStation, head to settings, and select 'Network'. From here, select 'Settings' again and then select 'Set Up Internet Connection'. You're going to go ahead and select the wifi that you have connected and of course, if you have your wifi hardwired, this will give you the best result.
Now, select 'Option', go to 'Advanced Settings', and find where it says 'DNS Settings'.
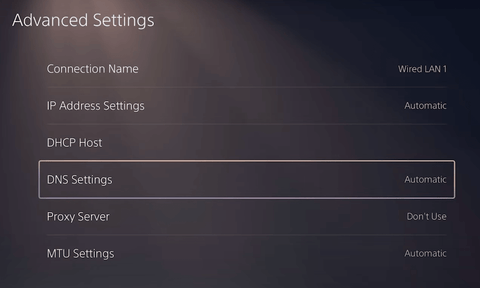
You're going to want to change this from 'Automatic' to 'Manual'. This will make you input your primary DNS. To find this, click here! This will give you the best option based on your location.
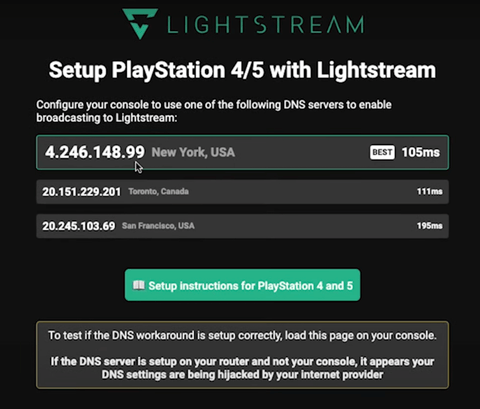
Now, you'll just need to copy this into your PlayStation. For the secondary DNS, we will just leave it set to zero. Press 'Okay', and then it will connect to your internet.
Next, you're going to exit settings and go to the game that you're going to be playing. It is important to note that you do have to load the game that you will be playing first before you are able to stream.
While the game is loading, you're going to want to hit the option on your controller to go ahead and start the broadcast. Once you get to 'Broadcast', you're going to select your Twitch account.
If you've never streamed to Twitch before, you're going to want to link your account by going to settings, coming to 'Users and Accounts, then to 'Linked Services', and finally, make sure that you have your Twitch linked.
After you've linked and selected your Twitch account, click on the three dots to the right, and select 'Broadcast Options'.

Here, you can go ahead and display your camera if you have one connected. You can display your chat, but I typically have this turned off as I don't want the chat on my screen and I can monitor it through my phone or on any of the streaming platforms that you're broadcasting to. Display activity is also just a personal preference setting. The most important aspect here is 'Video Quality'- you want to select the quality that matches the plan you chose when you signed up for Lightstream.
Once you have all of these settings in place, go back and enter your 'Broadcast Title' for Twitch, and then all you have to do is press 'Go Live'. This will send your stream over to Lightstream which will send it to all of the destinations that you added.
Sending your stream to multiple platforms is a great way to grow your stream, but if you want your stream to look professional by having overlays, click here!

![How to Add Overlays in OBS Studio (Complete Streaming Setup Guide) [2026]](http://www.streamdesignz.com/cdn/shop/articles/Thumbnail_1_917415b4-0055-48d9-9f13-46b188205824.png?v=1782571692&width=1920)

How to Multistream on Xbox to YouTube Twitch & Kick
How to Comply With Twitch TOS on Multistreaming (EXPLAINED)