Disclosure: Some of the links below are affiliate links. This means that, at zero cost to you, I will earn an affiliate commission if you click through the link and finalize a purchase. Learn more!
In this tutorial, I'll be explaining to you step-by-step how to set up 'Sub Badges' for YouTube. This way, when somebody becomes a channel member, an icon will appear by their name.
Getting Started
The first thing that you're going to do is get logged in to your YouTube account. It should be noted that to be able to do this, you must be a part of the YouTube Partner Program so that you can get access to channel membership.
Once you're a part of this, or once you get logged in if you are already in the YouTube Partner Program, these are the steps that you're going to follow.
Start by clicking on your profile icon and go to 'YouTube Studio'. Then, on the left-hand side, select 'Earn'.
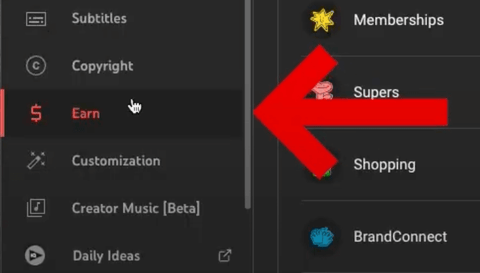
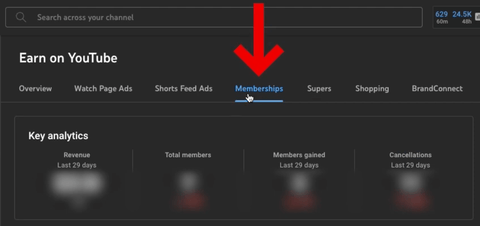
Once you're there, you'll select 'Memberships'.
Then, you'll go to where it says 'Customize Default Perks'.
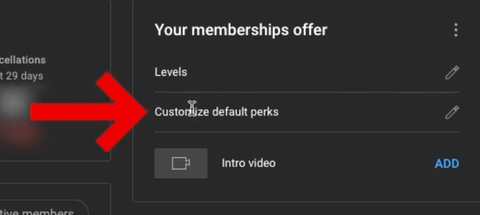
You'll be able to see that this is where you can upload your own sub badges. There's 'New Member', '1 Month', '2 Months', '6 Months', '12 Months', and '24 Months'.
To replace these images, you'll click on the pencil icon to the right of each month.
Once you click this icon, select 'Replace Image'. This is where you'll be able to upload your own custom sub badges.
For my sub badges today, I'll be utilizing a package from Stream Designz. They have lots of different sub badges to choose from and some of them even match their animated overlay packages to really make your stream look professional.
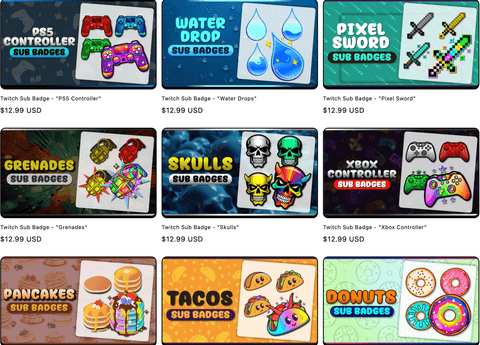
For this example, I'll be using the 'PS5 Controller' sub badges.
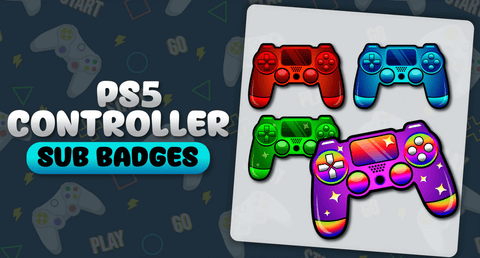
You can see below each of the badges that it comes with. It will include the one month, two months, three months, six months, nine months, and twelve months badges.

Once you've chosen your sub badges, you can head back over to YouTube.
Adding Your Custom Sub Badges
Now that you have your custom sub badges, you can start to add these to your YouTube.
Again, to do this, press the pencil icon next to 'New Member' and select 'Replace Image'.
If you purchased your sub badges from Stream Designz, they will come downloaded as a zip file and you will need to unzip these before you can use them. If you're on a Mac, simply double-click the zip file and this will create a new folder with the unzipped files. If you're on a Windows, right-click the zip file and select 'Extract'. This will also create a new folder with the unzipped files in it. Now, your sub badges are ready to be used.
Once you have these files ready, you're going to select folder '1' and then upload the '72x72' image.

Now, you'll have your 'New Member' sub badge all setup. You'll follow these same exact steps for the rest of them using the remaining folders.
For the 'After 1 Month' sub badge, you'll select the pencil icon, click 'Replace Image', and go to folder '2'. Then, you'll again select and upload the '72x72' image.

This same process can be followed for each individual month to get this completed.
Once you're done, you'll hit 'Save and Publish'.
Now what you're going to want to do is get your sub emotes set up as well. This way, while you're streaming, people are able to use your custom sub emotes. To learn how to set these up, watch this video here where I walk you step-by-step through setting up your sub emotes.

Share:
How to Add a Countdown Timer in Streamlabs
How to Setup Twitch Sub Badges