Ready to learn how to link your Kick and OBS Studio accounts to start having professional-looking streams? You're in the right place! This article will explain how to stream to Kick on your PC using OBS Studio step-by-step. To follow along with a video tutorial, click here!
Step One: Have OBS Ready to Go
First, you will want to have your OBS Studio open. If you do not already have OBS downloaded, download it here!
Step 2: Adjust your Video Settings.
Next, look toward the bottom right of the page and click 'Settings'.
This will bring up the Settings Menu. You'll need to go to 'Video' to ensure that your video settings are correct so that everything looks good while you're streaming on Kick.
You should have your 'Base Resolution' at 1920 x 1080, your 'Output Resolution' at 1920 x 1080, and your 'Common FPS Values' at 60.
Step 3: Adjust your Service Settings
Now that your video settings are correct, you will want to head over to 'Stream'.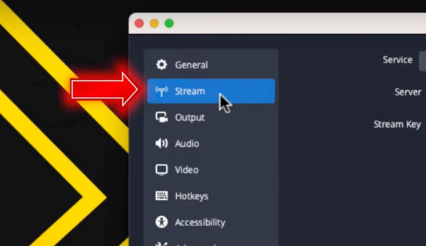
Under where it says 'Service', you'll need to change this to 'Custom'.
It will now ask you for your server and stream key. To get this information, you'll have to go over to Kick.
Step 4: Locate your Server on Kick
Once you're on Kick, click on your profile image and go to where it says 'Settings'. Then, click on where it says 'Stream Key'.
You should see your stream URL- copy this and head back to OBS Studio. Once you're back on OBS, you'll just paste this URL into where it says 'Server'.
Then, head back over to Kick so that you can copy and paste the 'Stream Key'. 
It's crucial not to share your stream key with anyone, as anyone who has this would be able to stream on your account.
Once you've copied that, head back to OBS Studio to paste your stream key.
All you have to do now is press 'Okay', and you're done with this step. At this point, your OBS account is directly connected to your Kick account.
Step 5: Adjusting your Output Settings
Head back into settings, but this time go to 'Output'. Adjusting these settings will ensure that you do not have a laggy or choppy stream.
You'll need to remain on the 'Streaming' page for now, but make sure that your 'Output Mode' is set to 'Advanced'.
The most important thing for us to focus on is your bit rate. This should be at a minimum of 6,000 Kbps. The sweet spot is 7,750 Kbps, but you can do 6,000 Kbps.
You might be wondering how you can know if you afford to use 6,000 Kbps without there being lag. Well, you just need to do a speed test which you can do here!
Once you've completed the speed test, you're going to be focusing on your upload speed. If the upload speed is 12 or higher, then you can utilize the 6,000 Kbps inside of OBS. 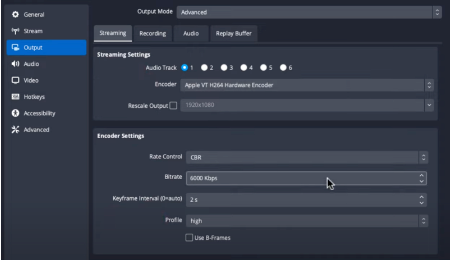
After you've checked this, you'll want to make sure that your 'Keyframe Intervals' are at 2, that your 'Profile' is set to 'High', and that your 'Encoder' is set to either your hardware encoder or to X264 to be able to get the best experience there.
This is what your Output Settings should look like.
Step 6: Testing your Stream
Now that all of your settings have been updated and your Kick has been linked to your OBS, you will want to test your stream.
Head back to the main screen and press 'Start Streaming'.
It will say 'Connecting,' and then this will change to say 'Stop Streaming'. Once this changes, you'll know that you're live.
Now, you'll want to return to Kick, go to your dashboard, and click 'Channel'. From here, you should be able to see that you're live.
With your Kick and OTS being linked and looking good, you certainly don't want a bland, boring stream. Your next step should be learning how to add overlays and other features to your stream on OBS. You can follow along with this video here to learn step-by-step how to get started as a beginner using OBS and to get your stream looking professional!
![How to Add Overlays in OBS Studio (Complete Streaming Setup Guide) [2026]](http://www.streamdesignz.com/cdn/shop/articles/Thumbnail_1_917415b4-0055-48d9-9f13-46b188205824.png?v=1782571692&width=1920)

How to add a Twitch Chat Overlay to Your Stream on OBS Studio
How to Set Up Panels on Kick