In this tutorial, I'll be explaining to you how to stream vertically to YouTube Shorts utilizing OBS Studio.
Adjusting your OBS Studio Settings
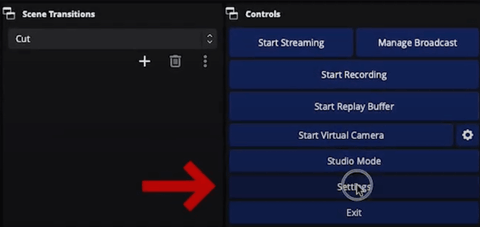
Once you have OBS open, head over to the bottom-right-hand side and click on 'Settings'.
From here, you'll select 'Stream', and for 'Service', you want to make sure that you have 'YouTube - RTMP5' selected.
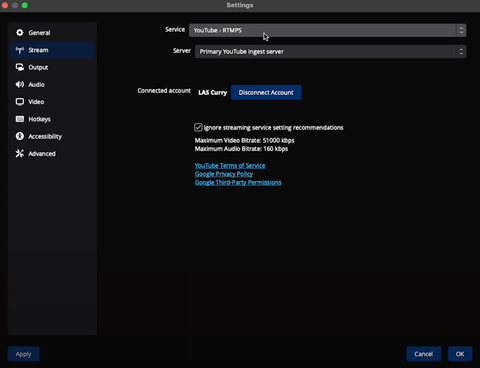
Then, if you're not already, you'll go ahead and get this connected to your YouTube account. If you have never livestreamed to YouTube before, you'll first want to go to your YouTube account on a browser window. Look to the right-hand side and select 'Create', then select 'Go Live'. Again, if you've never done this before, it will give you a prompt that says you must wait 24 hours before you are able to go live. If you see the screen in the picture below, then you're good to go.
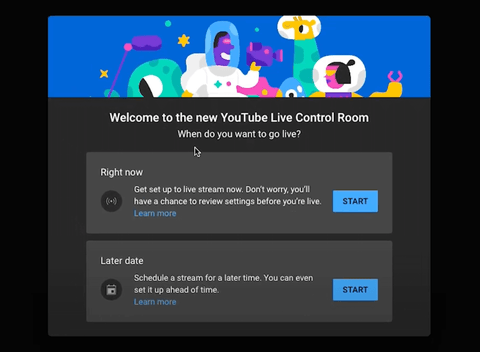
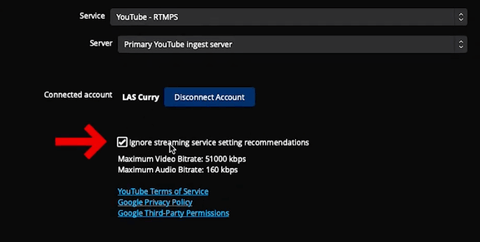
The YouTube Control Room is the screen that you need to see in order to actually go live. Once you get this sorted, you can head back over to OBS. Here, you'll want to select 'Ignore Streaming Service Setting Recommendations'.
Adjusting Your Output Settings
Now, go back to the settings sidebar and go to 'Output'. This is where you're going to be able to change the settings in order to get the best possible quality on your YouTube Shorts livestream when you're using OBS Studio.
Under 'Video Encoder', if you're on a Mac, you'll select 'Hardware Encoder'. If you're on a Windows computer, you'll select 'NVIDIA'.
For 'Rate control, you'll select 'CBR'.
As for 'Bitrate', I leave mine set to '9000 Kbps', but you can have this set to anywhere between 6000-9000 Kbps. The way that you figure out which number you should have this set to is by going to Speedtest.net which will give you your 'Upload speed'.
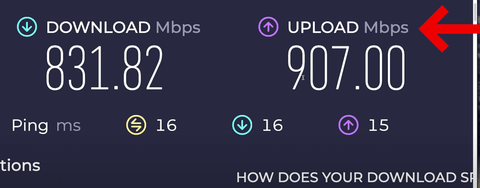
All you need to do once you're on this site is press 'Go'. In order for you to use 9000 Kbps, you need your upload number to be anything higher than 20 Mbps. Once you have this figured out, head back over to OBS and adjust this setting accordingly.
For 'Keyframe Intervals', you'll want this to be set to '2 s' which just means two seconds.
For 'Profile', you're going to select 'High'.
Lastly, you're going to select 'Use B-Frames'.
Adjusting Your Video Settings
Next, we're going to go back over to the settings sidebar and go to 'Video' Settings. This is where we're going to adjust the canvas size of the video so that it fits the vertical model of YouTube Shorts.
For the 'Base Canvas', you want to make sure that this is set to '1080 x 1920'. This will give you the 9:16 aspect ratio that you need. You also want to make sure that your 'Output (Scale) Resolution' is the same.
As for your FPS (Frames Per Second), you can just leave this at '60'.
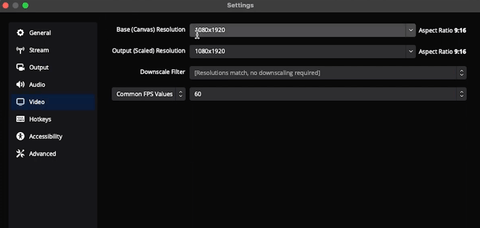
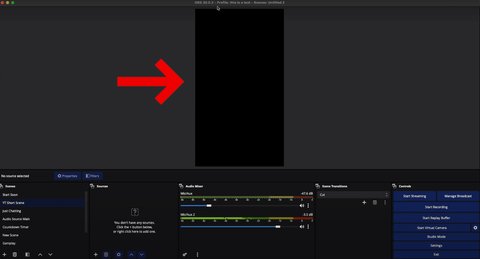
Now, you can press 'OK', and you'll be able to see that your canvas is a nice, vertical landscape.
Adjusting the Layout
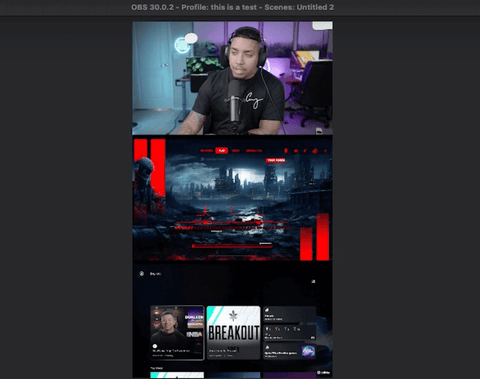
Next, we want to begin to build this out and add things to it that will make the vertical livestream look professional.
We're going to be creating something similar to what you can see in the photo below.
The first thing that we're going to do is hit the plus sign icon under sources and we're then going to select 'Video Capture Device' so that we can add our camera. You'll need to add your camera and select it. Once you press 'OK', you'll be able to see your camera on the vertical canvas.

You will need to resize your camera to fit in the frame, but all you have to do is grab the side and bring it in.
Now you're going to bring in your 'Starting Soon' screen. To do this, start by pressing the plus-sign icon under sources again, and then select 'Media Source'. I already have my starting soon scene set up, so all I need to do is select this and press 'OK'.
Once you add this in, you're going to resize and bring this in the same way that you did with the camera, but you're going to add this directly below where you put the camera.
I got my starting soon overlay from Stream Designz, and I would highly recommend checking them out! There are lots of overlays to choose from that are super easy to use. These go a long way to making your stream look professional and they help to keep your audience engaged with the content that you're making.
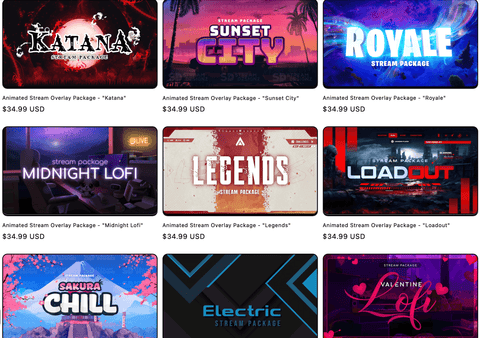
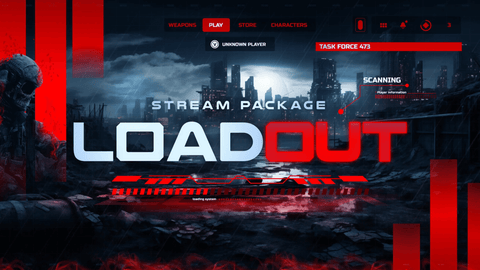
These are just some of the overlays that you can find on Stream Designz. Today, I'm using the 'Loadout' package. You can see below what this overlay looks like and what all is included in the package.

These packages include everything that you need for your stream; it has overlays for all of your different scenes. I highly recommend using these overlays, they are a great way to step up your stream.
Now, once you have your overlays, you'll be able to go ahead and start adding the rest of your scenes to your sources.
To add your 'Gameplay' scene, you'll press the plus sign icon under sources, select 'Video Capture Device', and again I already have my gameplay added here, so all I need to do is select it and press 'OK'. I'll shrink this and move to below the 'Starting Soon' scene.
You may find that you have a bit of a gap between the middle and bottom scenes, to fix this, simply make the middle one a bit larger. Then, right-click on the starting soon scene and select 'Center Horizontally'.
As you can see in the photo below, I have my layout ready to go.

You can always adjust this to be exactly how you want it to look, this is just how I adjust mine.
Adjusting Your Broadcast Settings
Once you have your layout ready to go, you're going to head over to the bottom-right-hand side, select 'Manage Broadcast', and this is where we're going to create a new broadcast.
Now, you're going to want to give this a title, it can be whatever you want your stream to be called- for now, mine will just say, "This is a test stream".
You'll then want to input your description. This is where you can put links to your other socials, give more details about what you'll be doing, or anything else that you want your audience to know.
It's very important to make sure that your privacy settings are adjusted how you want them to be. Public means that everyone can see your stream and that it will pop up on the YouTube shorts feed, private means that only you can see your stream, and unlisted means that anyone with the link can view the stream. For testing things, it's best to make these private or unlisted.
For category, select 'Gaming'. Now, it's going to ask, "Is this video made for kids?" If your content is kids' content and you're playing kids' games, then you'll want to select 'Yes', but otherwise you'll select 'No'. Most of the time, if you want anybody to be able to watch your content, then you'll need to select 'No, it's not made for kids'.
Next, you're going to add in your thumbnail. If you have never created a thumbnail before, check out this video here that shows you the quickest and easiest way to create one.
As for "Latency', you can leave this at 'Normal' or you can change it to 'Low'. You will also want to select 'Enable DVR'.
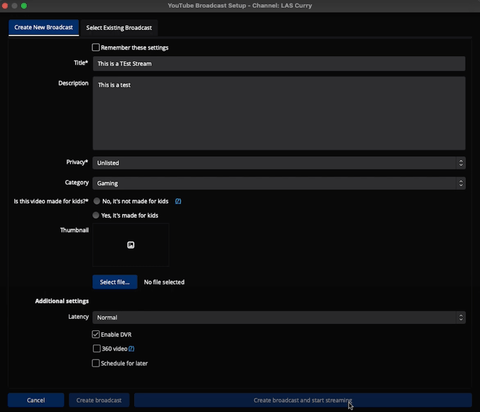
Now, you can select 'Create Broadcast and Start Streaming'. This will then be sent to YouTube and you can start streaming to Shorts using a vertical format!
If you want to be able to stream both vertically and horizontally at the same time using OBS Studio, check out this video here.

Share:
How to Add a Countdown Timer Using OBS Studio [2024]
How to Setup YouTube Alerts in OBS Studio