Disclosure: Some of the links below are affiliate links. This means that, at zero cost to you, I will earn an affiliate commission if you click through the link and finalize a purchase. Learn more!
In this tutorial, I'm going to show you the easiest way to set up Emotes for your Twitch stream.
Getting Started
The first thing that you'll need to do is log in to your Twitch account. Then, go to the top-right corner and select 'Creator Dashboard'.
Once you're there, select 'Monetization' on the left-hand side. Select 'Subscriptions' and then you'll come to the 'Emote' page.
Note: You do need to be a Twitch Affiliate or Partner to be able to access this. If you are, then you'll be brought to a page just like the one below.

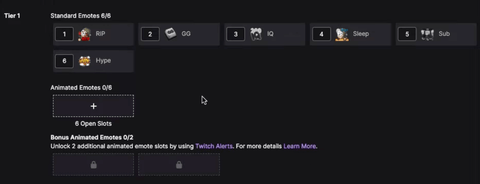
The first thing that you'll see is the 'Follower' emotes. You do get five free emotes, meaning that someone does not need to be subscribed to you, they just have to follow you to have access to some of the emotes.
The second option is for the 'Subscriber' emotes. This means that they are available to people who have a tier 1, tier 2, or tier 3 subscription. You will also have the option here to have either animated or static emotes. As you gain more subscribers, you'll be able to get main emote slots to utilize.
For this example, I'll be using an animated emote package from Stream Designz. There are lots of different options for emote packages that you can choose from, some of which even have a matching overlay package that you can use for the other parts of your stream.
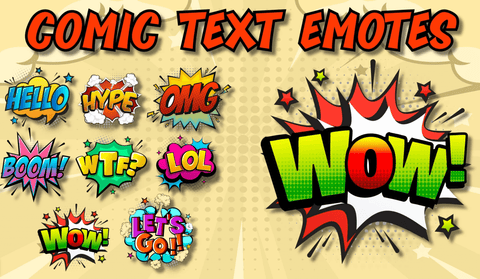
Specifically, I'll be using the 'Comic Text' emotes.

These will give you 'Hello', 'Hype', 'OMG', 'Boom', 'WTF', 'LOL', 'Wow', and 'Let's Go' emotes.
Once you have your emote package, you can head back over to Twitch.
If you purchase your emotes from Stream Designz, they'll come downloaded as a zip file and you'll need to unzip them before you can use them. If you're on a Mac, double-click the zip file and it will create a new folder with the emotes in it. If you're on a Windows, right-click the zip file and select 'Extract'. This will also create a new folder with the unzipped emotes inside of it. Now, your emotes are ready to be used.
Adding Static Emotes
With your emotes ready to be used, select one of the open 'Free' emote slots.

Then, you'll be brought to a screen to upload your emote. So, we'll select this, locate the folder that you unzipped, and you'll see that you have both 'Static' and 'Animated' emote folders.
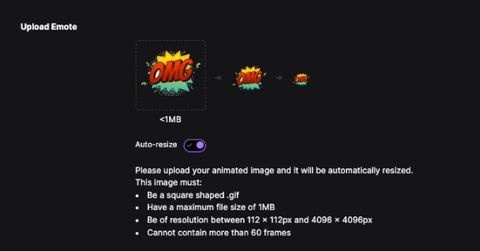
For now, we're going to select 'Static' and then use the 'Wow' emote. Be sure to select the '112x112' size. Press 'Open' and then this will upload and auto-resize. At the bottom where it says 'Enter Emote Name', you'll just want to name it what the emote is. So, this one would just be called "Wow" and then we can select 'Upload'. This is how you're going to upload all of your free emotes.
Next, we're going to go down to the 'Tier 1' subscription. Come to an open slot and select 'Upload' once again. We're going to use the 'Static' emotes again and this time we'll select 'Hype'. Be sure you use the '112x112' file, then select 'Open' and let it upload. As for the emote name, just use "Hype".
Adding Animated Emotes
Once you have your 'Hype' emote done, you'll have the option to add an animated emote.
There are two different ways to do this. The first is to just upload an animated emote the same way we uploaded the static emotes.
You'll just select 'Upload' and locate the 'Animated' folder. For this one, we'll use the 'OMG' emote in the '112x112' version. This is already going to be animated for you and at this point, you should be able to see it happening. We'll name this "OMG" and then press 'Upload'.
The second option is for those of you that only have static emotes. We can use these static emotes and automatically animate them.
To do this, press the plus sign icon under 'Upload Emote' on the 'Animated Emotes' page. Then, locate your static emote package and you can select any of these that you would like, but just be sure to use the '112x112' version. I'll be using the 'Let's Go' emote.
Then, this will upload and Twitch will give you a few different options of animations to choose from.
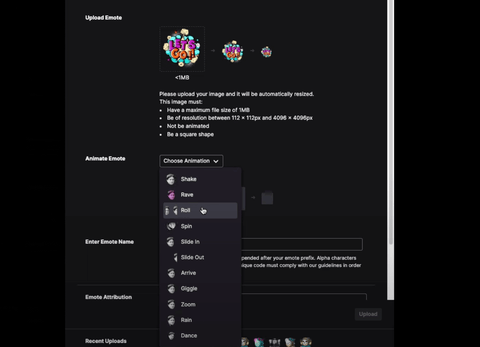
If you select 'Rave', you'll see that the emote will begin to have the 'Rave' animation. If you select 'Roll', you'll see the emote begin to roll for us.
This is a really easy way to have your emotes animate for you. When you've chosen your animation, be sure to name it according to whichever emote you used. For me, I'll name mine "Let's Go". Then, press 'Upload' and now you'll be good to go.
Now, you'll follow the same steps for the next ones
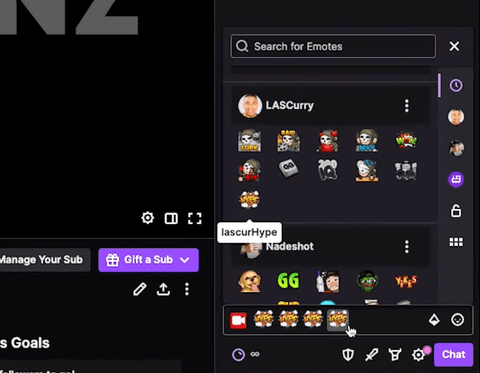
Once you have all of your emotes added, you can go back to your Twitch chat and you'll be able to see the emotes there and they are ready to be used.
If you want to learn how to have an icon appear next to a viewer's name when they subscribe, check out this video here where I walk you through step-by-step how to set up 'Sub Badges' using Twitch.

![How to Add Overlays in OBS Studio (Complete Streaming Setup Guide) [2026]](http://www.streamdesignz.com/cdn/shop/articles/Thumbnail_1_917415b4-0055-48d9-9f13-46b188205824.png?v=1782571692&width=1920)

How to Setup Emotes for Your YouTube Streams
How To Edit Your Twitch Streams Into TikToks YouTube Shorts & Reels