Disclosure: Some of the links below are affiliate links. This means that, at zero cost to you, I will earn an affiliate commission if you click through the link and finalize a purchase. Learn more!
In this tutorial, I'll be explaining to you how to set up the easier bot for your Twitch account: Nightbot.
Getting Started
The first thing you'll do is go to Nightbot.tv and get logged in with your Twitch account. Once you do this, you'll be brought to a dashboard like the one below.

Now, you'll want to first be sure to give Nightbot mod permissions. To do this, go over to your Twitch stream. Type "/Mod Nightbot" in the chat in the bottom-right corner and press 'Enter'. This will say that Nightbot is now a mod. This is going to allow Nightbot to come into your stream and drop commands, do timers, and everything else that we're going to set up here today.
This is going to be a complete walkthrough, so by the end of this tutorial, you should be an expert on how to use Nightbot.
Understand Your Dashboard
With the first step done, you can come back over to your Nightbot dashboard. This is where you can see your 'Chat Stats' which tells you how many messages you've received in the last week, how many commands there have been, and how many timeouts there have been. You'll also be able to see who your top chatter is and what the top command is being utilized in your streams.
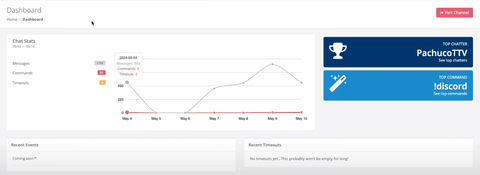
For me, the 'Top Command' is '!discord' because my goal is to build a community. Anytime someone comes into my Twitch stream, I'll go ahead and encourage them to go into the Discord Channel. This is always my top command.
Setting Up Your First Command
The first thing that we're going to do is come to the left-hand side and select 'Commands'. You'll select 'Default' and then you'll be able to see some of the default commands that Nightbot has.

You can look through all of these here and decide which ones you want to keep and utilize. These are just going to be the default options. You're also always going to want to create 'Custom' commands as well so that you have ones that are unique and can help you achieve the goals of your stream.
A quick hack for all of you, since I've done a lot of work here, if you come to my Twitch stream, you can go to the chat and type in "!commands" and it will give you a list of the commands that I utilize.

When you click this, it will bring you back to Nightbot and show you these commands.

You'll be able to look through these and select the ones that you want to use or not.
Now, we're going to go over some of the basic commands that you should be using and I'll show you how to set them up.
Once you're on the 'Commands' page, press 'Add Command' and the first one that we're going to want to add is 'Lurk'.
This command will make it so that if someone comes to your stream but needs to step away, it will still have your stream tabbed up, they'll still have the volume on, and they'll still be supporting your stream. We also want to make it easy for them to say that they're lurking so that you don't call them out when you know they're not there.
The command can be either '!lurk' or just 'lurk', but I always prefer to use the exclamation mark.
For the message, all you'll want to do is put in "$(touser), If you need to step away from the stream, no worries! Ensure you leave the tab open and volume on to continue supporting the stream while you're away!"

The first part, "$(touser)", is very important as it will input the user's name. If I were to come into my stream and type in '!lurk', it would pop up with "LASCurry, If you need to step away..."

Again, this just adds a little bit of personalization to your stream. Of course, you don't need to include their name if you don't want to, but why not do it anyway?
This is going to be the first command that you'll set up.
Setting Up the Rest of Your Commands
The second command that we're going to set up will be your Discord so that you can really begin to grow your community.
To do this, press 'Add Command' and for the command itself, type in "!discord". For this command's 'Message', type this in, "$(touser), Join [Channel Name]'s Community Discord: [Link to Discord]"
The link at the end should be the invite link to your Discord. For me, it's lascurry.com/discord, but it can also be just a regular invite to join your channel.
You can go to 'UserLevel' and decide who all can use this command. You can choose between everyone, only subscribers, VIPs, Regulars, Moderators, or only yourself. I'll typically use this code for everyone so that if I say, "Join the Discord," people can use the mod in the chat to get the link and I don't have to spend time sending it or searching for it. This is again all to make streaming easier for yourself.

The next one that we're going to add will be a 'Shout Out' command.
We'll do "!so" for the command itself. This is going to be good for when someone raids you, so you can just type in their name and use this command to have a proper message come up letting your viewers know that you support that individual.
For the message, I've put, "Be sure to follow $(tosuer) at twitch.tv$(touser)". For this, I only allow moderators to do this as I do not want regular viewers to be able to come in and start shouting themselves out.
Whenever you want to use this command, you will type in "!so [username you want to shout out].

This next command that we're going to create here is going to be a schedule.
I think this is super important to be able to go ahead and have your viewers know when you're live.
We'll follow the same prompt here and use "!Schedule" for the command.
For the message, we'll put "$(touser), [your channel name] is live [days and times you're live]. For me, this looks like "$(touser), Curry is live Monday - Friday at 9 pm EST".
I have this set for everyone so that if anyone is curious when I'm live, it will tell them.
The next thing you'll want to do, if you're an affiliate or a partner, you'll want to make sure you have the ability to use 'Prime' and to have the ability to donate.
To set these up, we'll start by adding a new command and then typing in "!Prime".
For the message, you'll want it to say, "Link Amazon Prime to your Twitch account and get a FREE SUBSCRIPTION every month. Twitch.amazon.com/prime | Click subscribe now to check if a free Prime sub is available to use." This is also for everyone.
So now if someone asks you if you have Prime, they can subscribe to the channel to avoid getting some ads and just type "!Prime" into the chat.

The next thing is for people to be able to donate to you.
If you haven't set up a way for people to donate, you can learn how to here!
You'll select 'Add Command' and type in "!Donate".
For the message, you'll type in, "You can donate here, $(touser), [Link to donate]".
Again, if you haven't set this up yet, you should definitely watch the other video and learn how.
Creating Command For Commonly Asked Questions
At this point now, we're going to want to start adding commands for some of the common things that people are going to be asking you, whether this be specific to your account, your game, or anything like that.
For me, I game on a PS5, so my 'PSN' is super important for people to have. People will ask me all the time, "Hey, what's your PSN?" So, now all they need to do to find out is to type '!psn' into the chat and it will give them my username. The message for this would be "$(touser), it's [PSN/username]"
I also play Call of Duty, so people ask me a lot what my 'Activision' is, so I've set up the command '!activision'. The message for this just includes my Activision account name for them.
These things make it really easy for people to engage with you and your accounts. You can also set up more commands that answer questions like, "What's your FOV?" "What monitor are you using?" "What controller are you using?" By setting up commands that answer these questions, your audience is able to easily get answers and connect further with your content.
One thing that I think is super important is having a command for if someone wants to gift someone else a sub on Twitch. You can just make the command '!gift' with a message that says, "You can now gift someone else a sub on Twitch; all you need to do is click on the person's name in the chat and press 'Gift Subscription' or click this link [insert your link] - and click 'Gift Subscription!"
Again, these are just all commands to answer commonly asked questions, help people understand what it is that you're going to do, and get them connected to your socials.
Creating Commands to Link Your Other Social Media Accounts
It's very important to incorporate your socials into your commands as this is a great way to grow on other platforms. If your viewers go to different platforms too, it will help to bring in new viewers as well.
To add a command for your socials, you'll go to 'Add Command', and there is a right and a wrong way to do this.
The first way is to input '!socials' and then make the message, "Stay connected by following [usernames]'s social media: [link to a site that will list all of your accounts]". You can also use this same link on Instagram, TikTok, or anywhere else too.
What you shouldn't do is put your Instagram, YouTube, Twitter, and everything else in there as separate links. This will not look professional and clean. It will end up just looking crazy when it goes into the chat. I would highly encourage you to watch the video linked above or to use a website like Solo.to to incorporate your socials.
If you do not have this link, you will want to create a command for each individual social media platform that you utilize. So, you'll type in '!Youtube' and make the message say, "Subscribe to my YouTube: [Link]".

You'll do the same for your Twitter with the command being '!Twitter' and the message saying, "Follow my Twitter account: [Link]". For TikTok, the command will be '!tiktok' and the message will say, "Follow me on TikTok: [Link]".
I would encourage you to create a command for all of the social media accounts that you have unless you have one link.
You can also make any of these commands whatever you would like them to be, so if instead of '!YouTube', you want it to just be '!yt', you can do this.
These are the things that you want to start thinking about when it comes to creating your commands. With these, you can go crazy too.
If you ever have any questions about setting up custom commands, you can also go to the Nightbot Help Docs and you can learn more about 'Commands List', 'Variables List', '!commands', '!filters', '!marker', '!tags', '!game', '!poll', '!regulars', '!songs', '!title', '!winner', and '!commercial' commands.

There are so many things that you can do here. I would highly encourage you to tap into the custom variables so that you can do more in-depth commands that will benefit you. Again, I've included the ones that I would recommend, but those are all just basic ones that you'll definitely want to include.
Giveaways
Nightbot doesn't just do commands. You can also use it for 'Giveaways'.
You can have an 'Active User', set up a 'Keyword', or have a 'Random Number' to give away something like a gifted sub or whatever it may be.

You can then decide whether you want your subscribers or your regulars to have more luck in winning the giveaway.
These are just some of the things that you're able to do here.
Timers
Another extremely important option here is 'Timers'.
I would really only encourage you to set up timers if you have somewhat of an active chat. If you don't have an active chat, the timer is going to go off and it's just going to bombard your chat and look crazy because all you're going to see is Nightbot messages.
However, when you use this, it's a great tool to link viewers to your Discord.
I would make the name '!Discord' and the message, "Subscribe to my Discord: [lLink]. You can also choose how often this gets sent out. I would set it to go out every 20 or 30 minutes and Nightbot will automatically send the message after that interval of time.

This will just help to remind people or show them where else they can find your content and how they can get involved with your community. You can do this and link your YouTube, Donations, Discord, or anything else that you want your audience to be reminded of every so often.
There is also an option to set how many messages have been sent in the chat before this timer goes off. You can make it so that 5-6 people have to have said things in the chat before the timer goes off even if it's hit the right time interval.
All this is doing again is making sure you're not flooding your chat with Nightbot messages. It's definitely embarrassing for someone to come into your stream and have them see only these chatbot messages. Personally, I like to keep the 'Chat Lines' feature off, but it's just more of a personal preference thing.
Spam Protection
The next thing we're going to look at is 'Spam Protection'. This is super important because it's going to give you a bit of protection when it comes to modding your chat.
You can decide how deep you want to go with this. Personally, I like to maintain a family-friendly stream, so the 'Blacklist Words/Phrases' feature is really important to me.
You can come to options and then type in any words and phrases that you don't want to be able to be utilized in your chat. There's also the 'Timeout' section and the 'Moderator' that's there.
Another section that you can use here is 'Links'.
Personally, I disable all links except for my personal links. You can, of course, decide which links you would like for people to be able to share or not.

This is just an additional protection that you can use for your account. It can help prevent people from sending videos or links to something that will not be available for the stream, so you'll definitely want to have this in place.
There are also other features that you can utilize such as 'Excessive Caps', 'Excess Emotes', Excess Symbols', and 'Repetitions'.

You can use any or all of these depending on what you want the vibe to be inside of your chat.
Song Requests
Another feature that you can use in your stream is 'Song Requests'.
You'll have a playlist that comes with a few songs from Monstercat, which is kind of like royalty-free music. There is also an 'AutoDJ' that you can use to randomly play whatever songs you want.
However, I really wouldn't recommend utilizing the Monstercat music if you're planning on taking this stream and posting it on other platforms. I would highly recommend that you instead use a platform like Epidemic Sound instead so that you know it's copyright-free and that you're protected in using it.
If you're interested in finding copyright-free music that you're not going to get any claims on, that you can post on any social media account, or while you're playing it on your stream, check out the video here! In this, I will walk you step-by-step through how to add royalty-free music to your stream using Epidemic Sound.

Share:
Stop Downloading Your Stream From Twitch if You Use OBS
How to Setup Discord Chat Overlay in OBS Studio