In this tutorial, which was made using a Mac and OBS version 30, you’ll learn step-by-step how to get the best OBS settings for when you stream to YouTube! These settings will give you the best possible quality for your stream.
Step 1: Make sure your OBS and YouTube accounts are linked
The first thing you’re going to do is go to settings in the bottom right corner of the OBS home page. From here, you will be able to make sure that your account is connected to YouTube by going to ‘Connected Accounts’.

If your account is not linked, it’s easiest to just follow the recommended route to do so. If it is, then you’re all good to go.
A very important feature that we’re going to want to be selected is ‘Ignore streaming service setting recommendations’. This will allow you more flexibility and the ability to have your stream be more customized when fixing the rest of the settings.
Step 2: Adjusting the Output Settings
Next, head over to where it says ‘Output’ in the settings menu.

This is where we’re going to set up all of the settings for the live stream to ensure that the stream comes out with good quality (for both video and audio) and that it isn’t lagging. It’s very important that you don’t skip any of these settings and that you understand the definition of what each setting does. This way, if you end up having any issues, you know where to look and how to fix the issue.
The first thing you’ll do here is go to ‘Audio Encoder’ and select ‘CoreAudio AAC’.

Then, go to ‘Audio’ and make sure that your ‘Audio Bitrate’ for ‘Track 1’ is set to ‘320’. This will ensure that you have the best audio quality possible

After checking this, head back to the ‘Streaming’ tab and change the ‘Video Encoder’ to ‘Apple VT H264 Hardware Encoder’. This is the setting that I have found to give me the best results as someone using a Macbook mini with an M1 chip and 8GB. Once you select this, the rescale output may change, but we're going to leave it is as is.

When streaming to Youtube, I stream to 1080p and I haven’t found any issues. This will give the most flexibility to the most users on mobile, desktop, or other devices to be able to enjoy your content with the best quality and no lag.
Next, for ‘Rate Control’, set it to ‘CBR’. The bitrate that I utilize here is ‘9,000 Kbps’; this is the bitrate that I’ve found to be the sweet spot. However, the CBR is entirely dependent on what your internet speed is. To test this, head over to Speedtest.net and once you get there, press ‘Go’. This is going to give you your internet speed and your upload speed.
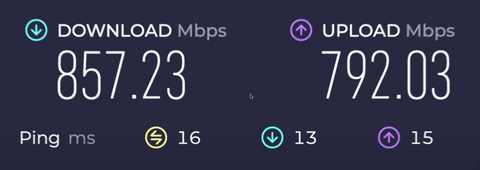
For your CBR, it’s the upload speed that matters. To have a CBR of 9,000 Kbps, you will need an upload speed of at least 20 Mbps. Typically, when it comes to live streaming, you can use half of your internet speed. However, I have 700,000, and I don’t need to use 300,000 in speed- 9,000 is perfectly fine. Again, if you have 20 Mbps, you can use 9,000 Kbps, and you can use more than that, but I’ve found 9,000 Kbps to be the sweet spot.
You can go higher to 18,000 if you want to do a 1440p stream, but again this is up to your personal preference. If your upload speed is less than 10, I would suggest streaming at 720p with a 4,500-bit rate instead.
Now, we’re going to go down a bit and look at the ‘Encoder Settings’. For ‘Keyframe Interval’, put this at ‘2s’ and set ‘Profile’ to ‘high. As for ‘B-frames’, I always leave this unchecked. This is what I feel gives me the best quality stream possible, but you can always test this with it turned on and off to see which you prefer.

Step 3: Adjusting Video Settings
After finishing up the output settings, head over to ‘Video’ on the sidebar. For ‘Base (Canvas) Resolution’, you’re going to want to set this to the resolution of your monitor. I have a 1080p monitor, so my ‘Base (Canvas) Resolution’ is 1920x1080. As for ‘Output Scale’, I just mirror the ‘Base (Canvas) Resolution’, so this will also be 1920x1080. This makes it easier for everything to process.

For ‘Common FPS Values’, I keep mine on 60, but again this is up to you and your needs. If you’re using OBS for gaming streams, 60 FPS is the better choice, but if you’re doing more of a talking-head stream, then 30 FPS would suit you more.
Step 4: Adjusting Advanced Settings
By checking the advanced settings, you’ll be able to ensure that everything is set up just the way you want it for the best-looking stream possible.
I would recommend putting these settings exactly as I have them in the picture below.

If you need these written out:
General
- You should have ‘Show active outputs warning on exit’ checked
Video
- Color Format: NV12 (8-bit, 4:2:0, 2 planes)
- Color Space: Rec. 709
- Color Range: Limited
- SDR White Level: 300 nits
- HDR Nominal Peak Level: 1,000 Nits
- You should have both ‘Disable macOS V-Sync’ and ‘Reset macOS V-Sync on Exit’ checked
Recording
- Filename Formatting: %CCYY-%MM-%DD%hh-%mm-%ss
- You should not have ‘Overwrite if file exists’ checked
- You should have ‘Automatically remux to mp4’ checked
- Replay Buffer Filename Prefix: Replay
- Suffix: Empty (this should be blank)
Step 5: Adjusting Broadcast Settings
After adjusting all of your advanced settings, head over to ‘Manage Broadcast’.
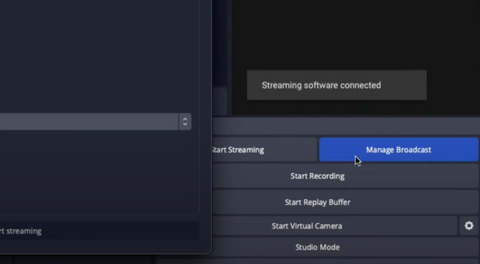
What you want to do here is set up all of your stream elements such as your title, thumbnail, description, privacy, and the category that you’ll be using to create your broadcast to go live.
One final note: if you are planning on recording this through OBS Studios and are not streaming to YouTube, these are not the settings that you’re going to want to use.
With all of these settings adjusted, you’re all ready to start streaming! These settings will give you the best video and audio quality for the most professional-looking stream that will keep viewers coming back to your channel. Here is a video for those of you looking for the best recording settings.
To follow along with the video version of this tutorial, click here!

Share:
The Single FASTEST Way To Make GAMING Thumbnails
How to Get the Best Recording Settings on OBS Studio