Being able to schedule your gaming content ahead of time for your social media accounts is the easiest way to be both consistent with your posting, and to also be able to grow your social media accounts, grow the number of views on your stream, and build up your community. The easiest and best tool to use for this is Adobe Express. This is what I use to create and schedule all of my posts and give you all of the tips and tricks to being able to consistently put out content.
The 2 Versions
Adobe Express is free to use forever, which is great especially if you don’t need it for a lot… but as a streamer who is trying to grow your channel, the paid version offers so many more features for only $9.99/month.
With the Free plan on Adobe Express, you can only use the Content Scheduler to post two times per month which is not nearly enough if you are serious about wanting to grow your channel and your community.

With the Premium plan, you can schedule as many posts as you need AND you can create videos and graphics directly using their program and tools. I would certainly say that this is well worth the cost for everything that is included in the Premium plan.

A Brief Introduction to the Abode Express Content Scheduler
First things first, you’re going to want to go to the Adobe Express website, which you can do by clicking here, and creating an account if you do not have one already. Once you’re there, you can scroll and find the section on the ‘Social Media Scheduler’. On the website, it says that it is free, but when you read the description it does mention that you only get to schedule two posts per calendar month with this free plan.

Being able to schedule two posts a month might not be a bad thing for you, but again, if you truly want to be able to grow your stream and create an engaged audience, you’re going to need to schedule and post content more frequently than twice a month. If you really want to have the viewership and the ability to grow your community, then you must level up your content output to be at least once per day or multiple times per week in order to see the results that you’re looking for. However, the ability to do this comes with the paid plan.
Regardless of which plan you choose, I want to be able to show you how you can utilize this very powerful and easy-to-use tool.
A Brief Introduction to Adobe Express’s Editor and Tools
When you go to create and schedule your first post, you’ll see that you have access to lots of templates on Adobe Express. This means that you don’t have to start from scratch and that you can create great-looking content without being a professional graphic designer. The ease of using Adobe Express allows you to also be able to save time in creating your content which gives you even more time to put towards the streams themselves and other means of building your community up.
Step 1: Choosing a template
When you are looking at the templates, if they hover over one of them, you can see that it will go ahead and give you the option to edit the template and make it your own. When you find one that you like- simply click “Edit this Template”.

Step 2: Using the Editor
Once you’ve decided on a template, you’ll be brought into the editor where you can play around with all of the different tools to get the desired look for your content and brand. You can use this to make all kinds of social graphics. On my Youtube, there are video tutorials on how to make a Twitch banner and how to make a Twitch profile picture which you can watch to be able to fully understand all of the features of the Adobe Express Editor.
This is the tool that I use to create a lot of my graphics since there are so many templates and tools to use. They offer fonts, photos, shapes, backgrounds, and so much more. It’s everything that you need to be able to create branded and engaging content for all of your social media accounts.
In-Depth on the Content Scheduler
As this is what this article is really about, let’s go ahead and dive right into the content Scheduling feature on Adobe Express. I would say that this is without a doubt one of the best and most crucial features that Adobe Express has to offer. One thing to keep in mind is that you’re able to edit a lot of this content on your mobile device- you don’t even have to have access to an actual computer.
On the Adobe Express website, you can see that it mentions whether you’re looking to schedule Instagram posts for the month, or for something to act as a social media manager to make an impact on multiple social media platforms, then this is for you. They allow you to schedule your content to be posted to Instagram, Facebook, Twitter, Pinterest, and even to LinkedIn.
Let’s now take a look at how you can get started with using the content scheduler.
Step 1: Creating your Content
The first step of this process is to actually create the content that you want to post. This is where you either utilize the editor tool to go ahead and edit the content or you may already have the content edited directly on your mobile device. This is the first thing that you want to have in place and ready to go.

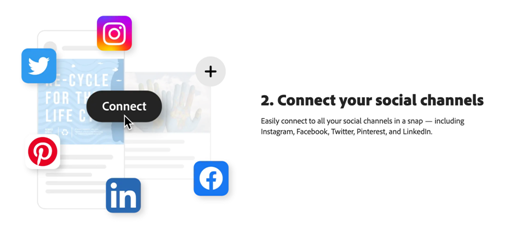
Step 2: Connect your Social Media Platforms
The next step is to make sure that you have all of the accounts that you want to post on consistently linked to your Adobe Express account.
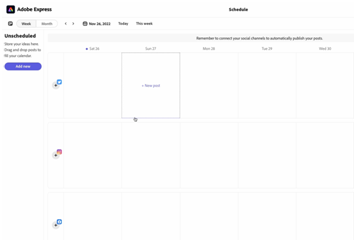
Step 3: Plan out your posts
Once you’ve linked all of your accounts, it’s time to plan out your posts! Of course, as time goes on you can make adjustments to this plan, but it’s very important to set up a plan first of when you’re going to post in order to keep things consistent.

With their easy-to-use drag-and-drop calendar, they have made planning out your posts very easy to schedule and adjust.
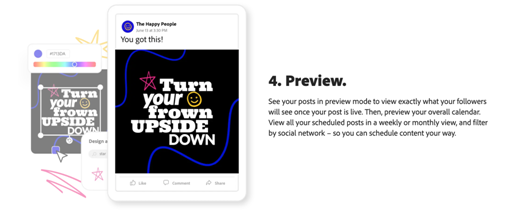
Step 4: Preview your Posts
Adobe Express allows you to be able to preview your post to know just how it will look before it’s sent out to your social media accounts. This feature creates a mock view for you that shows exactly how your followers are going to see this post, and it works for all of the social media platforms that you can post to
Step 5: Publish your Post
Once you’ve previewed your post to see how it will look, it’s time to publish it! This gives you the option to choose the exact date and time that your post will be sent out to your social media accounts. This is a very important and great to use feature.
Say you streamed for 2-3 hours and you don’t want to post all of the gaming clips from that stream at the same time- this feature allows you to spread them out. Say that you choose five clips from your stream- you can schedule these clips to be released over the next five days at specific times.
The time that you publish your posts is very important as well, you need to know when the majority of your followers are active online so that your post can get the most amount of visibility and interaction. Say that the time that your followers are most active is at 6 o’clock in the morning but you do not usually wake up until 9 o’clock- you can use this feature to schedule your posts ahead of time so that they post without you having to do anything else.

What I like to do for my Youtube Community posts is to sit down for at least an hour and decide what exactly it is that I want for my followers and my community. Once I’ve put in that work, all I have to do is schedule the post to go out when I want it to. That means I don’t have to do any more work in actually publishing the post, it will just go out when it’s scheduled to. This is exactly what makes this feature so powerful and important to use. You’re able to do so much more with your time when you’re spending less time on things like writing out your schedule or being sure to post at a specific time.
Extra: Optional Features
Aside from the five steps mentioned above, there are some optional features that you can take advantage of. They have the option to optimize and refine your captions, add emojis and hashtags before publishing, the ability to duplicate your posts with the click of a button, add a first comment for your Instagram posts, and to make your posts more accessible by using alt text.

These are some really great features to look into and use to be able to optimize the interaction and engagement that your post is going to get.
Why the paid plan is worth it:
Of course, you can choose to stay with the Basic (free) plan- but if you are really serious about growing your community and your stream, then the Premium plan would be the best option for you. It’s only $9.99/month which is definitely attainable and you get access to so many more features and options within Adobe Express.
As I always say, streaming alone is not enough to grow your stream to where you want it to be. By only streaming, you will not get any more viewers, you will not be able to grow your community, and you can’t grow your stream if that’s the only thing you’re doing. It takes creating content for people to find out about you and your stream. Utilizing this tool, Adobe Express, not only takes some of the pressure off of you by being super easy-to-use, but it will also help you to create the content which will in turn help you to grow your community.
The Premium plan might be a bit of an investment, but again if you’re serious about this then it is one of the best investments that you can be making for yourself and your stream.
What the Scheduler Looks Like
Once you’re inside of the scheduler, you’ll see that it’s going to look just like a calendar. On the left-hand side is where you’ll see the option to connect your social media accounts. As a streamer, aside from Youtube, you’re mostly going to be using Instagram, Twitter, and Facebook so it’s important to link these. Adobe also has a TikTok editor which is great to use for anyone who promotes their content through TikTok.
To connect your social accounts, click on one of the social media icons on the left-hand side and this will bring you to the ‘Connections’ page which is where you will link all of your accounts. Simply press ‘Connect’ and then it’s going to prompt you to log into your account and authorize Adobe Express to have access to post on your account.
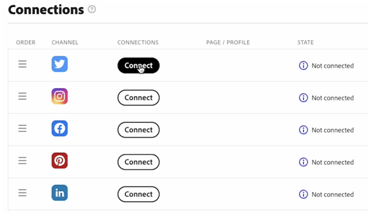
After you’ve done this, it will pop-up a screen saying that your account is now successfully connected and under ‘State’, it will say “Connected”

Now that it’s connected, you can start to schedule posts for your Twitter account! Firstly, return back to the Content Scheduler and leave the ‘Connections’ page.
Let’s say that today is November 26th and I want to schedule a post for tomorrow, November 27th, when I can’t actually post it at the time I want it to go out.
Since you know what day you want the content to go out, you’re going to scroll through the calendar and find that day and click on it. This will bring you to a screen that says ‘New Post’. Let’s start off by adding the media that you want to post. Click ‘Add Media’ and you can either choose from one of your Adobe Express projects or choose something directly from your computer.
Again, you can do this directly from your mobile device, it doesn’t have to be on a computer.

For this tutorial, I’m going to select the project titled “Stream Designz” and then I’m going to choose “Add to Post”. Now you can see that the image has been added to your new post.
Next, we’re going to add the caption that we want to appear on Twitter.

Once you’ve written your caption, go to the right side of your screen to set the time that you want to post. I’m going to put in a time that’s going to be early in the morning. Select ‘Done’ when you’re happy with the time that it will be posted.

Now you select ‘Preview’ to see what the post will look like to your followers.

If you’re happy with how the post is looking, then all you need to do now is to press ‘Schedule’ and your post will go out at 7 A.M. on your Twitter.
Now you can see on the calendar that the post is scheduled to be sent out the next day.

If you need to make any adjustments to the post that you scheduled, all you have to do is click on the post and you can go back into the scheduler to make your changes.
If you also want to create a post for Monday, then all you have to do is click on Monday and it will bring you back to the same ‘New Post’ page where you will create the post. To post on any of the other social media platforms that Adobe Express offers, you’re going to be following this exact same process.
In Conclusion
You can really start to see how powerful this tool is and how it is super important for maintaining a consistent posting schedule. It is fairly simple to utilize this tool and now that you know how to schedule your content, you’re going to want to get the hang of creating graphics directly inside Adobe Express.
Click here to watch a video that will explain to you all of the basics of using Adobe Express to create content. This video will explain to you how to create content when it comes to editing videos, editing graphics, editing images, making banners, making logos, and everything else that you need to level up your stream whether it’s on your stream, off your stream, or even during your stream.
You can and should be using Adobe Express to take your content and your stream to the next level.

![How to Add Overlays in OBS Studio (Complete Streaming Setup Guide) [2026]](http://www.streamdesignz.com/cdn/shop/articles/Thumbnail_1_917415b4-0055-48d9-9f13-46b188205824.png?v=1782571692&width=1920)

The Best Tool to Grow your Stream- Adobe Express
Stream Designz is now available on Etsy! - StreamDesignzStore