Disclosure: Some of the links below are affiliate links. This means that, at zero cost to you, I will earn an affiliate commission if you click through the link and finalize a purchase. Learn more!
If you've been streaming for a while, or if you've just started streaming, everything that comes along that you have to manage while streaming can be a bit of a challenge. Trying to change scenes, adjust your settings, adjust your mic, adjust your music, and everything else while you're trying to focus on the game and the chat can be difficult to balance.
You could definitely go into Streamlabs and set up various hotkeys to be able to switch between scenes, however, remembering what each key does can be a bit challenging. This is exactly why I utilize a Loupedeck Live S to manage all of the elements of my stream.

By clicking here, you can check out the Loupedeck Live S and all that it has to offer. If you decide you want to purchase one of these for yourself, be sure to use code LASCurry15 for a 15% off discount!
First, I'm going to go over what all you get on the Loupedeck, and then we'll go over how to use it in conjunction with Streamlabs, as well as some other things that you can use it for to make your life easier when working with your setup.
Loupedeck Live S Features
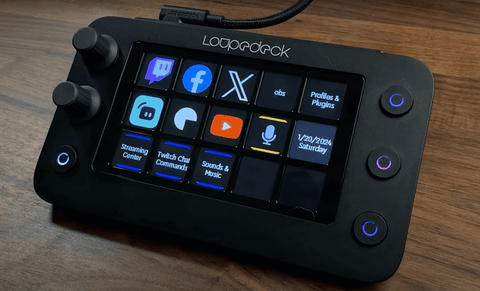
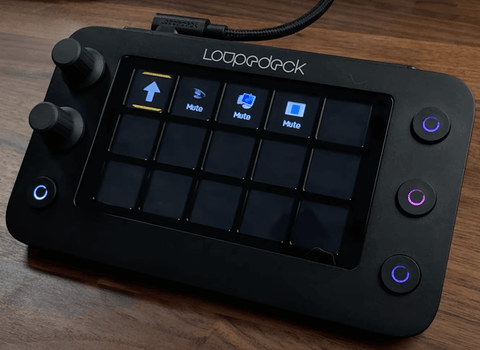
The first thing you will notice about the Loupedeck Live S is that there are two dials on the left-hand side that will control the volume for your chosen audio inputs.

Everything that you see on the device, you can program. These position dials will make a click every time you turn them, this way you can set the volume to exactly where you want it to be. You can also push down on these buttons to use as a quick way to mute/unmute during your stream. You could use one of these buttons for your desktop audio and the other for your actual mic audio, but it's really all up to your needs.
As you adjust these dials, you'll see the changes you're making appear on the screen in the icon box closest to the knob you're adjusting.

You'll also see around the edges that you have four RGB buttons that you can program however you would like. We'll get into what all of the options are a bit later in the article.
Now, you also have 15 hepatic feedback buttons on the screen that will emit a slight vibration each time you push them. You're not limited to just these 15, there are 14 total pages that you can use, so there are really 210 buttons. I've never been able to use all of these buttons, maybe you will be able to, but I really like the way that I have everything set up.
This product is 100% 'Plug and Play' meaning that as soon as you plug it in, it will get picked up by your computer and then you'll be able to get the actual software. Once you have it plugged in, you're going to head to the Loupedeck website, and you'll be able to get the software downloaded for either Mac or Windows.

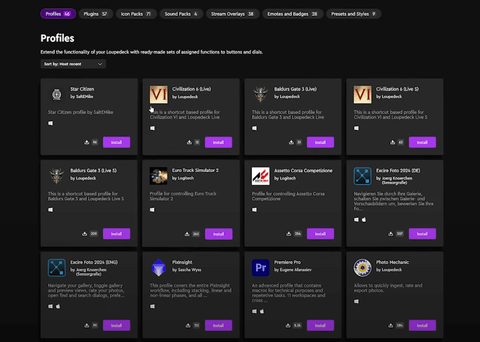
Once the software is downloaded, go ahead and open it. You should see a dashboard like the one below.

This is the software that you will be able to utilize to customize your Loupedeck to your liking and needs. The beautiful thing about the Loupedeck Live S software is that it comes with multiple profiles already built in. So, if you're using this for Streamlabs, it already has a Streamlabs desktop plug-in (which we will get to in just a little bit).
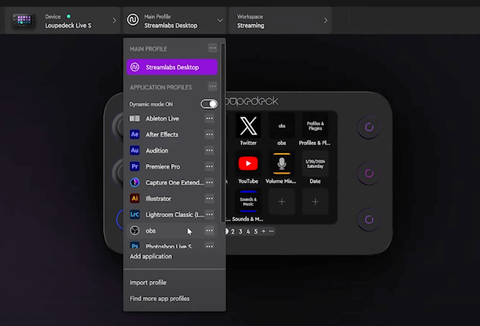
It also has other plug-ins for Premiere Pro, Illustrator, Lightroom, OBS Studio, and more. You can create your own profiles for each different software if you want.
You can turn on 'Dynamic Mode', which means that Loupedeck is smart enough to know what software you're using and it will automatically switch to that software's profile.
Using the Loupedeck Live S
Now, we're going to go ahead and open Streamlabs so that we can learn how to start utilizing this.
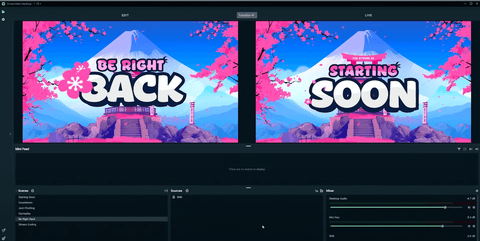
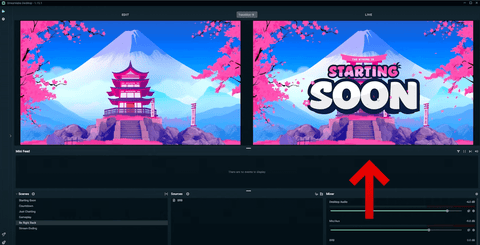
If you like the overlays that you see in this video, be sure to check out Stream Designz! There are lots of different options for overlays, animated overlays, countdown timers, and more for you to choose from and take your stream to the next level. They're super easy to use and they all look very professional which keeps your viewers coming back. You can see the overlay that I'll be using from Stream Designz in the photo below.
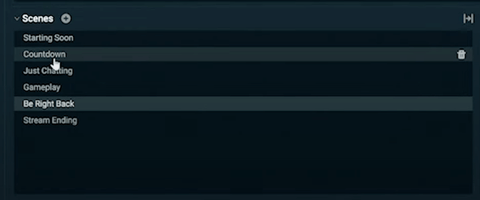
You'll see all of your scenes on your Streamlabs in the bottom-left corner (Starting Soon, Countdown, Just Chatting, Gameplay, Be Right Back, and Stream Ending).
To the right of these, you'll have your 'Sources'. Then, on the bottom-right side, you'll have your desktop audio and your mic.
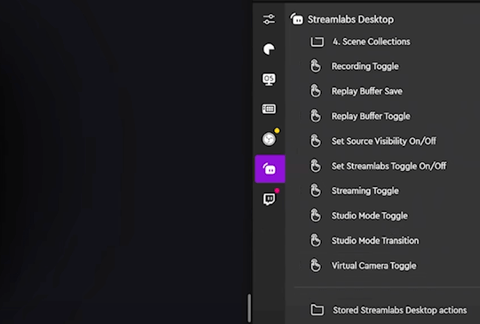
When you go back to the Loupedeck software, you'll see that you have a tab called 'Streamlabs Desktop'.
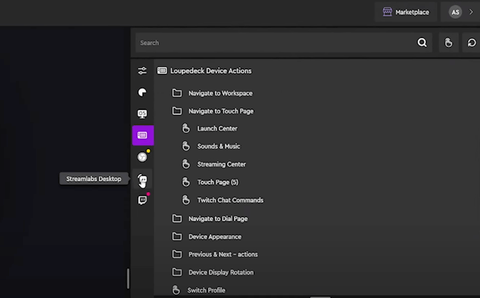
This will have automatically pulled in the scenes, sources, and audios that I had on Streamlabs.

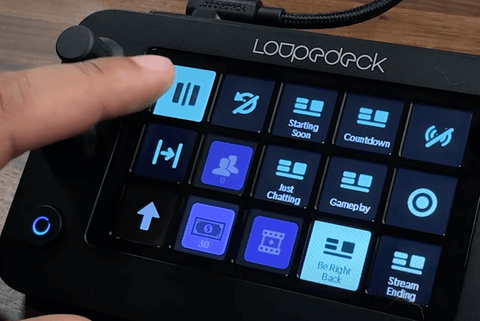
Now, you can go ahead and start to actually create your scenes. By default, it's going to create a scene like what you can see in the picture below, minus a few things.

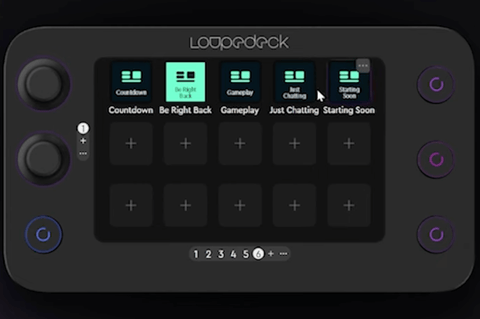
To create a new page, all you have to do is hit the '+' icon next to the number of pages on the Loupedeck visual that you have on the software.
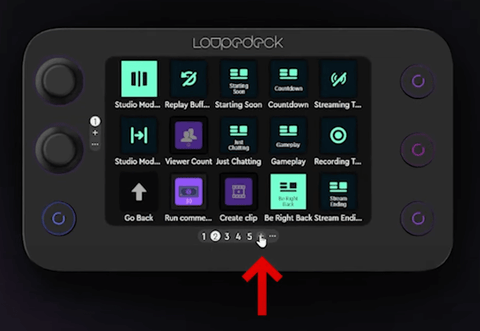
To start adding your scenes to this new page, all you need to do is drag them from the side-bar into an open spot on the Loupedeck model. It's just a simple drag-and-drop. Everything that you want to manage, you're going to want to add here. I'm going to be adding my Countdown, Be Right Back, Gameplay, and Starting Soon scenes.
Now, I'm going to put in my desktop audio, but remember you can also use the knobs on the left side of the Loupedeck to adjust the volume. Similar to how you added the scenes, this is just a drag-and-drop function, but instead of placing it on the screen, you'll place it on top of the knobs. I would recommend making the top knob your desktop audio and the bottom knob your microphone audio.

The turning symbol just means that the dial can be turned to adjust the volume of the audio. Below this, there will be another option for when you press down on the button, and this will be how you mute it. To add these commands, all you need to do is find where they are in your sidebar and drag them into place. You'll do the exact same thing to add the audio for your microphone.
To see what this actually looks like, do a split screen between the Loupedeck software and Streamlabs. When you adjust your desktop audio on the Loupedeck, you'll see the changes on your Streamlabs. For example, if I press on the Loupedeck knob to mute my desktop audio, I'll see on Streamlabs that my audio is muted.
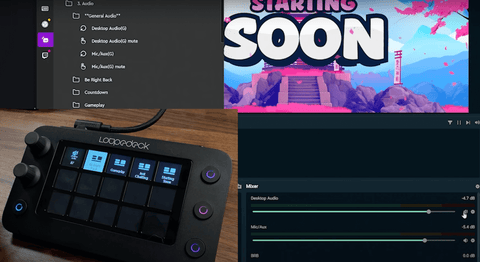
You can also turn the knob and see the volume as it's adjusting on your Streamlabs. This is again the same with the second knob. You can always program these to be whatever you want, so if you want one to control your music then you can do that, but this is just what I've found works best for me.
Once you've set this up, you can now adjust everything else on your pages. If you scroll down on the sidebar you'll see additional tools that you can utilize. There are options that will start recording when you press it, select buffers, toggle your streaming, turn on studio mode, and more.
Next, I'm going to look back over at Streamlabs, where I have studio mode and my actual scene. Studio mode just means that the left-hand side is just a preview for you and the right-hand side is what your viewers are seeing.
On my Loupedeck, I have 'Studio Mode' as an option that I can turn on and off.
I like to use this because it allows me to queue up another scene for when I'm ready. Let's say that I want to queue my 'Just Chatting' scene. I just need to select the scene on my Loupedeck, and then in studio mode, I can see that this is the scene that is going to come up before I transition. Then, on the Loupedeck, I can press 'Transition', and it will bring the 'Just Chatting' scene over for my viewers to see.
These are all things that we set up directly inside of the Loupedeck software for us to be able to utilize. This also integrates with other tools just as OBS or Twitch does. There are still also tons of other things that you can do with this.
You can also use this toggle on/off your recording or your streaming.
If you look at the photo below, you'll see how I like to keep my Loupedeck set up.

By now, you should really be able to see how much easier it is to use a device like this while you're streaming. It doesn't take any thinking and just makes the entire process much more smooth and streamlined. All you have to do is push a button to make adjustments to your screen.
You can even change the image on any of the buttons that you've added if you want to customize it even further. To do this, all you need to do is press the pencil button in the bottom right-hand corner of the button that you have selected.

You can use this to upload your own image and create your own text. This will allow you to make it more personalized and easier for you to remember where everything is and what everything does.
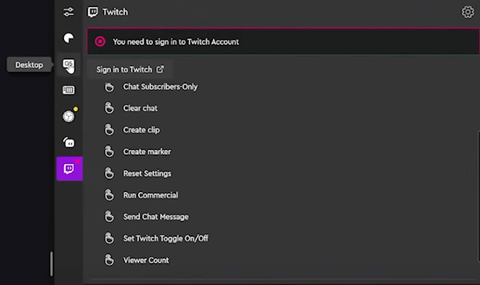
When you come back over to the sidebar, go ahead and select Twitch.

You'll see all of the options that you have available here. There are lots of options like 'Create Clip' which will create a clip every time you press the button, you can slow down the chat, send a message, run a commercial, and more.
This all makes streaming so much easier. Imagine having to complete all of these actions in the middle of your stream and remember where everything is. With this, you get to continue playing as you just press buttons to do everything that you need.
Let's get into what you can use this for beyond streaming!
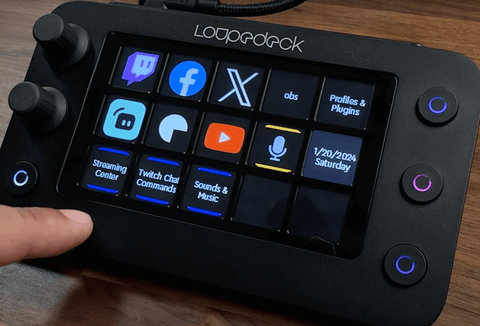
You can see in the photo below that I have Facebook, Twitch, X, and YouTube on my Loupedeck.
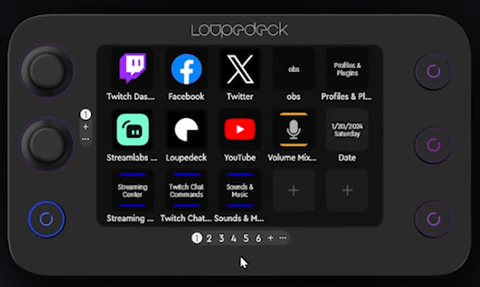
You can program any one of these buttons to open up a website for you. So, if I were to hit YouTube, it's going to automatically open up Youtube for me. Again, this is just simplifying your workflow.
On the sidebar, you'll find 'Desktop'.
This is where you can program your Loupedeck to open up certain programs or windows.
I can also go ahead and adjust the audio directly on my Loupedeck, so I don't need to go into any software or website to do this. All I have to do is click the microphone icon on my Loupedeck and all of the audio options appear.
I can use this to mute the audio, make adjustments, and change the volume. It's really just as simple as clicking a button.
Loupedeck also has a fantastic marketplace. There are tons of profiles and plug-ins that you can install and utilize.
These are all things that you can integrate directly into the Loupedeck to make things even easier. It is a powerhouse of a tool that allows you to not only manage your stream but also to manage the other aspects of your workflow.
I use my Loupedeck every single day. I use it when I'm recording my videos, when I'm editing my videos, when I'm streaming- it just simplifies everything. You'll see once you get your hands on one of these, that you'll never want to not use it because of all of the customizations that you have.
One of the things that I like to do is to set up different profiles at the bottom of the Loupedeck so that it becomes super easy to switch between them. I have 3 different profiles: my streaming center, Twitch chat commands, and sounds and music.
Under sounds and music, you can even add sound effects, so the Loupedeck can even act as a soundboard.
For example, if something crazy happens in the game that you're playing while streaming, you can quickly get to your sounds and play one of these automatically with just the touch of a button.
It's genuinely incredible how much you're able to do with this.
One of the things I want you to think about when you're looking at this is the simplicity of being able to manage everything on your stream. Again, this is a device that I use every single day.
Once again, you can click here to learn even more about the Loupedeck Live S and if you use this link, you'll get a 15% off discount when you purchase this.
If you really want to go even beyond this, to truly level up your stream and start to gain more viewers, check out this video!

![How to Add Overlays in OBS Studio (Complete Streaming Setup Guide) [2026]](http://www.streamdesignz.com/cdn/shop/articles/Thumbnail_1_917415b4-0055-48d9-9f13-46b188205824.png?v=1782571692&width=1920)

Improve Your Webcam Quality in OBS
How to Multistream on Xbox to YouTube Twitch & Kick