Disclosure: Some of the links below are affiliate links. This means that, at zero cost to you, I will earn an affiliate commission if you click through the link and finalize a purchase. Learn more.
In this tutorial, I'll be explaining to you step-by-step how to set up stream labels inside of Streamlabs. This way, when you get a new follower or a new donation, their name will show up on the screen.
Getting Started
The first thing you'll need to do is have Streamlabs desktop up and running. If you do not already have Streamlabs desktop, you can download it here.
You're then going to want to come to your 'Gameplay' scene. This is typically where you're going to add your stream labels, but you'll also want to add them to your 'Just Chatting' scene.
The overlays that I'll be using today for the overlay bar and the webcam are from Stream Designz.
The ones I'll be using today are from the Pixel World package which is an animated overlay package. It will also include all of the stream labels like 'New Follower', 'New Subscriber', 'New Donation', and the 'Stream Goal' for your 'Just Chatting' scene.
You can see everything that is included in this overlay package below.

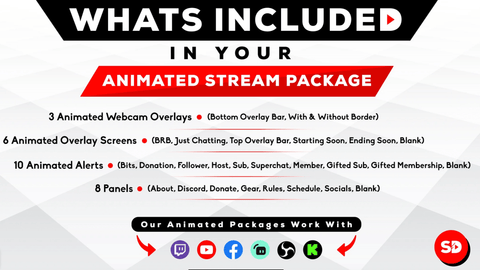
Stream Designz has lots of different animated overlay packages that match the needs and aesthetics of every streamer. These are really easy to use and set up, plus they go a long way towards making your stream look professional.
Once you have your overlay package, head back over to Streamlabs.
If you downloaded your overlays from Stream Designz, they'll come as a zip file, and you will need to unzip this before you can use them. If you're on a Mac, double-click the zip file and it will create a new folder with the unzipped files. If you're on a Windows, right-click the zip file, select 'extract', and then you'll also be given a new folder with the unzipped files.
If you haven't set up a 'Gameplay' scene before, you'll need to do that first. This video here will show you step-by-step how to set this up.
Setting Up Your Labels
The first thing we're going to do is click on 'Gameplay' under 'Scenes'. Then, come over to 'Sources' and create a new folder. To do this, press the folder icon on the right side of the 'Sources' tab. You want to do this since there are going to be multiple labels that you're going to create, and if you group them together, it won't crowd your sources.
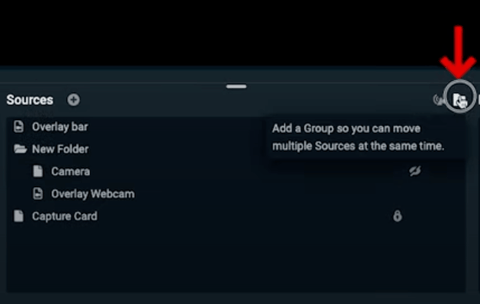
Let's name this folder "Labels" and then select 'Done'. Now we have our folder here. Make sure that the folder is open and then press the plus sign icon right next to sources. Here, you'll select 'Stream Label', press 'Add Source', and we'll name this "New Follower".
Now, it's going to ask you what the label type will be. If you've never had any new followers, new subscribers, new donations, or any stream goals, then nothing is going to appear in these boxes. What you'll want to do is set it up, and then as they happen, things will appear in your stream.
It is also super important that your Streamlabs account is connected to the accounts that you're going to be streaming to. These options will all be a little bit different depending on what platform you're streaming to.
For this example, I have mine connected to Twitch. You can see below what some of these options are going to be.
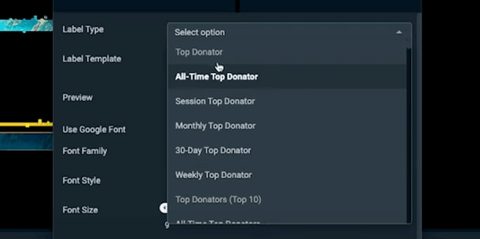
I'm going to search for 'Most Recent Follower' and then it should come up. I then like to scroll down and select 'Drop Shadow' and 'Outline' as well.
Select 'Done' and then you'll be able to see your 'New Follower'. You can grab this, move it into place, and resize it.
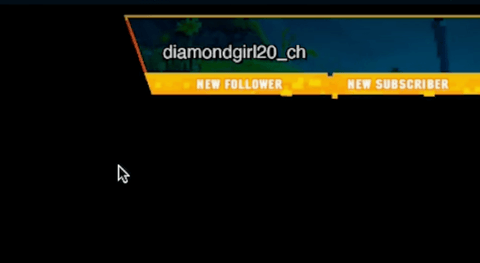
Now, with this done, every time someone follows you, that name is going to automatically update there.
To add the second one, right-click on the 'New Follower' source, select 'Copy', right-click again, and then select 'Paste'. Then, go into the label's settings by pressing the gear icon and edit the 'Label Type' to be 'Most Recent Subscriber'.
If yours is like mine, this is going to be blank, like I was talking about earlier. For the purposes of setting this up, I'll leave it set to 'Most Recent Follower' so that I can see that I'm putting it in the right place.
Then, right-click on the source and rename it to "New Subscriber" so that all of the labels are named correctly.
For the next one, you'll copy and paste the 'New Subscriber' label just like you did before.
Right-click on this label, name it "New Donation", and then press 'Done'. Then, press the gear icon to go into the label settings and change the 'Label Type' to 'Most Recent Donator'.
If you haven't had anyone donate before, again, it's going to be blank. If this is the case for you, just like with the 'New Subscriber' label, change it back to 'Most Recent Follower' just so that you can align it.
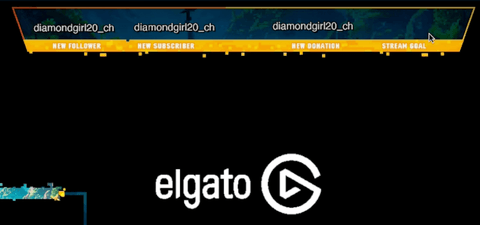
Now, copy and paste this one just like we've done with the others. Right-click on it and we'll name this one "Stream Goal".
Go ahead and place this where it needs to be, then press the gear icon and change the 'Label Type' to 'Donation Goal'. Since I again do not have anything showing up here, I'll change it back to 'Most Recent Follower'.
Now, you're going to also add some labels to your webcam overlay.
Right-click again and select 'Paste'. Then, rename this to "Top Sub", and press 'Done'. Now, drag the label into place in your webcam overlay.
This is going to be my top subscription of the week.
Paste this to create a new one like you've done with the others since we want to add another label of the same size to the webcam overlay.
Then, right-click and rename this one to "Top Dono". This is going to be your top donation.
Move this into place and then press the gear icon. For the 'Stream Label', select 'Weekly Top Donor'. Then, go back to the 'Top Sub' label, press the gear icon, and select 'Weekly Top Subscriber'.

With those in place, we want to make sure that they stay in alignment. You're going to want to select the 'Labels' folder and drag all of these new sources that we've created into it. To do this, you just highlight the source and bring it over into the folder.
We do this so that when we move the overlay bar, these labels stay in place and we don't also have to move them every time. You'll want to exclude the 'Top Dono' and 'Top Sub' as these will go in a different folder. However, you do need to bring in the 'Overlay Bar' to the folder as well. When you do this, make sure that 'Overlay Bar' is the first thing in the folder, everything else needs to be above it. If not, the labels will not be visible underneath the overlay bar.
Now, when I click on the 'Labels' folder, and I move the overlays bar, all of the labels will move with it.
You'll want to do the same thing for the 'Top Sub' and 'Top Dono'. You're going to bring these into the folder that you have your 'Webcam Overlay' in. Now, when you move your 'Webcam Overlay', these labels will move with it.
Now you need to add your alerts. This way when someone subscribes or donates, their name will pop up and it will highlight this person before their name goes to the label. To learn step-by-step how to do that, check out this video here.

Share:
How to Setup a Gameplay Scene in Streamlabs
How to Setup Animated Twitch Alerts in Streamlabs