In this tutorial, I’ll be teaching you step-by-step how to set up your twitch panels. By following these 9 quick and simple steps, you will have a much more professional looking stream.
Step 1: Finding your Panels
If you don’t already have a stream overlay package, your first step is to purchase this. A really great website to find these is streamdesignz.com. Their stream overlay packages come with panels included so that your branding will always match and your stream will look professional and seamless.
Step 2: Adding your Panels Files to Twitch
Once you have your stream design package head over to Twitch and make sure that you’re logged in.
On the right-hand side of your profile, you’ll notice a button that says ‘Channel’, select this and then select ‘About’. From here, scroll down and click ‘Edit Panels’.
Now, this is going to bring up a portion at the bottom of the page and we’re going to press the plus sign icon (+) that appears. Select ‘Add a Text or Image Panel’. Select ‘Panel Image’, then press ‘Add Image’, and locate the panel files that you’ve downloaded.
No matter which design package you downloaded, you can find the panels files under the folder ‘Panels’.
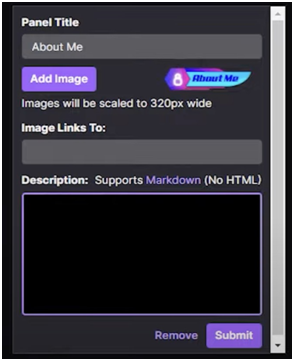
Step 3: Adding your ‘About Me’ Panel
Start by pressing ‘Open’ and then hit ‘Done’. Under where it says ‘Title’, put “About Me”. Next, you should put a description to tell people about yourself and what your stream is about. Once you’ve done this, click ‘Submit’.
Step 4: Adding the Discord Panel
NOTE: The panels that you see in your files that you’ve downloaded from Streamdesignz are the ones that you are going to make mandatory use of. You can always go and make others, but you should be using all of the ones that are available in your files.
Next you’re going to want to choose the Discord panel. For the panel title, you should name this ‘Discord’ and then the link to your Discord under ‘Image Links to’. You can choose to leave a description to tell people what your Discord is about, or can leave it blank- either way, the last step is to press ‘Done’.

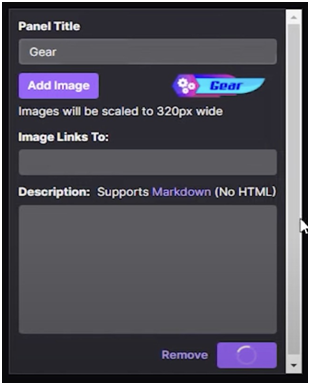
Step 5: Adding the Gear Panel
Like before, press the plus sign icon, add the image from your files, and we’re going to add ‘Gear’ and name it ‘Gear’ as well. This is where you’re going to want to add all of the gear that you utilize for your streams. This could also be an Amazon Affiliate link or any other link that will lead people to the specific gear that you’ve used and can get a commission for.
Step 6: Adding your Rules Panel
Scroll down to find your next plus sign icon, press this, and find the ‘Rules’ panel in your files. We’ll name these rules, and what you’re going to want to do is write the rules for your stream and chat in the description box. Be sure to submit this once you’re done.

Step 7: Adding the Schedule Panel
Exactly the same as before, press the plus sign icon, select ‘Add a Text or Image Panel’, and now can upload your schedule. This is really important as it’s how people know that you’re streaming or when you will be live again next. There isn’t really a need to give this a ‘Panel Title’ as the text is already on the page. Type in your schedule in the description box and hit ‘Submit’ once you’re done.

Step 8: Adding your Socials Panel
Press the plus sign icon again, click ‘Add a Text or Image Panel’, select ‘Add Image’, and then select the ‘Social’ panel. Here, you can choose to either link to one of your social media accounts or to multiple. If you are going to add more than one social media, you can duplicate this to use it over and over again.

Step 9: Adding your Donate Panel
To learn how to set up the ‘Donate’ panel, check out this youtube video here! This will walk you through step-by-step how to set up donations on Twitch.
After just 9 short and easy steps, you’ve learned how to add panels to your Twitch. These will help to give your streams a greater sense of cohesion and professionality.
Happy Streaming!

Share:
OBS Studio Overlay Setup for Beginners (FREE Overlays)
How to Setup a Stinger Transition in Streamlabs